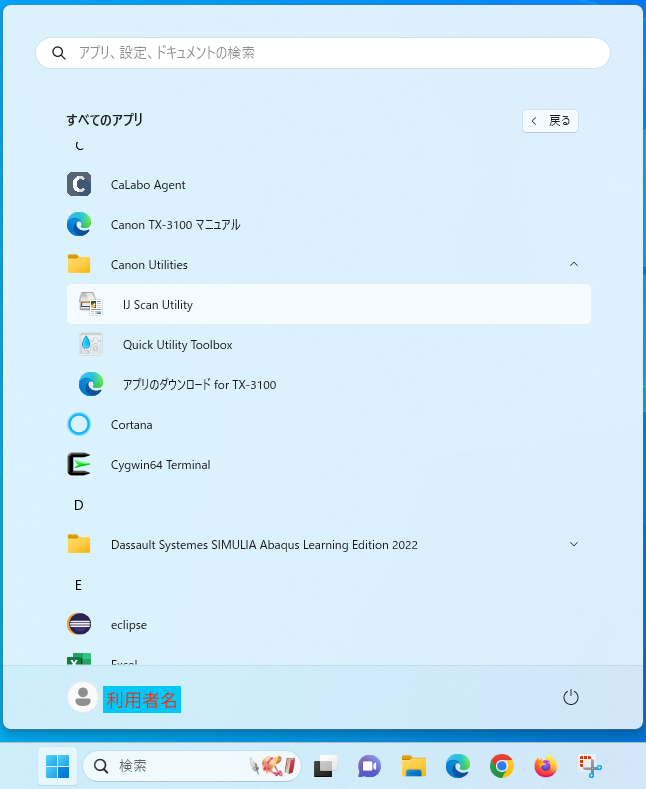
Log-in
About roaming profile
On Windows of the Zengaku Computer System, some profiles (such as application settings and browser’s cache) are saved as “roaming profile” when signing out, and are reloaded the next time you sign-in. However, there are some applications which do not save settings into the roaming profile.
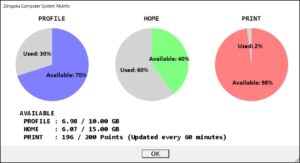
The size of roaming profile has an upper limit, and it is set to be 10 GB. If you exceed this limit when signing-out, the roaming profile will not be saved. The next time you sign in, the last saved roaming profile will be reloaded. If you exceed the limit during signing-in, the following message will be displayed at every 15 minutes.
プロファイル格納領域がいっぱいになりました。ログオフする前に、プロファイルの項目をネットワークまたはローカルの記憶域に移動してください。
詳しくは以下の Web ページをご覧ください。
https://130.158.234.43/old-icho2017/ufaqs/windows-roaming-profile/

You have exceeded your profile storage space.  Before you can log off, you need to move some items from your profile to network or local storage.
For details, please refer to the following webpage.
https://130.158.234.43/old-icho2017/ufaqs/en-windows-roaming-profile/
How to check the size of your roaming profile
The size of the roaming profile currently in use and the maximum size limit for the roaming profile can be displayed by running
“Zengaku Computer System MyInfo” from the Start menu in the Windows environment of the Zengaku Computer System.
How to reduce roaming profile
* Pay close attention and do at your own risk when managing roaming profile. Consider taking a backup before an operation.
Your roaming profile is stored in a location different from the user home (Z: drive). There are the following methods to reduce it.
- Browser’s temporary files (browsing history, cookies, cache) are often inflated, so delete them with a browser you often use. There are also cases where large files for Slack and LINE are created in the roaming profile, so if you are using these applications, delete those files that you can delete from those applications. If you know something about another application that saves settings etc in the roaming profile, also delete settings and data in it.
Go to 2 if the above still does not work. - Initialize the profile.
If you do not want to initialize your settings, go to 3. - Delete some files of your choice (after backing up, if possible) under C:\Users\Username. You can check the size of a file or a folder by right-click → Properties.
In the new Windows system environment, the initial sign-in is not the end of the desktop environment. The first time you sign in, the icons in the Start menu, the drive name display in Explorer, and the default page settings in your browser may not be in the state they should be.
After signing in for the first time, please sign out and sign in again to start using the system.
By the time you sign in the second time, your desktop environment will be ready.
Please refer to Changing/Resetting Your Password.
Please refer to SSH login by public key authentication.
It takes long time when logging in for the first time or logging in the first time after profile initialization. This is because the system is (re)creating your profile. It will not take such a time to log in from the next time on.
The following error message appears on the current satellite terminal when you perform a multiple sign-in to Windows. When you see this error, make sure you are not signing in to another terminal.
This error also occurs when you sign in to the satellite terminal while you are signed in to Windows via Remote Access.
No, you cannot. You can read and write e-mails by adding an Exchange account.
Please refer to the E-mail Client Settings site.
We do not recommend setting up e-mail forwarding in Microsoft 365. You will also receive a warning message when you sign in.
These days, some e-mail systems seem to reject forwarded e-mail. Please set up forwarding at your own responsibility.
Students who enrolled before the 2022 school year, for whom @s email is provided, can continue to use it. It is independent of @u.
No, you cannot.
If you have not used Microsoft 365 before, you will need to set a password at the following website.
Cloud mail service authentication setting system (on-campus only)
If you are off-campus, you can connect using a VPN setting on your smartphone or other device.
E-mail clients other than Microsoft Outlook and Apple Mail require registration by a Microsoft 365 administrator.
Sending and receiving e-mails with an unregistered e-mail client may result in errors.
The e-mail clients registered to date are listed below.
Available SMTP, IMAP and POP clients
If you wish to use an e-mail client not listed here, please contact icho-inquiry{at}cc.tsukuba.ac.jp.
There are a couple of possible causes.
- Your mail forwarding is set to send the e-mails to another address, but not retaining any e-mails in the Zengaku system server.
- You have used up the disk capacity for your e-mail address, therefore cannot save the new mail any more. (If you have received messages such as “maildir delivery failed: Disk quota exceeded”, then it is likely the case.)
→ Please erase your old e-mails from the server by using your e-mailer.
No, you cannot. We recommend that you keep backups before deleting emails which may be necessary later.
Confirming mailbox usage / How to move your email data to another location
https://www.u.tsukuba.ac.jp/en-email-backup/
Though after signing in the Microsoft 365, some functions may be open unexpectedly, you are not supposed to use functions other than sending/receiving e-mail.
Any so created contents will be deleted by the system without warning.
File
About roaming profile
On Windows of the Zengaku Computer System, some profiles (such as application settings and browser’s cache) are saved as “roaming profile” when signing out, and are reloaded the next time you sign-in. However, there are some applications which do not save settings into the roaming profile.
The size of roaming profile has an upper limit, and it is set to be 10 GB. If you exceed this limit when signing-out, the roaming profile will not be saved. The next time you sign in, the last saved roaming profile will be reloaded. If you exceed the limit during signing-in, the following message will be displayed at every 15 minutes.
プロファイル格納領域がいっぱいになりました。ログオフする前に、プロファイルの項目をネットワークまたはローカルの記憶域に移動してください。
詳しくは以下の Web ページをご覧ください。
https://130.158.234.43/old-icho2017/ufaqs/windows-roaming-profile/

You have exceeded your profile storage space.  Before you can log off, you need to move some items from your profile to network or local storage.
For details, please refer to the following webpage.
https://130.158.234.43/old-icho2017/ufaqs/en-windows-roaming-profile/
How to check the size of your roaming profile
The size of the roaming profile currently in use and the maximum size limit for the roaming profile can be displayed by running
“Zengaku Computer System MyInfo” from the Start menu in the Windows environment of the Zengaku Computer System.
How to reduce roaming profile
* Pay close attention and do at your own risk when managing roaming profile. Consider taking a backup before an operation.
Your roaming profile is stored in a location different from the user home (Z: drive). There are the following methods to reduce it.
- Browser’s temporary files (browsing history, cookies, cache) are often inflated, so delete them with a browser you often use. There are also cases where large files for Slack and LINE are created in the roaming profile, so if you are using these applications, delete those files that you can delete from those applications. If you know something about another application that saves settings etc in the roaming profile, also delete settings and data in it.
Go to 2 if the above still does not work. - Initialize the profile.
If you do not want to initialize your settings, go to 3. - Delete some files of your choice (after backing up, if possible) under C:\Users\Username. You can check the size of a file or a folder by right-click → Properties.
“wwws” it the folder where you publish files on the web; therefore, everybody should have “read” rights on this folders. As for your other folders, unless you have a particular reason to do otherwise, you should set no rights for everyone except you.
If there is a reason and you want to change permission, it is possible to do it by using the Linux chmod command or by SSH access with WinSCP or something.
On the Zengaku Computer System, different restrictions apply to the capacity of your home directory and the capacity of your mail home.
- User home: refer this page
- Mail home: refer this page (if you reach the upper limit, you will not be able to receive new mails)
When preview function is set to allow on explorer, file is locked and cannot overwrite sometimes.
Please refer to SSH login by public key authentication.
Web
Please refer to Publishing Web Content.
Create a directory named “local_only” inside the “wwws” directory. The files inside “local_only” can only be accessed from the Zengaku Computer System terminals or web browsers launched on remote desktop service.
The same restrictions apply even if “local_only” is not directly under “wwws” (i.e. wwws/[*/]local_only).
Please confirm Publishing Web Content.
When connecting to the server using WinSCP or other means, please refer to the “Publishing Web Content
on The Zengaku Computer System” column in the following list of servers.
https://portal.cc.tsukuba.ac.jp/en-member/server-information/
Printing
WEB Printing uploads and prints data stored in the operating terminal. Direct printing of data on the cloud (e.g. Google Drive or OneDrive) is not supported.
If you want to print a file in the cloud, please download the data to the device itself and then upload the downloaded data for web printing.
Immediately after duplex printing, the remaining point balance will be the value consumed twice. This is due to the fact that the server will restore half of the points after printing. The point return is not reflected in real time on the touch panel. To check the exact remaining points, please log out of the printer and log in again to check.
Check the following issues first:
- Over 24 hours have passed since your job submission
- You have reached the maximum number of prints allowed
If none of the above apply, you can inquire at:

Make sure to include your name, your user ID, as well as the place and date/time when you attempted to make the prints.
You can use the printers in any satellite room. Please refer to Satellite Rooms.
Yes. Please refer to Yearly print quota.
Please refer to Increasing the yearly print quota.
Users can use only A4 size paper the university prepared because the other kind of papers may cause some trouble.
When printing from application, please print with paper size A4.
If a Word document contains a chart with color, it may be handled as color data even if monochrome is specified in “Printer Properties”. It seems to be due to the specification of Word file format (.docx). To print in monochrome, set it to monochrome on the on-demand terminal or send it to the on-demand terminal as monochrome data by one of the following operations.
- Make charts grayscale
Select each chart on Word, make it grayscale by [Design]-[Change Colors], and perform printing.
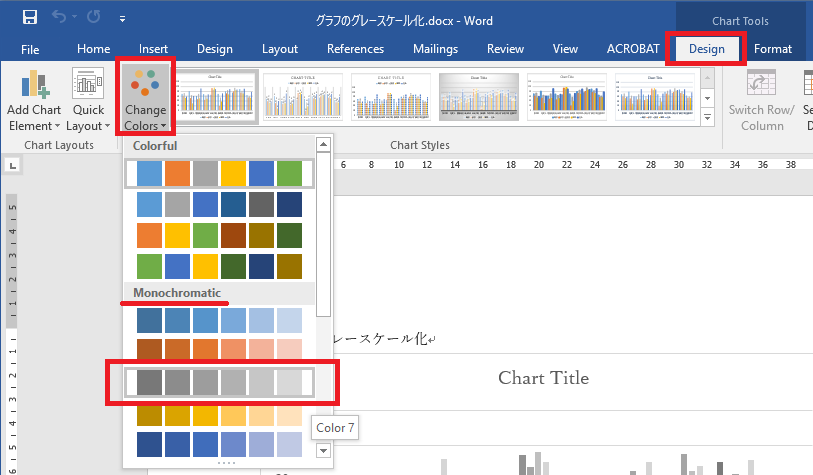
* In this method, you need to make all charts in the Word document grayscale one by one. - Convert to Word 2003 file format (.doc)
Save the file as the type “Word 97-2003 Document (*.doc)” by [File]-[Save As]. However, changing the format may disrupt the appearance.
If you do either of the above and perform printing in monochrome setting (default), it will be sent to the on-demand terminal as monochrome data from the beginning.
Make it monochrome by Adobe Acrobat
In addition to the above, there is also a way to convert the document into PDF, and make it monochrome data using “Print Production” tool of Adobe Acrobat. The procedure is as follows:
- Open the PDF file with Adobe Acrobat Pro DC.
- Add [Tools]-[Print Production].
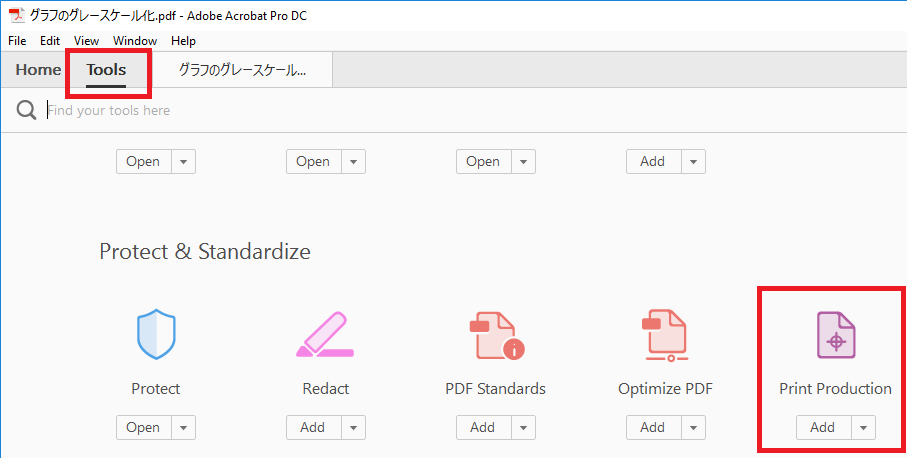
- Select [Print Production]-[Convert Colors].
- Set “Conversion Profile” to “Dot Gain xx%” and click on “OK”.
* In the part of “xx”, select a shade as you like.
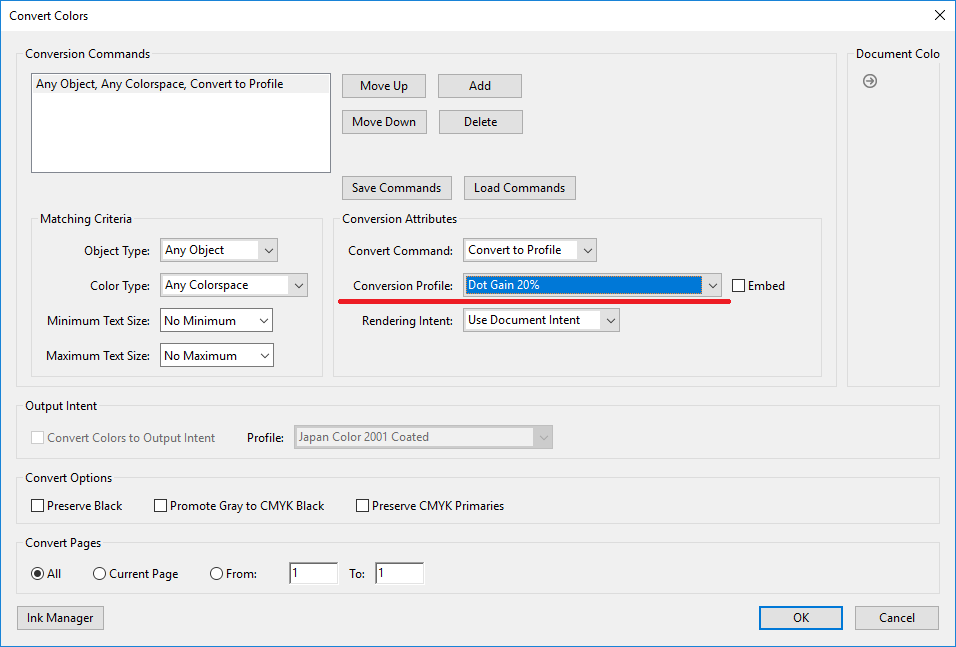
- Perform printing in monochrome setting (default).
Specify monochrome settings on the application side so that the print request is sent as a monochrome data to the on-demand terminal.
However, in applications such as Word, monochrome data may not be produced as intended, so please refer to the FAQ below for concrete methods:
Even if I send a print request in monochrome setting from Word, for some reason it becomes in color setting on the on-demand terminal.
https://www.u.tsukuba.ac.jp/ufaqs/en-printing-mono/
For PDF files that have complicated structures or special fonts, the printing may end with an error. In such a case, if you print “as image” with Adobe Acrobat or Acrobat Reader, it may be possible to print. For the procedure, please refer to the following page:
Quick fix | Print PDF as image
https://helpx.adobe.com/acrobat/kb/quick-fix-print-pdf-image.html
When printing, “Paused” is displayed as the status of the printer. In addition, when you instruct printing, “Printer paused” may be displayed at the lower right of the desktop. Since printing can be done without problems even if it is displayed like this, please disregard the message. If you change the status of the printer from the desktop, printing may not be possible, so please do not do such an operation.
Windows
About roaming profile
On Windows of the Zengaku Computer System, some profiles (such as application settings and browser’s cache) are saved as “roaming profile” when signing out, and are reloaded the next time you sign-in. However, there are some applications which do not save settings into the roaming profile.
The size of roaming profile has an upper limit, and it is set to be 10 GB. If you exceed this limit when signing-out, the roaming profile will not be saved. The next time you sign in, the last saved roaming profile will be reloaded. If you exceed the limit during signing-in, the following message will be displayed at every 15 minutes.
プロファイル格納領域がいっぱいになりました。ログオフする前に、プロファイルの項目をネットワークまたはローカルの記憶域に移動してください。
詳しくは以下の Web ページをご覧ください。
https://130.158.234.43/old-icho2017/ufaqs/windows-roaming-profile/

You have exceeded your profile storage space.  Before you can log off, you need to move some items from your profile to network or local storage.
For details, please refer to the following webpage.
https://130.158.234.43/old-icho2017/ufaqs/en-windows-roaming-profile/
How to check the size of your roaming profile
The size of the roaming profile currently in use and the maximum size limit for the roaming profile can be displayed by running
“Zengaku Computer System MyInfo” from the Start menu in the Windows environment of the Zengaku Computer System.
How to reduce roaming profile
* Pay close attention and do at your own risk when managing roaming profile. Consider taking a backup before an operation.
Your roaming profile is stored in a location different from the user home (Z: drive). There are the following methods to reduce it.
- Browser’s temporary files (browsing history, cookies, cache) are often inflated, so delete them with a browser you often use. There are also cases where large files for Slack and LINE are created in the roaming profile, so if you are using these applications, delete those files that you can delete from those applications. If you know something about another application that saves settings etc in the roaming profile, also delete settings and data in it.
Go to 2 if the above still does not work. - Initialize the profile.
If you do not want to initialize your settings, go to 3. - Delete some files of your choice (after backing up, if possible) under C:\Users\Username. You can check the size of a file or a folder by right-click → Properties.
In the new Windows system environment, the initial sign-in is not the end of the desktop environment. The first time you sign in, the icons in the Start menu, the drive name display in Explorer, and the default page settings in your browser may not be in the state they should be.
After signing in for the first time, please sign out and sign in again to start using the system.
By the time you sign in the second time, your desktop environment will be ready.
It takes long time when logging in for the first time or logging in the first time after profile initialization. This is because the system is (re)creating your profile. It will not take such a time to log in from the next time on.
Press F5 in the Explorer window.
Please refer to Environment Setup.
There are possibilities as follows.
- Caps Lock is ON
To switch ON/OFF Caps Lock, hold down the [Shift] key on the keyboard and press the [Caps Lock] key. - “All caps” option is ON in Microsoft Word font setting
The “All caps” option is toggled ON/OFF with Microsoft Word keyboard shortcut [Ctrl] + [Shift] + [A]. If you encounter such a problem on Word, you may have pressed this keyboard shortcut without noticing.
When you want to use Microsoft Office via remote access, please sign in using @u.tsukuba.ac.jp and the password you set on the M365 password setting site, as you do when using the satellite terminal.
Please check the following announcement for the latest information on this problem. Information before it became an FAQ is also available.
How to resolve the problem when authenticating Microsoft Office products on a satellite device
You need to initialize multifactor authentication with administrator privileges.
Please send an e-mail to the address listed under “Other General” in the “Inquiries” section, or contact the Academic Center for Computing and Media Studies.
The following error message appears on the current satellite terminal when you perform a multiple sign-in to Windows. When you see this error, make sure you are not signing in to another terminal.
This error also occurs when you sign in to the satellite terminal while you are signed in to Windows via Remote Access.
Linux
When dealing with LaTeX in Japanese language, use dvipdfmx that can handle Japanese language.
Try deleting the following .mozilla
For FireFox : home directory .mozilla
For Chrome : home directory ► .config ► google-chrome
If you have deleted the .bashrc under user home, you can use the following command to restore the .bashrc created at first login.
cp /etc/skel/.bashrc .
Software
ArcGIS
When a user selects the same file on ArcMap and ArcCatalog, the messages such as follows will be shown. If a user wishes to add a field in ArcMap, no other application but ArcMap can be used.
—–
Field could not be added.
Field cannot be added to the selected table or FeatureClass, because it is used by other applications/users. Please try again when the geodatabase becomes available.
—–
To use ArcGIS Pro installed on a remote desktop, you must sign in with a your Unified Authentication ID.
The procedure is as follows.
- Start ArcGIS Pro
- Select “Your ArcGIS organization’s URL” for “Sign in with”
- Input “u-tsukuba” in the form and click “Continue”
- Click “Univ. of Tsukuba”
- Next, you see the authentification page. Enter your ID and Password
* Shibboleth authentification is used. So, if you already sign-in manaba or so, the authentication step will be skipped.
* Contact us if you are a Professors Emeriti, researchers and so on, who need account application.
If there is not enough space on your user home area disk allocated to an individual, the software will not be able to perform the writes that occur at startup and will not be able to save. Please increase the your home directory quota by referring to the following page, or clear out unnecessary files to free up your home directory.
Disk Extension
https://www.u.tsukuba.ac.jp/en-disk/-
This may be caused by the user’s configuration files (profiles) becoming full. If the above does not improve the problem, please see the following page and try reorganizing the profile area to free up storage space. https://www.u.tsukuba.ac.jp/ufaq/en-windows-roaming-profile/
It can be accessed via the ‘ArcGIS’ -> ‘Data Contents Academic Data Pack’ folder in the Start menu.
Microsoft
In the new Windows system environment, the initial sign-in is not the end of the desktop environment. The first time you sign in, the icons in the Start menu, the drive name display in Explorer, and the default page settings in your browser may not be in the state they should be.
After signing in for the first time, please sign out and sign in again to start using the system.
By the time you sign in the second time, your desktop environment will be ready.
When you want to use Microsoft Office via remote access, please sign in using @u.tsukuba.ac.jp and the password you set on the M365 password setting site, as you do when using the satellite terminal.
If there is not enough space on your user home area disk allocated to an individual, the software will not be able to perform the writes that occur at startup and will not be able to save. Please increase the your home directory quota by referring to the following page, or clear out unnecessary files to free up your home directory.
Disk Extension
https://www.u.tsukuba.ac.jp/en-disk/-
This may be caused by the user’s configuration files (profiles) becoming full. If the above does not improve the problem, please see the following page and try reorganizing the profile area to free up storage space. https://www.u.tsukuba.ac.jp/ufaq/en-windows-roaming-profile/
If you use the application version, a very large amount of space for each user’s configuration file (profile) will be used, which may cause trouble.
Therefore, please use the browser version.
Please use the browser version.
Please refer to the following notice for details.
Attention on use of Dropbox etc. on the Zengaku Computer System
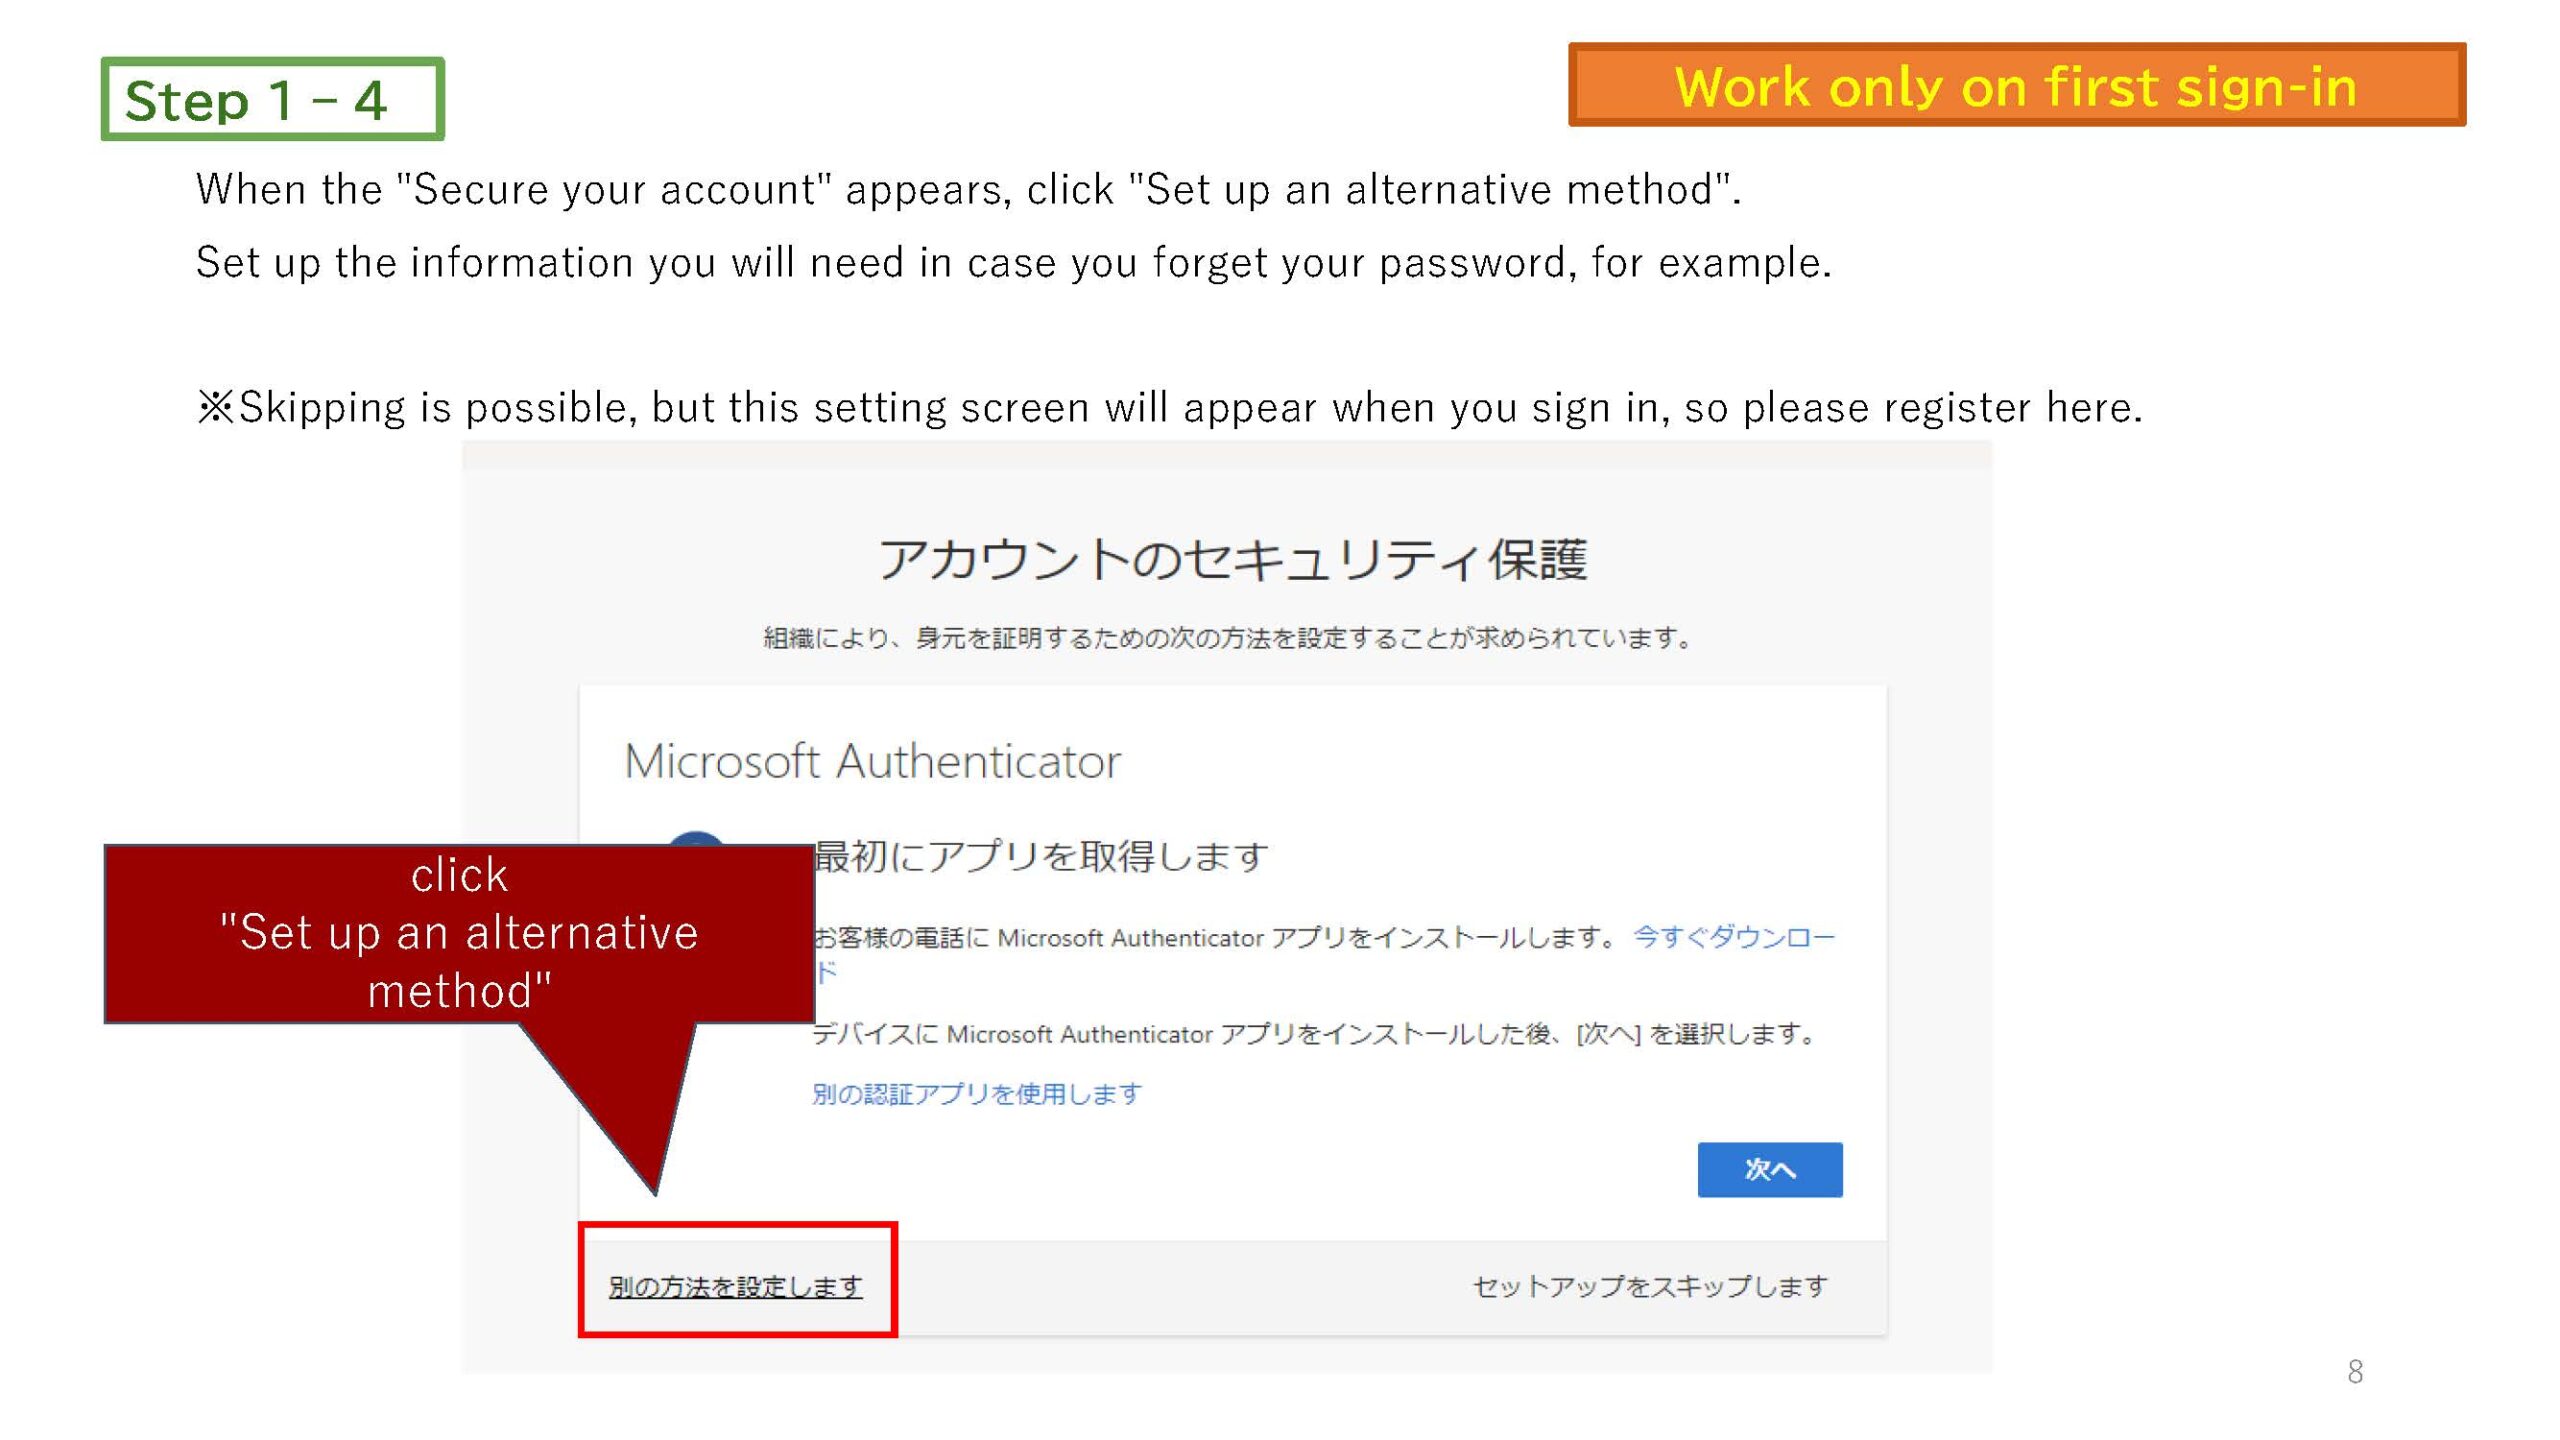
When you first sign in to Microsoft 365, you will be asked to configure settings regarding authentication in case you forget your password. The same dialog appears as the initial settings for multi-factor authentication, which is very difficult to distinguish, but if you have not turned on multi-factor authentication at https://m365setting.u.tsukuba.ac.jp/, multi-factor authentication is not enabled.
You can also proceed with the setup without installing Microsoft Authenticator. Please refer to the following image to proceed with the setup.
Though after signing in the Microsoft 365, some functions may be open unexpectedly, you are not supposed to use functions other than sending/receiving e-mail.
Any so created contents will be deleted by the system without warning.
Please check the following announcement for the latest information on this problem. Information before it became an FAQ is also available.
How to resolve the problem when authenticating Microsoft Office products on a satellite device
You need to initialize multifactor authentication with administrator privileges.
Please send an e-mail to the address listed under “Other General” in the “Inquiries” section, or contact the Academic Center for Computing and Media Studies.
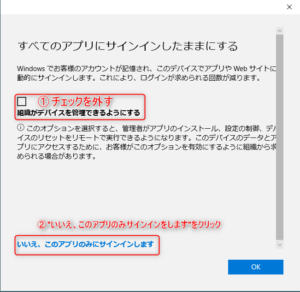
- Open [Start] – [Settings] – [Accounts] – [Access to work or school].
- Click [Disconnect] when the connected accounts are displayed.
- Two confirmation dialogs will appear in succession. Click [Yes] on the first dialog and [Disconnect] on the second dialog.
When asked to restart, do so. - After completing the above, start the Microsoft Office product again and enter your @u email address and password when the dialog box appears.
This trouble may also occur when you use a satellite device with an account that you signed in to without following the settings below when signing in at the time of Office product startup on your PC.
This procedure is different from the setting when using Office products on a satellite device. Please be careful.
The following is a reference to an image posted on the A.C.C.C. Web.
MATLAB
On the terminals of the Zengaku Computer System, it is not possible to perform software installation operation requiring administrator rights. Therefore, if you try to start the file of installer format (EXE) distributed on the DYNARE site, the User Account Control screen will be displayed and you will be prompted to enter the information of the administrator user. You cannot go forward from this screen.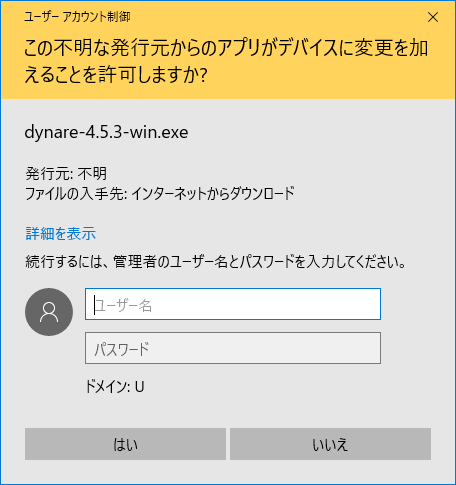
To use DYNARE files without using administrator rights, there is a method as follows.
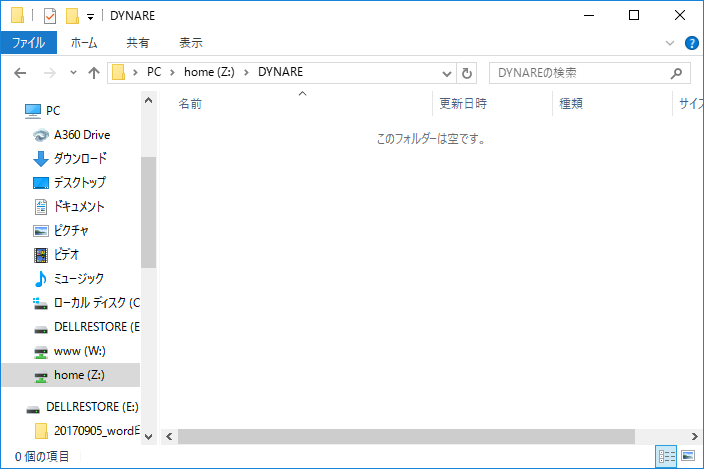
- Create a folder to put DYNARE files, and keep it open (in this example, the folder is “Z:\DYNARE”).
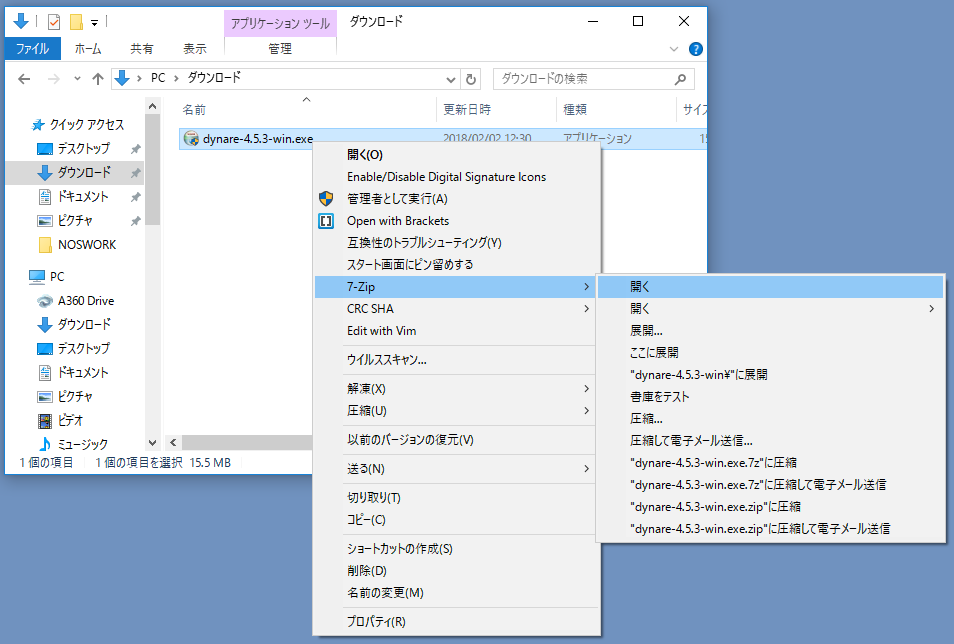
- Right click on the file downloaded from the DYNARE site, and select “7-Zip” → “Open archive”.
- After opening the file with 7-Zip (7-Zip File Manager), select all files and folders in it.
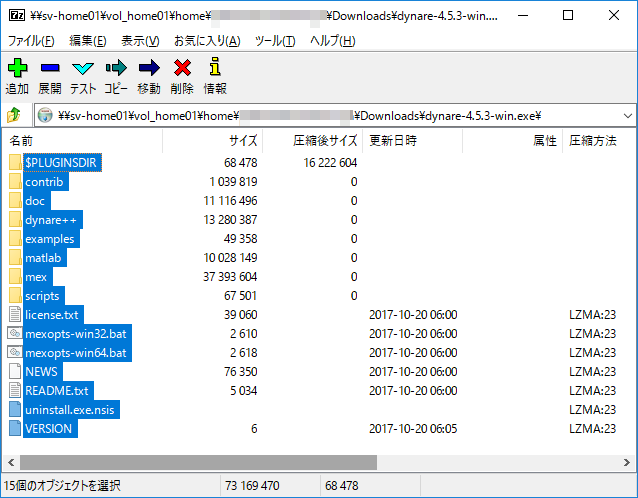
- Copy by drag & drop the objects you selected at 7-Zip (7-Zip File Manager) to the destination folder (Z:\DYNARE in this example).
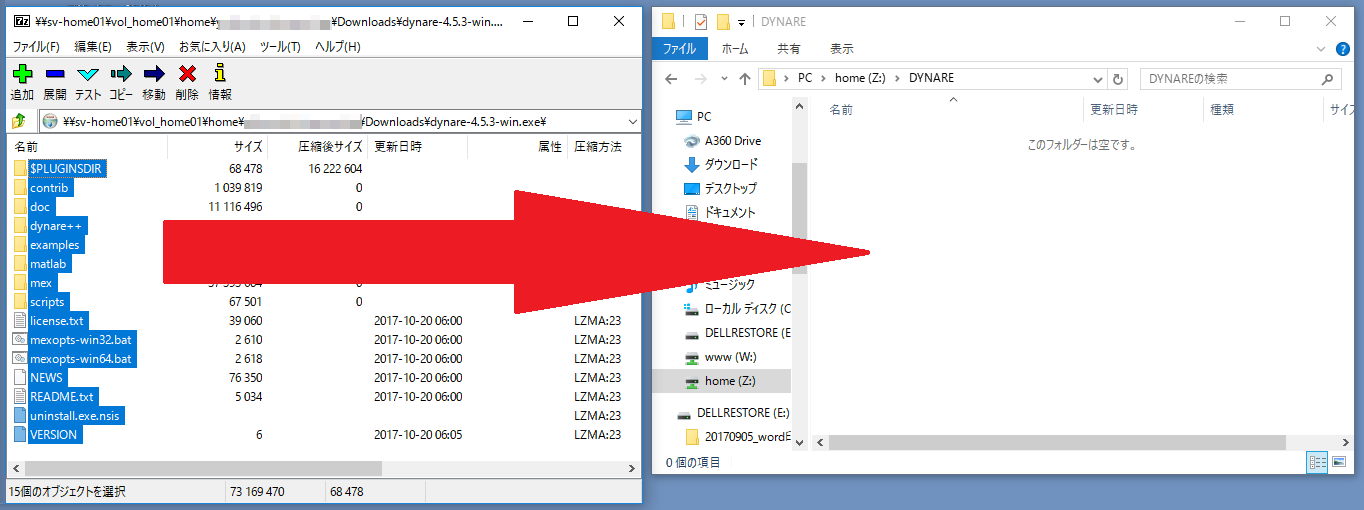
- It is ready when all the objects are copied.
You can copy the path of the folder by clicking around the red frame in the following image.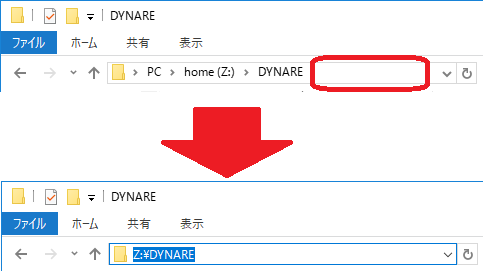
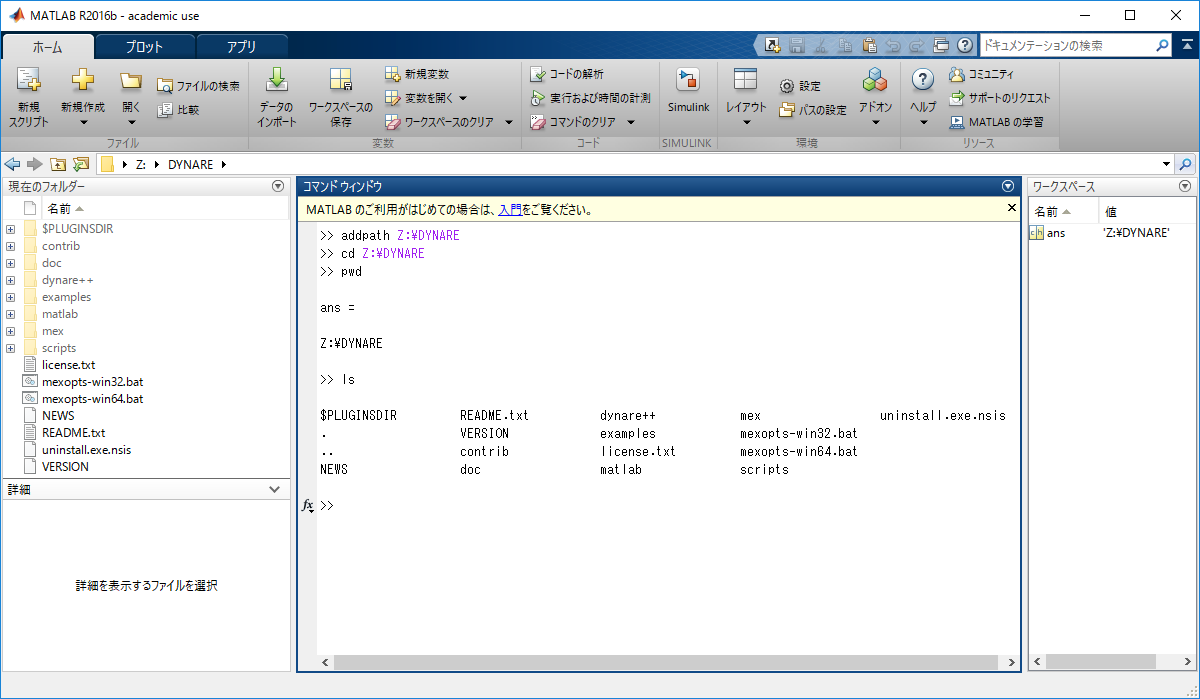
- After that, you can use the DYNARE files by accessing the folder from MATLAB.
The MATLAB mex command is provided under the alias matlab_mex.
Use this alias command. The reason for the alias is that the name conflicts with the mex command of the TeX Live package.
Note: As of December 2023, this FAQ is only applicable to Ubuntu machines.
To use MATLAB installed on the Zengaku Computer System, you must sign in to your MathWorks account.
For details, please see the MathWorks (MATLAB) Campus-Wide License page.
An issue has been confirmed where users who initialize their profile in MATLAB R2025b will see a warning message displayed every time they launch MATLAB thereafter. A tool to resolve this issue has been deployed on the Windows Remote Desktop Server. You can invoke this tool by executing the following item in the Start Menu:
– ResetMatlabLoginInfo
Adobe
When you use Adobe Products on Zengaku Computer System, you have to sign in first.
- For Students and Faculty:
Please authenticate with @u email address and password.
Note : You can sign in to Adobe Creative Cloud with the same ID, up to two at a time. If you exceed that, you will be warned and you should sign out as needed.
Mathematica
Other Software
When preview function is set to allow on explorer, file is locked and cannot overwrite sometimes.
There are possibilities as follows.
- Caps Lock is ON
To switch ON/OFF Caps Lock, hold down the [Shift] key on the keyboard and press the [Caps Lock] key. - “All caps” option is ON in Microsoft Word font setting
The “All caps” option is toggled ON/OFF with Microsoft Word keyboard shortcut [Ctrl] + [Shift] + [A]. If you encounter such a problem on Word, you may have pressed this keyboard shortcut without noticing.
In principle, software products to be installed on the Zengaku Computer System are restricted to those which are used in classes. We conduct biannually a needs survey for educational institutions of our university, and install software products based on the requests.
You cannot install software whose installation requires administrator rights.
On the other hand, you can install software whose installation does not require administrator rights, at your own risk.
(Example 1) I want to use free software named DYNARE which runs on MATLAB.
https://www.u.tsukuba.ac.jp/ufaqs/en-dynare/
(Example 2) I want to install Python package program.
https://www.u.tsukuba.ac.jp/ufaqs/en-python1/
In principle, software products to be installed on the Zengaku Computer System are restricted to those which are used in classes.
You cannot install software whose installation requires administrator rights.
On the other hand, you can install some Python packages (library) to your own directory (~/.local) by running the “pip” command with “––user” option.
pip install --user [package]
If there is not enough space on your user home area disk allocated to an individual, the software will not be able to perform the writes that occur at startup and will not be able to save. Please increase the your home directory quota by referring to the following page, or clear out unnecessary files to free up your home directory.
Disk Extension
https://www.u.tsukuba.ac.jp/en-disk/-
This may be caused by the user’s configuration files (profiles) becoming full. If the above does not improve the problem, please see the following page and try reorganizing the profile area to free up storage space. https://www.u.tsukuba.ac.jp/ufaq/en-windows-roaming-profile/
Please use the browser version.
Please refer to the following notice for details.
Attention on use of Dropbox etc. on the Zengaku Computer System
PC-Talker works on the accessibility terminal at each library.
You can also use PC-Talker program with two terminals simultaneously at Satellite Computer Rooms on all campus.
Due to sound comes out regardless of the volume setting of the terminal,
please use a Headphone when you use PC-Talker.
Terminals
About roaming profile
On Windows of the Zengaku Computer System, some profiles (such as application settings and browser’s cache) are saved as “roaming profile” when signing out, and are reloaded the next time you sign-in. However, there are some applications which do not save settings into the roaming profile.
The size of roaming profile has an upper limit, and it is set to be 10 GB. If you exceed this limit when signing-out, the roaming profile will not be saved. The next time you sign in, the last saved roaming profile will be reloaded. If you exceed the limit during signing-in, the following message will be displayed at every 15 minutes.
プロファイル格納領域がいっぱいになりました。ログオフする前に、プロファイルの項目をネットワークまたはローカルの記憶域に移動してください。
詳しくは以下の Web ページをご覧ください。
https://130.158.234.43/old-icho2017/ufaqs/windows-roaming-profile/

You have exceeded your profile storage space.  Before you can log off, you need to move some items from your profile to network or local storage.
For details, please refer to the following webpage.
https://130.158.234.43/old-icho2017/ufaqs/en-windows-roaming-profile/
How to check the size of your roaming profile
The size of the roaming profile currently in use and the maximum size limit for the roaming profile can be displayed by running
“Zengaku Computer System MyInfo” from the Start menu in the Windows environment of the Zengaku Computer System.
How to reduce roaming profile
* Pay close attention and do at your own risk when managing roaming profile. Consider taking a backup before an operation.
Your roaming profile is stored in a location different from the user home (Z: drive). There are the following methods to reduce it.
- Browser’s temporary files (browsing history, cookies, cache) are often inflated, so delete them with a browser you often use. There are also cases where large files for Slack and LINE are created in the roaming profile, so if you are using these applications, delete those files that you can delete from those applications. If you know something about another application that saves settings etc in the roaming profile, also delete settings and data in it.
Go to 2 if the above still does not work. - Initialize the profile.
If you do not want to initialize your settings, go to 3. - Delete some files of your choice (after backing up, if possible) under C:\Users\Username. You can check the size of a file or a folder by right-click → Properties.
There is no optical drive in terminals of the Zengaku Computer System.
When using an optical drive in a lesson etc., in a satellite room please use the optical drive of the lecturer’s terminal.
In a library please use the optical drive of the terminal with the following numbers:
- Central Library 2nd and higher floors
- Medical Library and off-site satellites
- Art and Physical Education Library
- Library on Library and Information Science 1st floor
- Otsuka Library
If you want to use an optical drive on a terminal other than the above, please prepare an external drive with USB by yourself.
In addition, AutoPlay is disabled for security reasons. On Windows, launch the Explorer, select “This PC” (or “PC”) in the left menu, and check the “Devices and drives (デバイスとドライブ)” section.
For location of scanners, please refer to the table of Satellite Computer Rooms. Scanners are installed on the lecturer’s terminals in the rooms where numbers are written in the scanner field (S).
To use a scanner, start Windows of the lecturer’s terminal and launch the following software in the Start menu.
IJ Scan Utility
- Click the [Start] button.
- Click [All Apps] in the upper right corner, click the [canon utilities] folder in the list, and then click [IJ Scan Utility] in the list that appears.
- IJ Scan Utility will start up.
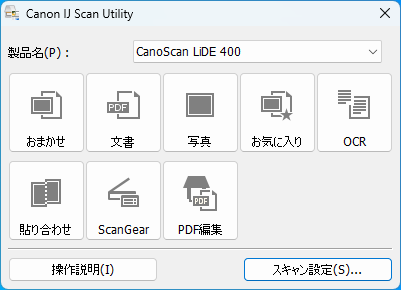
For more information, see the following manuals
Scanning from a computer (Windows)
* Canon Web will open
Please refer to the table of Satellite Computer Rooms. Satellites with * in the number of terminals have one accessibility terminal.
Please connect your own keyboard and/or mouse to the terminal and use them.
When you are done using the terminal, please return the provided keyboard and mouse to their proper positions.
Be careful not to forget the USB receiver, especially if your mouse is the type that uses a USB receiver.
Remote Access
In the new Windows system environment, the initial sign-in is not the end of the desktop environment. The first time you sign in, the icons in the Start menu, the drive name display in Explorer, and the default page settings in your browser may not be in the state they should be.
After signing in for the first time, please sign out and sign in again to start using the system.
By the time you sign in the second time, your desktop environment will be ready.
Please refer to SSH login by public key authentication.
Please refer to SSH login by public key authentication.
You can use the printers in any satellite room. Please refer to Satellite Rooms.
When you want to use Microsoft Office via remote access, please sign in using @u.tsukuba.ac.jp and the password you set on the M365 password setting site, as you do when using the satellite terminal.
It is not permitted to access some of our services from remote systems.
For more information, please contact the department that provides the service.
When Remote Desktop Service try to connect ,
Error.
All desktop sources available on this desktop are currently busy.
is displayed, the number of concurrent users on the Remote Desktop Service server (approximately 30 or so) has been exceeded.
Try again after a while.
For faculty members
– Assignments using a remote desktop service for online classes –
The Remote Desktop Service is intended for temporary use at home and other locations.
The number of users that can be connected at the same time is limited to about 30.
Please instruct students to move the time of use to a different time of day or minimize the time of use.
For connections using HTML5, this feature may not work in some environments, such as browsers. In such cases, please use Omnissa Horizon Client.
You can forward the screen of a Linux desktop application to your own PC (Windows) via SSH connection.
This section describes the setup procedure in the following environment.
- SSH Host : Linux server on the Internet or intranet
* X11Forwarding must be allowed on the server side. - SSH Client : Tera Term (Download : GitHub)
- X Server : VcXsrv Windows X Server (Download : SourceForge)
* Or your favorite X server.
First, install Tera Term and VcXsrv in your PC and set up the Tera Term as follows.
- Click [Setup]-[SSH Forwarding…] on the Tera Term menu bar. Then check [Display remote X applications on local X server] in the [TTSSH: Forwarding Setup] dialog box.
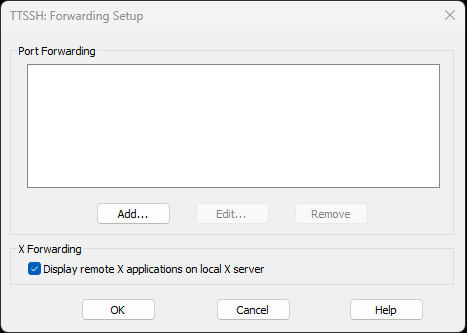
- The following alert dialog box will pop up. Click the [OK] button.
- Click [Setup]-[Save setup…] on the Tera Term menu bar to save the settings.
Next, click the XLaunch icon on the desktop to launch the application and set up as follows.
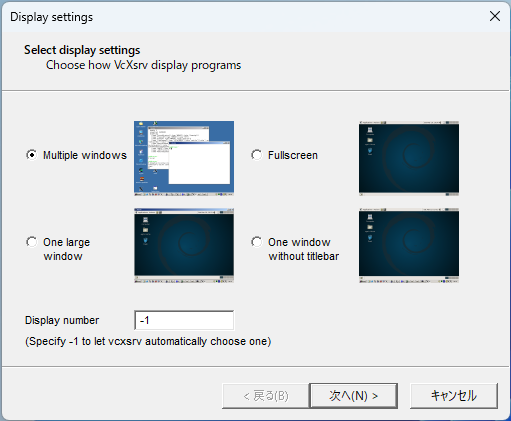
- Setting 1
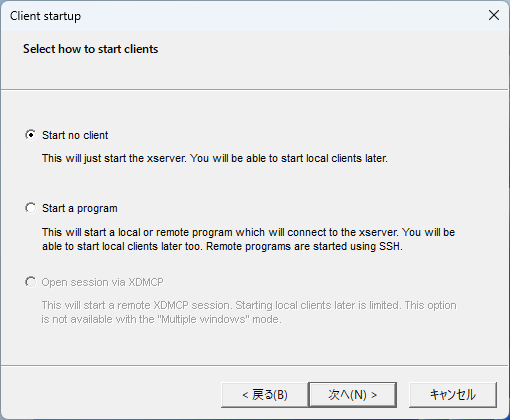
- Setting 2
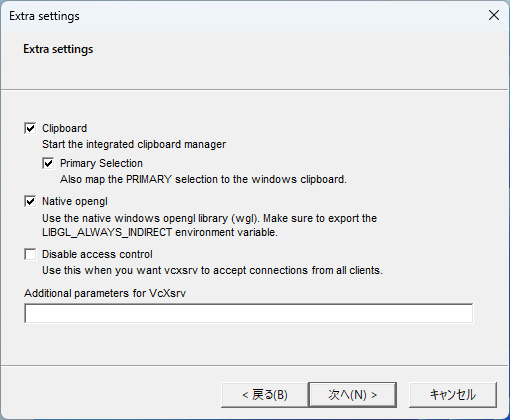
- Setting 3
- Setting 4
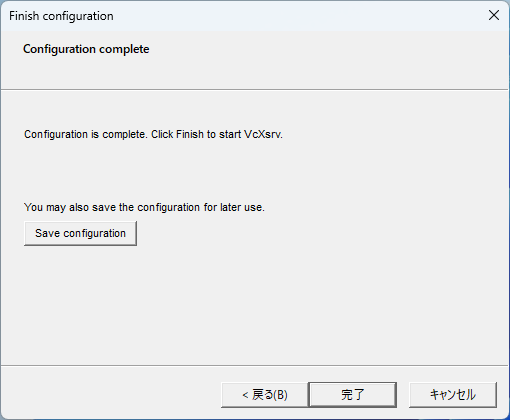
This completes the setup.
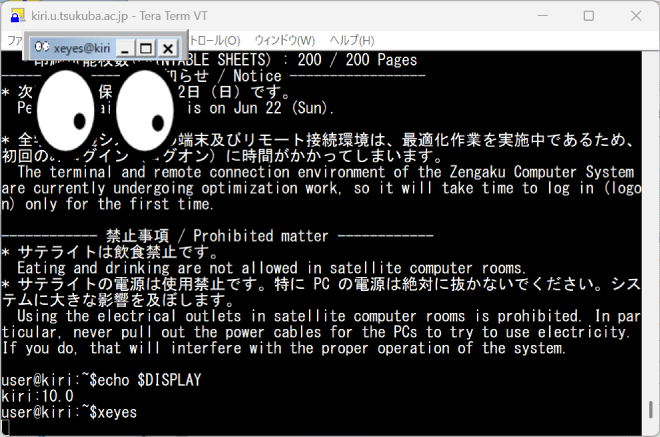
Connect Linux server using Tera Term and if the environment variable “DISPLAY” is set to a value, this is normal.
(The left side of the colon shows the host name of the Linux server you are connecting to, and the right side shows the automatically assigned display number.)
$ echo $DISPLAY
kiri:10.0
Below is a screenshot of xeyes.
You can use large applications like Firefox and Mathematica over X11 forwarding. However, it is very slow and not practical.
The following error message appears on the current satellite terminal when you perform a multiple sign-in to Windows. When you see this error, make sure you are not signing in to another terminal.
This error also occurs when you sign in to the satellite terminal while you are signed in to Windows via Remote Access.