For security enhancement, SSH login for the Linux server of the Zengaku Computer System from outside of the university is rejected except for public key authentication. If you do not have a public key in your home directory, SSH login can not be done from outside of the university.
In order to put keys in the home directory, log in from on-campus, such as a satellite computer room, or use Remote Desktop.
- About Key Authentication
- Generating and Registering
- Test Login and Initial Setup
About Key Authentication
Public Key authentication allows to login for a user who has a private key only. Create a pair of public key and private key in advance, put a public key in the server and store a private key in the client (laptop, etc.).
Generating and Registering
Generating key pair (public key and private key)
- On Windows
Generate public key and private key using PuTTYgen. Refer the following page if you like.Note: Public key should be generated with the method using how to copy public key described in [Public key for pasting into OpenSSH authorized_keys file], and make sure NOT pressing [Save public key] button.
- On macOS or Linux
Create a pair of public key and private key using ssh-keygen command included in OpenSSH.- On macOS, open a Finder window, select Applications → Utilities, and launch Terminal.
On Linux, work on the console, or use a terminal emulator such as xterm. - Create a directory to store keys by the following command.
$ mkdir -m 700 ~/.ssh
However, if the .ssh directory already exists, you do not need to create it.
- Generate a pair of public key and private key by the following command.
$ ssh-keygen -t rsa
Generating public/private rsa key pair.
Enter file in which to save the key (/UserHome/.ssh/id_rsa):
Enter passphrase (empty for no passphrase):
Enter same passphrase again:
At the part “Enter file …”, you will be prompted to enter the file name of the key to be created, but if you do not need to change it, just press [Enter] without entering anything.
Next you will be prompted for entering a passphrase. We recommend that you set a longer passphrase to an extent that you do not forget. Also, since it is different from the password of the real account, do not specify the same password. After that, you will be prompted to enter the passphrase again for confirmation.
If there is no problem, a public key (id_rsa.pub) and a private key (id_rsa) are created under the .ssh directory. - As a precaution, set the permission so that only you can read the private key (id_rsa).
$ chmod 600 ~/.ssh/id_rsa
Keep the private key (id_rsa) locally, and put the public key (id_rsa.pub) on the server side as the file named “authorized_keys” (see next section).
- On macOS, open a Finder window, select Applications → Utilities, and launch Terminal.
Setup your public key to server
After you generate the key pair, set your public key to the server. The following is a summary of the procedure written on “Generating key pair using PuTTYgen, and setting up your public key to server“.
Note: The following procedure is for a case using only one key pair. If you already use another key, append the new public key to the existing [authorized_keys]. You can register multiple public keys in [authorized_keys] (one line per key).
- Rename public key file to [authorized_keys] (there is no extension).
- Have a remote connection to Windows desktop of Zengaku Computer System via the remote access.
- Create a directory [.ssh] under Z: drive, at where public key is saved. (Skip this step if the folder already exists.)
- Right-Click on [Start] → Click on [Run] and input “cmd” in the appeared window.
- Type as follows:
Z:\> mkdir Z:\.ssh [ENTER]
- Copy your public key [authorized_keys] (there is no extension) in the .ssh directory.
- Note: No need to copy a private key.
Test Login and Initial Setup
Using a local SSH client, check whether you can log in, and do the initial setting. Here are examples with TeraTerm and WinSCP on Windows, and with OpenSSH on macOS or Linux.
When logging in for the first time, since the host key of the server is not cached, a confirmation dialog as to whether to trust the server is displayed. In that case, check the fingerprint of the key displayed in the dialog and the fingerprint at the bottom of this page to make sure if you are connected to the correct server.
Tera Term (on Windows)
Please select one of icho01, icho02, or kiri for “Host”.


WinSCP (on Windows)
Please select one of icho01, icho02, or kiri for “Host”.
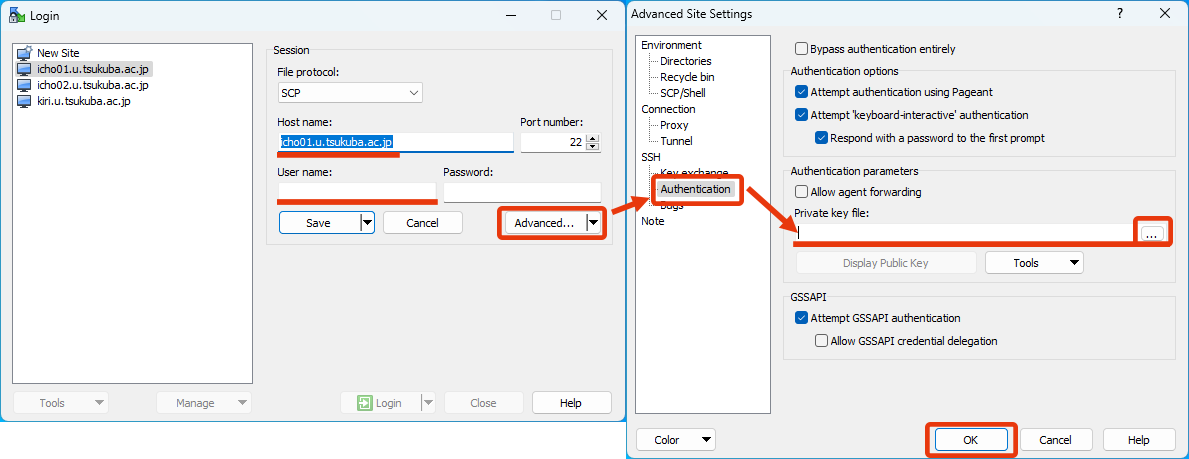
After you specify your private key file, leave the password field blank and click on “Login”. Then you will be required passphrase of the private key later. At that time, input the passphrase that you specified when you created the private key using PuTTYgen.
OpenSSH (on macOS or Linux)
Login by the following command. Please select one of icho01, icho02, or kiri as the server to connect to.
$ ssh icho01.u.tsukuba.ac.jp -l Username -i ~/.ssh/id_rsa
Then you will be prompted for a passphrase so enter the passphrase you set when generating the key.
In addition, if you create a file ~/.ssh/config on the client side and describe a configuration as follows in it, you can login more easily.
host icho01
  hostname icho01.u.tsukuba.ac.jp
  user Username
  IdentityFile ~/.ssh/id_rsa
In this example, you can login by the following command.
$ ssh icho01