Here we will explain a procedure to create a key pair (public key and private key) using a tool called PuTTYgen, assuming a case of public key authentication with WinSCP etc. from an off-campus Windows PC.
Contents
Basics
- A public key have to be put on the server side, and a private key have to be put on your PC (the client side).
- Take care when handling a private key. Pay special attention to its location and management so that it will not be abused by other people. When generating a key, be sure to set a passphrase without fail.
- The passphrase of your private key is different from the password of your real account, so never specify the same one.
How to generate a key pair
- Get PuTTYgen and start it.
- PuTTYgen is normally installed together when WinSCP is installed. If you already have WinSCP installed on your PC, start up WinSCP once, click on “Tools” button and select “Run PuTTYgen” to start up PuTTYgen.

- You can download WinSCP at the following site to install it:
https://winscp.net/ - If you do not install WinSCP (or did not install PuTTYgen together when installing WinSCP) you can also download PuTTYgen directly at the following site:
https://www.chiark.greenend.org.uk/~sgtatham/putty/latest.html
Download puttygen.exe from this site, save it in a suitable place (eg desktop, etc.), and double click it to start it.
- PuTTYgen is normally installed together when WinSCP is installed. If you already have WinSCP installed on your PC, start up WinSCP once, click on “Tools” button and select “Run PuTTYgen” to start up PuTTYgen.
- When you start PuTTYgen, the “PuTTY Key Generator” dialog box will be displayed.
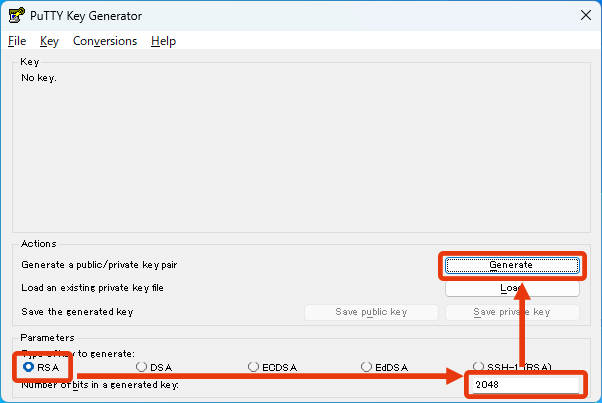
Select “RSA (SSH-2 RSA)” in the “Parameters” section, specify “2048” as it is in the “Number of bits in a generated Key” field and press the “Generate” button. - A random number is generated by moving the mouse within the area, and the green bar increases. Continue to move the mouse arbitrarily until it becomes fully green.
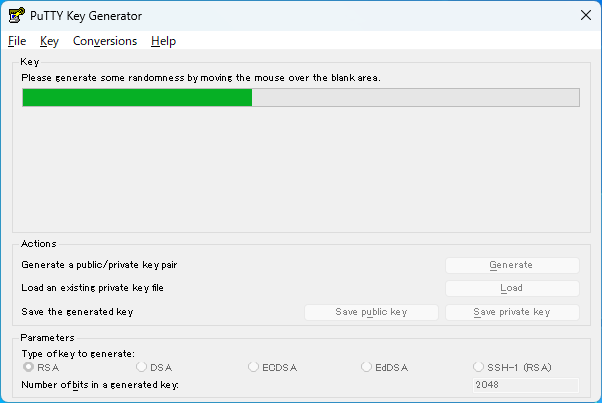
- After the random number is generated, a key pair (public key and private key) will be generated based on it. To save the generated keys, do as follows respectively.
How to save private key
- The “Key comment” field can be specified arbitrarily. If necessary, specify a comment to be displayed during public key authentication.
- Be sure to enter your passphrase in the “Key passphrase” and “Confirm passphrase” fields. Passphrase can be specified even in a long sentence (even spaces can be used), so it is recommended that you set a longer passphrase to an extent that you do not forget. Since it is different from the password of your real account, never specify the same one.

- Click on the “Save private key” button to save the private key in your PC. The location to save is arbitrary, but avoid the desktop or a place that others can easily access by file sharing, etc.
How to save public key
- Use the public key shown in the [Public key for pasting into OpenSSH authorized_keys file] box. As probably all the characters are not displayed in the box at once, check the whole using the slide bar. Make sure you select all the characters, then press the right mouse button, and select “Copy”.

- Launch Notepad etc, paste the copied public key, and save it in an appropriate place.
- A public key is a long string of one line. Save it so that no line break occurs.
- The filename is arbitrary. But when setting up public key authentication for the first time, if you set the filename as “authorized_keys”, you will not need to rename it later. In that case a filename extension such as “.txt” is unnecessary. If a filename extension is added automatically when saving it, then you will need to rename it. Therefore we recommend to set your environment to display filename extensions beforehand.
Putting public key on the server
After saving the public key on your PC, put it on the server of the Zengaku Computer System.
- On the server, make a directory (folder) named .ssh in your home directory and put the public key in the .ssh directory as the filename authorized_keys (~/.ssh/authorized_keys).
- If you already have authorized_keys file in the .ssh directory, append the new public key to the existing authorized_keys file. You can register multiple public keys in authorized_keys file (one line per key).
There are several ways to put the public key on the server side. Here we explain how to transfer it via Remote Desktop.
* Depending on the upload method of authorized_keys file, it seems that the permission of the file becomes inappropriate (000), which may cause the setup to fail (especially when uploading by copy and paste). If you do not understand well, please create .ssh directory and upload authorized_keys file in exactly the same way as follows.
- Please refer to the Remote Access page of the Zengaku Computer System for basic information on Remote Desktop. Here we explain a case using Remote Desktop “On Web browser (HTML5)”.
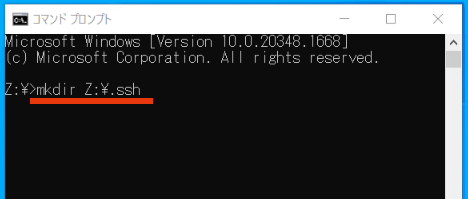
- In order to put the public key on the server side, first launch the Command Prompt and make the .ssh directory (* skip this item if you have already created it before).
On the Remote Desktop screen, press R while holding down the Windows key on the keyboard, type “cmd” in the appeared field, and click on the “OK” to launch the Command Prompt.
In the Command Prompt, input the command (mkdir Z:\.ssh) as follows and press ENTER.
- Launch the Windows Explorer and check under the Z: drive to confirm that the .ssh directory is created.
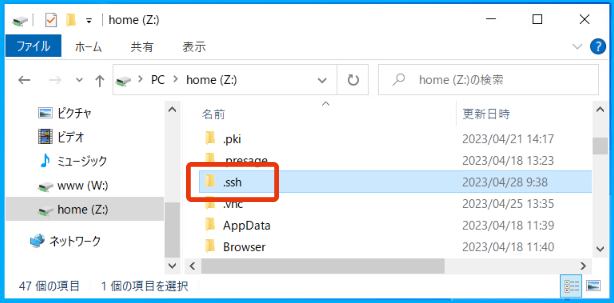
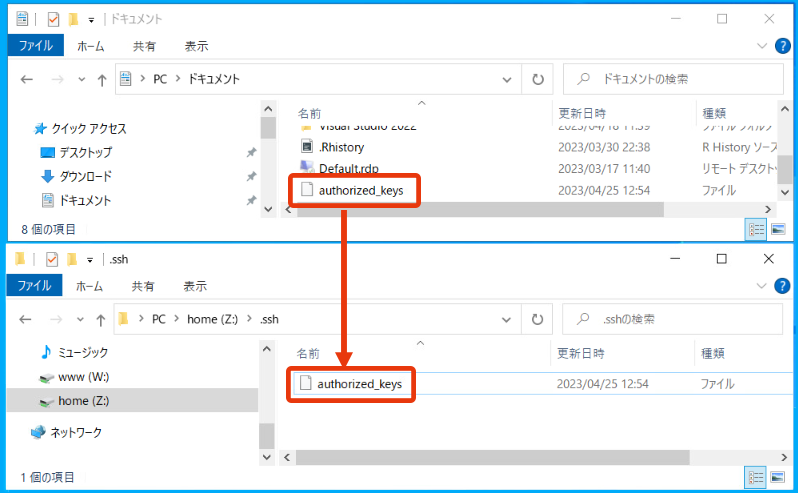
- Copy the public key (authorized_keys) generated by PuTTYgen into this .ssh directory.
If the authorized_keys file already exists in the .ssh directory, be careful not to overwrite the authorized_keys file. In that case, we recommend to open the public key file with Notepad etc., copy it, and then append (paste) it to the end of the authorized_keys file in the .ssh directory under the Z: drive.
For general ways to transfer files between your PC and Remote Desktop, please refer to the “File Transfer” section of each connection method on the Remote Access page of the Zengaku Computer System. Here we explain how to copy the authorized_keys file to the .ssh directory when using Remote Desktop “On Web browser (HTML 5)”.
- Click on the center left tab and click on the second button from the left in the upper part inside the tab to open the “Transfer Files (ファイル転送)” panel.
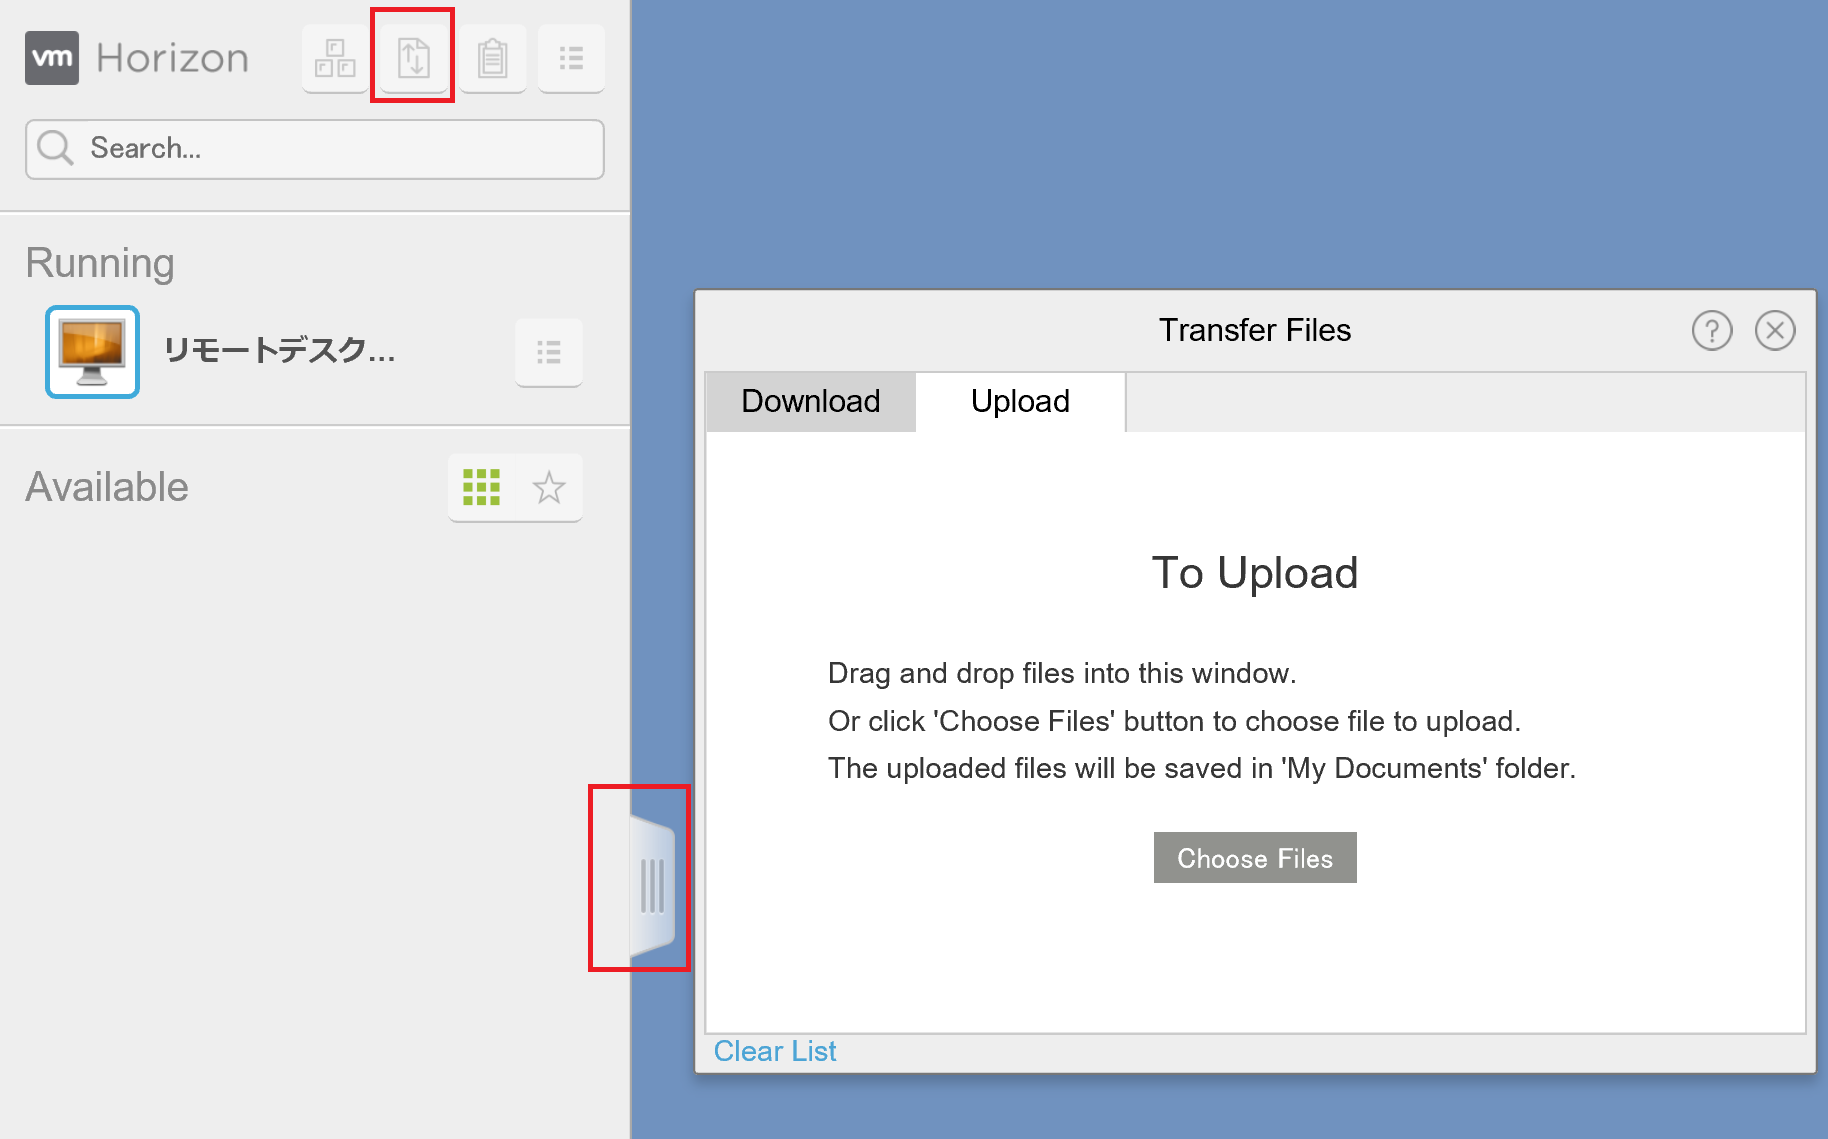
- Select the “Upload (アップロード)” tab in the “Transfer Files (ファイル転送)” panel, and drag & drop (or select by clicking on the “Choose Files (ファイルの選択)” button) the authorized_keys file in your PC.
- After uploading, the file will be saved in the “Documents (ドキュメント)” folder. Then drag & drop it in the .ssh directory to copy it.
This completes preparation for public key authentication.
- Click on the center left tab and click on the second button from the left in the upper part inside the tab to open the “Transfer Files (ファイル転送)” panel.
Logging-in by public key authentication with WinSCP
Now the public key is ready. Let”s login by public key authentication with WinSCP from your local PC. You need to enter the location of the private key in the session configuration with WinSCP.
- Launch WinSCP on your PC and configure the session as follows.
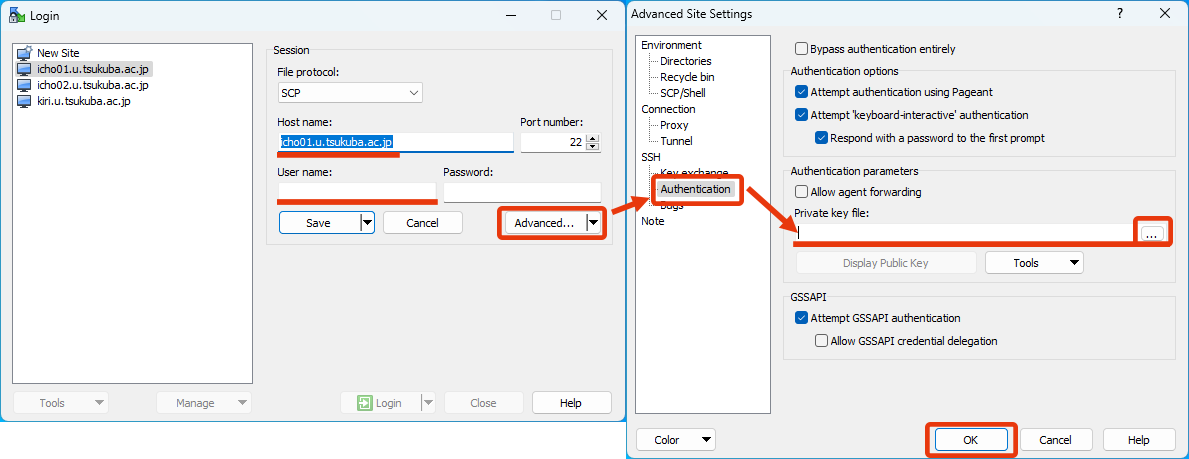
- Host name: icho01.u.tsukuba.ac.jp (or icho02, kiri)
- User name: your username of the Zengaku Computer System (like s7654321 or family.given.xx)
- Password: Leave blank without specifying anything. If already set, erase it. (If you specify it here, it will be authenticated with a normal password.)
- To specify the private key, press the “Advanced…” button under the “Password:” field to display the “Advanced Site Settings” window.
Select [SSH]-[Authentication] in the “Advanced Site Settings” window and specify the private key file in the “Authentication parameters” section. After that, click on “OK” to close the “Advanced Site Settings” window. - You can use this settings from the next time on by clicking on the “Save” button to save this settings.
- After configuring the session, let’s log in by public key authentication by clicking on the “Login” button.
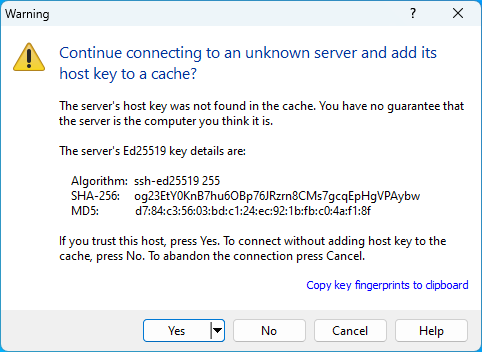
- When logging in for the first time, a warning message as to whether to trust the server is displayed. Check the fingerprint of the key displayed in the message and the fingerprint at the bottom of this page to make sure if you are connected to the correct server. If there are no suspicious points, click on the “Yes” button to continue the connection.
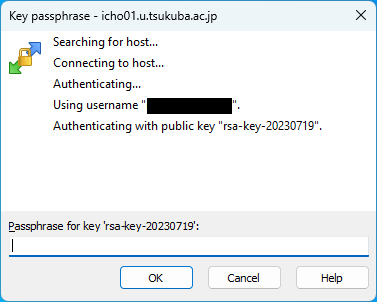
- When logging in by public key authentication, you will be prompted for a passphrase. Enter the passphrase you specified when saving the private key with PuTTYgen and click on the “OK” button.
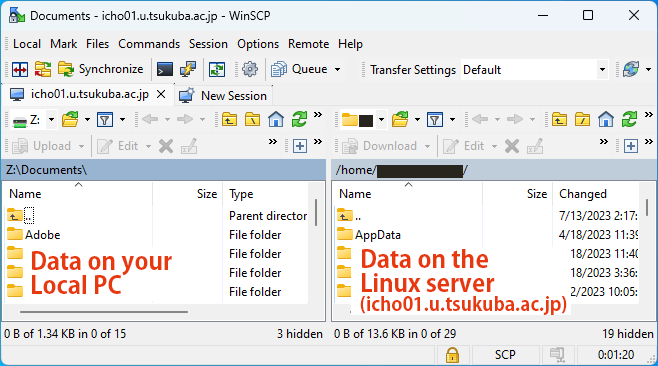
- If authentication succeeds, the session will be established. To change settings click on the “Preferences” button (gear icon). For other detailed information on how to use WinSCP, please search on the help and the Internet.
When the message “Server refused our key” appears and connection cannot be established
Check the following points.
- Permissions of the .ssh directory and the authorized_keys file
The permission of .ssh should be 700, and the permission of authorized_keys should be 600. If you do not understand well, try renaming or deleting them once, and make the .ssh directory creation and authorized_keys uploading exactly the same as those written on this page. Then connect again. - Correspondence between the uploaded public key and the private key specified when connecting
Use the public key displayed when creating / saving the private key. - Whether the entire key was selected when saving the public key
Include the first “ssh-rsa”. There may be parts not shown in the frame, so check the whole using the slide bar and copy it after selecting all the characters. - Whether there was no line break when saving the public key
Save the public key so that no line break occurs.