
This section of the manual explains the function of each element in NetLogo's user interface.
マニュアルのこのセクションでは、NetLogoのユーザーインターフェイスの各要素の機能について説明します。
In NetLogo, you have the choice of viewing models found in the Models Library, adding to existing models, or creating your own models. The NetLogo interface was designed to meet all these needs.
NetLogoでは、モデルライブラリで見つけたモデルを表示するか、既存のモデルに追加するか、独自のモデルを作成して表示するかを選択できます。 NetLogoインターフェイスは、これらすべてのニーズを満たすように設計されています。
The interface can be divided into two main parts: NetLogo menus, and the main NetLogo window. The main window is divided into tabs.
インターフェイスは、2つの主要部分に分けることができます。:NetLogoメニューとメインNetLogoウィンドウ。メインウィンドウはタブに分かれています。
On a Mac, if you are running the NetLogo application, the menu bar is located at the top of the screen. On other platforms, the menu bar is found at the top of the NetLogo window.
Mac上でNetLogoアプリケーションを実行している場合、メニューバーは画面の上部に位置しています。他のプラットフォームでは、メニューバーはNetLogoウィンドウの上部にあります。
The functions available from the menus in the menubar are listed in the following chart.
メニューバーのメニューから利用可能な機能は次の表に記載されています。
|
File | ||
|
|
New |
Starts a new model. 新しいモデルを開始します。 |
|
|
Open |
Opens any NetLogo model on your computer. お使いのコンピュータ上の任意のNetLogoモデルを開きます。 |
|
|
Models Library |
A collection of demonstration models. デモモデルのコレクションです。 |
|
|
Save |
Save the current model. 現在のモデルを保存します。 |
|
|
Save As |
Save the current model using a different name. 別の名前を使用して、現在のモデルを保存します。 |
|
|
Save As Applet |
Saves a web page, in HTML format, that has your model embedded in it as a Java "applet". Javaの " applet "を埋め込んだモデルのHTML形式でWebページを保存します。 |
|
|
|
Sends the contents of the currently showing tab to your printer. プリンタに現在表示タブの内容を送信します。 |
|
|
Export World |
Saves all variables, the current state of all turtles and patches, the drawing , the plots, the output area and the random state information to a file. すべての変数と、現在の状態のすべてのタートルとパッチ、図面、プロット、出力領域のランダムな状態の情報をファイルに保存します。 |
|
|
Export Plot |
Saves the data in a plot to a file. プロット内のデータをファイルに保存します。 |
|
|
Export All Plots |
Saves the data in all the plots to a file. 現在のビュー(2Dまたは3D)の画像をファイル(PNG形式)に保存します。 |
|
|
Export View |
Save a picture of the current view (2D or 3D) to a file (in PNG format). 現在のビュー(2Dまたは3D)の画像をファイル(PNG形式)に保存します。 |
|
|
Export Interface |
Save a picture of the current Interface tab. ( in PNG format ) 現在のInterfaceタブの画像を保存します。 (PNG形式) |
|
|
Export Output |
Save the contents of the output area or the output section of the command center to a file. 出力領域またはコマンド・センターの出力部分の内容をファイルに保存します。 |
|
|
Import World |
Load a file that was saved by Export World. エクスポート·ワールドによって保存されたファイルを読み込みます。 |
|
|
Import Patch Colors |
Load an image into the patches; see the import-pcolors command. パッチにイメージを読み込みます。import-pcolorsコマンドを参照してください。 |
|
Import Patch Colors RGB |
Load an image into the patches using RGB colors; see the import-pcolors-rgb command. RGBカラーを使用してパッチにイメージを読み込みます。import-pcolors-rgbコマンドを参照してください。 | |
|
|
Import Drawing |
Load an image into the drawing, see the import-drawing command. 図面にイメージを読み込みます。import-drawing コマンドを参照してください。 |
|
|
Import HubNet Client Interface |
Load the interface from another model into the HubNet Client Editor. 別のモデルからHubNet Client Editorにインターフェイスを読み込みます。 |
|
|
Quit |
Exits NetLogo. (On a Mac, this item is on the NetLogo menu instead.) NetLogoを終了します。 (Macでは、この項目はNetLogoメニューにあります。) |
|
Edit | ||
|
|
Undo |
Undo last text editing action you performed. 最後に実行したテキスト編集操作を元に戻します。 |
|
|
Redo |
Redo last undo action you performed. 最後に実行した取り消し操作をやり直します。 |
|
|
Cut |
Cuts out or removes the selected text and temporarily saves it to the clipboard. 選択したテキストを切り取ったり、削除して、一時的にクリップボードに保存します。 |
|
|
Copy |
Copies the selected text. 選択したテキストをコピーします。 |
|
|
Paste |
Places the clipboard text where cursor is currently located. カーソルが現在置かれているクリップボードのテキストを配置します。 |
|
|
Delete |
Deletes selected text. 選択したテキストを削除します。 |
|
|
Select All |
Select all the text in the active window. アクティブウィンドウ内のすべてのテキストを選択します。 |
|
|
Find |
Finds a word or sequence of characters within the Info or Code tabs. InfoまたはCode タブ内の単語または文字列を検索します。 |
|
|
Find Next |
Find the next occurrence of the word or sequence you last used Find with. 最後に検索した単語または文字列の次の出現箇所を検索します。 |
|
|
Shift Left /
|
Used in the Code tab to change the indentation level of code. Codeのインデントレベルを変更するには、Code タブを使用します。 |
|
|
Comment /
|
Used in the Code tab to add or remove semicolons from code (semicolons are used in NetLogo code to indicate comments). Code(セミコロンは、NetLogoCodeでコメントを表すために使用されます)からセミコロンを追加または削除するには、Codeタブを使用します。 |
|
Snap to Grid |
When enabled new widgets stay on a 5 pixel grid so it is easier to line them up. (Note: this feature is disabled when zoomed in or out.) それらを整列する方が簡単なので、新しいwidgetsは5ピクセルグリッド上でご利用いただけます。 (注:zoomed in または outする場合は、この機能は無効になっています) | |
|
Tools | ||
|
|
Halt |
Stops all running code, including buttons and the command center. (Warning: since the code is interrupted in the middle of whatever it was doing, you may get unexpected results if you try to continue running the model without first pressing "setup" to start the model run over.) buttonsおよびcommand centerを含む実行中のすべてのCodeを停止します。 (警告:何をしていてもその途中で中断されるので、もし最初に "setup"を押すことなく、モデルの実行を開始しようとすると、予期しない結果を得る可能性があります) |
|
|
Globals Monitor |
Displays the values of all global variables. すべてのグローバル変数の値を表示します。 |
|
|
Turtle Monitor |
Displays the values of all of the variables in a particular turtle. You can can also edit the values of the turtle's variables and issue commands to the turtle. (You can also open a turtle monitor via the View; see the View section below.) 特定のタートルの持つすべての変数の値が表示されます。タートル変数およびissue commandsの値を編集することもできます。 (また、ビューを介してタートルモニタを開くことができます。以下のビューセクションを参照してください。) |
|
|
Patch Monitor |
Displays the values of all of the variables in a particular patch. You can can also edit the values of the patch's variables and issue commands to the patch. (You can also open a patch monitor via the View; see the View section below.) 特定のパッチ内のすべての変数の値が表示されます。パッチ変数およびissue commandsの値を編集することもできます。 (また、ビューを介してパッチモニタを開くことができます。以下のビューセクションを参照してください。) |
|
|
Link Monitor |
Displays the values of all of the variables in a particular link. You can can also edit the values of the link's variables and issue commands to the link. (You can also open a link monitor via the View; see the View section below.) 特定のリンク内のすべての変数の値が表示されます。リンク変数とissue commandsの値を編集することもできます。 (また、ビューを介してリンクモニタを開くことができます。以下のビューセクションを参照してください。) |
|
|
Close All Agent Monitors |
Closes all open agent monitor windows. 開いているすべてのエージェントモニタウィンドウを閉じます。 |
|
|
Hide/Show Command Center |
Makes the command center visible or invisible. (Note that the command center can also be shown or hidden, or resized, with the mouse.) command centerを、表わすことも表さないこともできます。 (コマンド·センターはマウスで、表示または非表示、またはサイズ変更できることに注意してください。) |
|
|
3D View |
Opens the 3D view. See the Views section for more information. 3Dビューを開きます。詳細については、Views セクションを参照してください。 |
|
|
Color Swatches |
Opens the Color Swatches. See the Color Section of the Programming Guide for details. 色見本を開きます。詳細についてはプログラミングガイドのColorセクションを参照してください。 |
|
|
Turtle Shapes Editor |
Draw turtle shapes. See the Shapes Editor Guide for more information. タートルの形を描画します。詳細については、Shapes Editor Guideを参照してください。 |
|
Link Shapes Editor |
Draw link shapes. See the Shapes Editor Guide for more information. リンク形状を描画します。詳細については、Shapes Editor Guide を参照してください。 | |
|
|
BehaviorSpace |
Runs the model over and over with different settings. See the BehaviorSpace Guide for more information. 異なる設定を持つモデルを繰り返して実行します。詳細については、BehaviorSpace Guideを参照してください。 |
|
|
System Dynamics Modeler |
Opens the System Dynamics Modeler. See the System Dynamics Modeler Guide for more details. System Dynamics Modelerを開きます。詳細については、System Dynamics Modeler Guide を参照してください。 |
|
|
HubNet Client Editor |
Opens the HubNet Client Editor. See the HubNet Authoring Guide for more details. HubNet Client Editorを開きます。詳細については、HubNet Authoring Guide を参照してください。 |
|
|
HubNet Control Center |
Disabled if no HubNet activity is open. See the HubNet Guide for more information. HubNetのactivityが開いていない場合は無効になります。詳細については、HubNet Guideを参照してください。 |
|
Zoom | ||
|
|
Larger |
Increase the overall screen size of the model. Useful on large monitors or when using a projector in front of a group. モデルの全体的な画面サイズを大きくします。グループの前でプロジェクターを使用する時や、大きなモニターを使う時に便利です。 |
|
|
Normal Size |
Reset the screen size of the model to the normal size. 通常のサイズにモデルの画面サイズをリセットします。 |
|
|
Smaller |
Decrease the overall screen size of the model. モデルの全体的な画面サイズを小さくします。 |
|
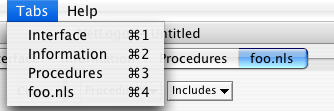
Tabs |
This menu offers keyboard shortcuts for each of the tabs. (On Macs, it's Command 1 through Command 3. On Windows, it's Control 1 through Control 3.) このメニューでは、各タブのキーボードショートカットを提供しています。 (Macでは、それはコマンド1~3です。Windowsでは、コントロール1~3です。) | |
|
Help | ||
|
|
About NetLogo |
Information on the current NetLogo version you are running. (On Macs, this menu item is on the NetLogo menu instead.) 実行している現在のNetLogoバージョンに関する情報です。 (Macでは、このメニューアイテムはNetLogoメニューにあります。) |
|
|
Look Up In Dictionary |
Opens a browser with the dictionary entry for the selected command or reporter. (You may also use the F1 key for this.) 選択したコマンドまたはレポーターの辞書エントリを持つブラウザを開きます。 (F1キーを使用することができます。) |
|
|
NetLogo User Manual |
Opens this manual in a web browser. Webブラウザでマニュアルを開きます。 |
|
|
NetLogo Dictionary |
Opens the NetLogo Dictionary in a web browser. WebブラウザでNetLogo辞書を開きます。 |
|
|
NetLogo Users Group |
Opens the NetLogo Users Group site in a web browser. WebブラウザでNetLogoユーザーグループサイトを開きます。 |
|
|
Donate |
Opens the NetLogo donation page in a web browser. WebブラウザでNetLogoの寄付ページを開きます。 |
At the top of NetLogo's main window are three tabs labeled "Interface", "Info" and "Code" . Only one tab at a time can be visible, but you can switch between them by clicking on the tabs at the top of the window.
NetLogoのメインウィンドウの上部に、 "Interface", "Info"と "Code"というラベルの付いた3つのタブがあります。一度に1つのタブのみが表示することができますが、ウィンドウ上部のタブをクリックして、それらを切り替えることができます。

Right below the row of tabs is a toolbar containing a row of controls. The controls available vary from tab to tab.
タブの行の右下は、コントロールの行を含むツールバーです。利用可能なコントロールは、タブごとに異なります。
The Interface tab is where you watch your model run. It also has tools you can use to inspect and alter what's going on inside the model.
モデルの実行を見ているところにInterfaceタブがあります。モデル内で起こっていることを調査して変更するために使用できるツールが用意されています。
When you first open NetLogo, the Interface tab is empty except for the view, where the turtles and patches appear, and the Command Center, which allows you to issue NetLogo commands.
NetLogoを最初に開いた時、Interfaceタブは、タートルとパッチが表示されるビュー、およびNetLogoのコマンドを発行できるコマンド·センターを除いて、空になっています。
The toolbar on the Interface tab contains buttons that let you edit, delete, and create items in the Interface tab and a menu that lets you select different interface items (such as buttons and sliders).
Interfaceタブのツールバーには、編集、削除、およびInterfaceタブの中でアイテムを創造できるボタンと、別のインターフェイス項目(例えば、ボタンやスライダなど)を選択できるメニューのボタンが含まれています。
The buttons in the toolbar are described below.
ツールバーのボタンは以下のとおりです。
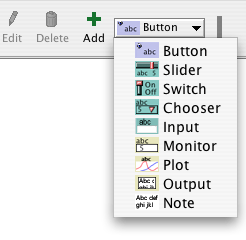
Adding: To add an interface element, select the element from the drop down menu. Note that the Add button stays down. Then click on the white area below the toolbar. (If the menu is already showing the right type, you can just press the Add button instead of using the menu again.)
追加: インタフェイス要素を追加するには、ドロップダウンメニューから要素を選択します。 追加buttonが押されたままであることに注意してください。次に、ツールバーの下の白い領域をクリックします。 (メニューが既に右のタイプを表示している場合は、もう一度メニューを使用する代わりに、追加ボタンを押すことができます。)
Selecting: To select an interface element, drag a rectangle around it with your mouse. A gray border with black handles will appear around the element to show it is selected.
選択: マウスを使ってその周りに四角形をドラッグし、インターフェイス要素を選択します。黒いハンドルの付いたグレーの境界線は、選択されて表示された要素の周囲に表示されます。
Selecting multiple items: You can select multiple interface elements at the same time by including them in the rectangle you drag. If multiple elements are selected, one of them is the "key" item, which means that if you use the "Edit" or "Delete" buttons on the Interface Toolbar, only the key item is affected. The key item's border is darker gray.
複数の項目を選択する: ドラッグする四角形の中にそれらを含めることにより、同時に複数のインターフェイス要素を選択することができます。複数の要素が選択されている場合は、そのうちの一つが"キー"の項目です。それは、インターフェイスのツールバーの " 編集 "または"削除" ボタンを使用している場合に、キー項目のみが影響を受けていることを意味します。キーアイテムは境界線が濃い灰色になっています。
Unselecting: To unselect all interface elements, click the mouse on the white background of the Interface tab. To unselect an individual element, right-click the element and choose "Unselect" from the popup menu.
選択解除: すべてのインターフェイス要素の選択を解除するには、Interfaceタブの白い背景の上でマウスをクリックします。個々の要素の選択を解除するには、要素を右クリックし、ポップアップメニューから "解除"を選択します。
Editing: To change the characteristics of an interface element, select the element, then press the "Edit" button on the Interface toolbar. You may also double click the element once it is selected. A third way to edit an element is to right-click it and choose "Edit" from the popup menu. If you use this last method, it is not necessary to select the element first.
編集: インタフェイス要素の特性を変更するには、要素を選択し、インタフェイスツールバーの "編集"ボタンを押します。一度それが選択されると、要素をダブルクリックして編集することもできます。要素を編集する三番目の方法は、それを右クリックし、ポップアップメニューから "編集"を選択することです。この最後の方法を使用する場合は、最初に要素を選択しておく必要はありません。
Moving: Select the interface element, then drag it with your mouse to its new location. If you hold down the shift key while dragging, the element will move only straight up and down or straight left and right.
移動: インターフェイス要素を選択して、新しい場所にマウスでドラッグします。ドラッグ中にShiftキーを押した場合、要素はまっすぐに上下または左右に移動します。
Resizing: Select the interface element, then drag the black "handles" in the selection border.
サイズ変更: インタフェイス要素を選択し、選択境界線の黒い "ハンドル"をドラッグします。
Deleting: Select the element or elements you want to delete, then press the "Delete" button on the Interface toolbar. You may also delete an element by right-clicking it and choosing "Delete" from the popup menu. If you use this latter method, it is not necessary to select the element first.
削除: 削除する要素、または複数の要素を選択して、Interface toolbarにある "削除"ボタンを押します。また、右クリックしてポップアップメニューから "削除"を選択して要素を削除することができます。この後者の方法を使用する場合は、最初に要素を選択しておく必要はありません。
To learn more about the different kinds of interface elements, refer to the chart below.
インターフェイス要素のさまざまな種類の詳細については、下表を参照してください。
| Icon & Name | Description | |
|---|---|---|
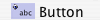
| A button is either once or forever. When you click on a once button, it executes its instructions once. The forever button executes the instructions over and over, until you click on the button again to stop the action. If you have assigned an action key to the button, pressing the corresponding keyboard key will act just like a button press when the button is in focus. Buttons with action keys have a letter in the upper right corner of the button to show what the action key is. If the keyboard focus is in another interface element such as the Command Center, pressing the action key won't trigger the button. The letter in the upper right hand corner of the button will be dimmed in this situation. To enable action keys, click in the white background of the Interface tab. ボタンは1回か永久かのどちらかです。1回ボタンをクリックすると、その命令を1回だけ実行します。永遠ボタンを押すと、もう一度ボタンをクリックしてあなたが行動を停止するまで、繰り返し命令を実行します。ボタンにアクションキーを割り当てた場合、(ボタンにフォーカスがあるときは)対応するキーボードのキーを押すだけでボタンを押すように動作します。アクションキーを持つボタンは、アクションキーが何であるかを示す文字をボタンの右上隅に持っています。キーボードフォーカスがそのようなコマンド·センターなどの別のインターフェイス要素である場合は、アクションキーを押すしても、ボタンがトリガされません。ボタンの右上隅にある文字はこのような状況では淡色表示されます。アクションキーを有効にするには、Interface タブの白い背景をクリックします。 | |

| Sliders are global variables, which are accessible by all agents. They are used in models as a quick way to change a variable without having to recode the procedure every time. Instead, the user moves the slider to a value and observes what happens in the model. | スライダーは、すべてのエージェントがアクセスできるグローバル変数です。それらは、処理を毎回recodeせずに変数を変更する簡単な方法として、モデルで使用されています。代わりに、ユーザーがスライダの値を動かして、モデルで何が起こるかを観察することができます。 |
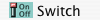
| Switches are a visual representation for a true/false global variable. You may set the variable to either on (true) or off (false) by flipping the switch. | スイッチは、true / falseでグローバル変数を視覚的に表現しています。スイッチを切り替えることによってオン(true)またはオフ(false)のいずれかに変数を設定することができます。 |
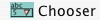
| Choosers let you choose a value for a global variable from a list of choices, presented in a drop down menu. The choices may be strings, numbers, booleans, or lists. | チューザを使用すると、ドロップダウンメニューに表示される選択肢のリストから、グローバル変数の値を選択することができます。選択肢は文字列、数値、booleans、またはリストがあります。 |

| Input Boxes are global variables that contain strings or numbers. The model author chooses what types of values you can enter. Input boxes can be set to check the syntax of a string for commands or reporters. Number input boxes read any type of constant number reporter which allows a more open way to express numbers than a slider. Color input boxes offer a NetLogo color chooser. | 入力ボックスは、文字列または数値を含むグローバル変数です。モデル作成者は、入力できる値のタイプを選択します。入力ボックスは、コマンドやreportersの文字列の構文をチェックするように設定できます。数値入力ボックスは、スライダーよりも数字を表現するためのよりオープンな方法を可能にする一定数のレポーターの任意の型を読みます。色の入力ボックスはNetLogoのカラーチューザ(Color Chooser)を提供します。 |
| Monitors display the value of any reporter. The reporter could be a variable, a complex reporter, or a call to a reporter procedure. Monitors automatically update several times per second. | モニターは、reportersの値を表示します。reportersは、変数、複雑なレポーター、またはレポーター処理の呼び出しである可能性があります。モニターは自動的に毎秒数回更新します。 |
| Plots show data the model is generating. | プロットは、モデルが生成したデータを表しています。 |
| The output area is a scrolling area of text which can be used to create a log of activity in the model. A model may only have one output area. | 出力領域は、モデル内のactivityのログを作成するために使用できるテキストのスクロール領域です。モデルは出力領域を1つだけ持つことができます。 |

| Notes lets you add informative text labels to the Interface tab. The contents of notes do not change as the model runs. | ノートには、Interface tabに有益なテキストラベルを追加することができます。モデルの実行時にノートの内容は変更されません。 |
The other controls in the Interface toolbar allow you to control the view updates and various other model properties.
インターフェイスのツールバーにある他のコントロールでは、ビューの更新や他の様々なモデルのプロパティを制御することができます。

"Continuous" updates means that NetLogo updates (that is, redraws) the view many times a second, regardless of what is going on in the model. "Tick-based" updates means that the view only updates when the tick counter advances. (For a fuller discussion of view updates, see the Programming Guide.)
"連続"の更新は、モデルで何が起こっているかに関係なくNetLogoビューを1秒間に何回も更新(再描画)することを意味します。 " Tick-based "更新は、目盛りカウンタが進んだときだけビューを更新することを意味します。 (ビューの更新の、より全体的な議論についてはProgramming Guideを参照してください。)
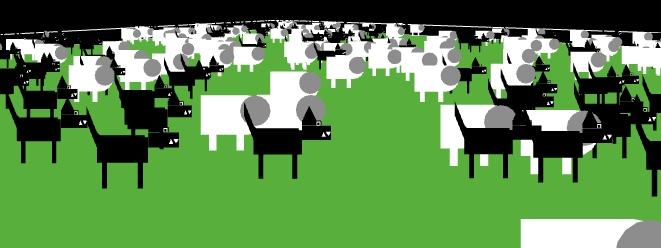
The large black square in the Interface tab is the 2D view. It's a visual representation of the NetLogo world of turtles and patches. Initially it's all black because the patches are black and there are no turtles yet. You can open the 3D View, an alternate visual representation of the world, by clicking on the "3D" button in the View Control Strip.
視覚的に表現しています。パッチが黒くて、タートルはまだないので、最初はすべて黒です。ビューコントロールバーで "3D"ボタンをクリックして、3Dビューという世界の別の視覚的表現を開くことができます。

The three sets of black arrows in the upper left let you change the size of the world. When the origin is centered the world will grow in increments of two, adding one to the maximum and subtracting one from the minimum. If one of the edges is set to 0 the world will grow by one in the other direction to keep the origin along the edge. If the origin is at a custom location the black arrows will be disabled.
左上の黒い矢印の3セットで、世界のサイズを変更することができます。原点が中心のとき、最大に1を追加し、最小値から1を引いて、世界は二つ大きくなります。エッジの一つが0に設定されている場合、世界は縁に沿って原点を維持するために他の方向のいずれかに成長します。原点がカスタムの場所にある場合は、黒の矢印は無効になります。
There are a number of settings associated with a view, accessed through the "Settings..." button.
ビューに関連付けられている多くの設定があります。;"設定..."ボタンをクリックしてアクセスします。
Notice that the control strip in the 3D View combines the ticks counter from the 2D view control strip and the controls from the right portion of the interface toolbar.
3Dビュー内のコントロールstripは、2DビューコントロールstripからのTickカウンターと、interface toolbarの右側の部分からのコントロールを組み合わせていることに注意してください。

Here are the settings for the View (accessible by editing the View, or by pressing the "Settings..." button in the Interface Toolbar):
ビューの設定は、次のとおりです。(ビューを編集することによってアクセスできる、またはInterface Toolbarで "設定..."ボタンを押す)
Notice that the settings are broken up into three groups. There are world, view, and ticks counter settings. World settings affect the properties of the world that the turtles live in (changing them may require resetting the world). View and tick counter settings only affect the appearance, changing them will not affect the outcome of the model.
設定は3つのグループに分割されることに注意してください。世界、ビュー、およびTickカウンターの設定があります。世界の設定は、タートルが(それらを変更すると世界のリセットを求められる場合があります)住んでいる世界の属性に影響を与えます。ビューとTickカウンターの設定は外観のみに影響を与え、それらを変更してもモデルの結果には影響しません。
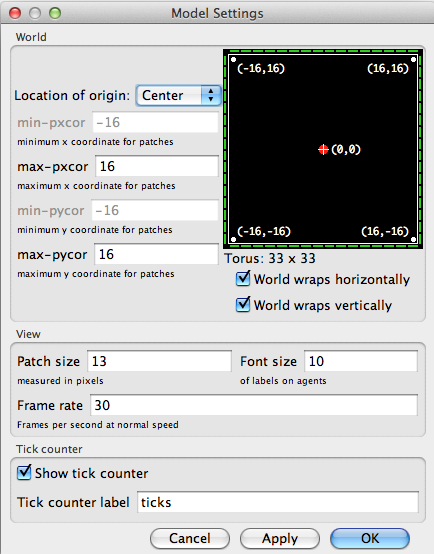
The world settings allow you to define the boundaries and topology of the world. At the top of the left side of the world panel you can choose a location for the origin of the world either "Center", "Corner", "Edge", or "Custom". By default the world has a center configuration where (0,0) is at the center of the world and you define the number of patches from the center to the right and left boundaries and the number of patches from the center to the top and bottom boundaries. For example: if you set Max-Pxcor = 10, then Min-Pxcor will automatically be set to -10, thus there are 10 patches to the left of the origin and 10 patches to the right of patch 0 0, for a total of 21 patches in each row.
世界の設定では、世界の境界とトポロジーを定義することができます。世界パネルの左側の上部で、世界の起源の場所 "センター"、 "コーナー"、 "エッジ"、または "カスタム"のいずれかを選択できます。初期値では、世界は(0,0)が世界の中心である中央の環境設定があります。中心から右と左の境界までのパッチの数と、中心から上下の境界までのパッチの数を定義することができます。例えば:マックスPxcor = 10を設定した場合、その後のMin-Pxcorが自動的に-10に設定されます。従って、中心のパッチの左に10、(0,0)のパッチの右に10、合計で21のパッチが各行にできます。
A Corner configuration allows you to define the location of the origin as one of the corners of the world, upper left, upper right, lower left, or lower right. Then you define the far boundary in the x and y directions. For example if you choose to put the origin in the lower left corner of the world you define the right and top (positive) boundaries.
コーナーの環境設定は、世界の四隅の一つとしての起点位置、左上、右上、左下、または右下を定義することができます。次に、xとy方向に最も遠い境界を定義します。例えば、世界の左下隅に原点を置くことを選択した場合、右、上(正の)境界を定義します。
Edge mode allows you to place the origin along one of the edges (x or y) then define the far boundary in that direction and both boundaries in the other. For example if you select edge mode along the bottom of the world, you must also define the top boundary, as well as the left and the right.
エッジモードは、エッジの1つに沿って(xまたはy)原点を配置します。その方向に最も遠い境界およびその他の両方の境界を定義することができます。例えば、世界の底に沿ってエッジモードを選択した場合、左と右の境界を定義するのと同様に上の境界も定義する必要があります。
Finally, Custom mode allows you to place the origin at any location in the world, though patch 0 0 must still exist in the world.
最後に、パッチ0は世界に存在しなければなりませんが、カスタムモードでは、世界のどの場所にも原点を置くことができます。
As you change the settings you will notice that the changes you make are reflected in the preview on the right side of the panel which shows the origin and the boundaries. The width and height of the world are displayed below the preview.
設定を変更すると、その変更が、原点と境界を示すパネルの右側にプレビューに反映されていることがわかります。世界の幅と高さは、プレビューの下に表示されます。
Also below the preview there are two checkboxes, the world wrap settings. These allow you to control the topology of the world. Notice when you click the check boxes the preview indicates which directions allow wrapping, and the name of the topology is displayed next to the world dimensions. See the Topology section of the Programming Guide for more information.
また、プレビューの下に世界のラップの設定をする二つのチェックボックスがあります。これらで世界のトポロジを制御することができます。チェックボックスをクリックしたときに、プレビューの方向はラップできるようになることを示し、トポロジの名前は世界の大きさの横に表示されていることに注意してください。詳細についてはTopology section of the Programming Guideを参照してください。
The view settings allow you to customize the look of the view without changing the world. Changing view settings will never force a world reset. To change the size of the 2D View adjust the "Patch Size" setting, measured in pixels. This does not change the number of patches, only how large the patches appear in the 2D View. (Note that the patch size does not affect the 3D View, as you can simply make the 3D View larger by making the window larger.)
ビューの設定では、世界を変えることなく、ビューの外観をカスタマイズすることができます。ビューの設定を変更することは、世界のリセットを強制することはありません。 2Dビューのサイズを変更するには、ピクセル単位の "パッチサイズ"設定を調整します。このことはパッチの数を変更することはなく、2Dビューに表示される大きさだけを変更します。 (単にウィンドウを大きくすることにより、大規模な3Dビューを単純に作るときには、パッチのサイズは、3Dビューに影響を与えないことに注意してください。)
The font size setting lets you control the size of turtle, patch, and link labels.
フォントサイズの設定は、タートル、パッチ、およびリンクのラベルのサイズを制御することができます。
The frame rate controls how often the view gets updated. This can have a dramatic effect on the default speed at which a model runs. For more details, see the view updates section of the Programming Guide.
フレームレートは、ビューが更新される頻度を制御します。これは、モデルを実行するときに初期値の速度に劇的な効果を持ちます。詳細については、プログラミングガイドの view updates section を参照してください。
The "Smooth edges" checkbox controls the use of anti-aliasing in the 3D view only and only appears when editing from the 3D view. Unchecking it makes lines appear more jagged but may speed up rendering.
" Smooth edges "チェックボックスは、3Dビューのアンチエイリアスの使用だけを制御し、3Dビューから編集しているときのみ表示されます。それをオフにすると線がギザギザに表示されますが、renderingのスピードを上げることができます。
Tick counter settings control the appearance of the tick counter which is visible (or not) in the view control strip.
Tickカウンターの設定は、ビューコントロールstripに表示されている(またはしない)Tickカウンターの外観を制御します。
Turtle, patch and link monitors are easily available through the View, just right-click on the turtle or patch you want to inspect, and choose "inspect turtle ..." or "inspect patch ..." from the popup menu. You can also watch, follow or ride a turtle by selecting the appropriate item in the turtle sub-menu. (Turtle, patch and link monitors can also be opened from the Tools menu or by using the inspect command.)
タートル、パッチ、およびリンクモニタは、ビューを介して容易に入手可能であり、ちょうど検査したいタートルやパッチを右クリックし、"タートルの検査..."または "パッチを検査"をポップアップメニューから選択します。また、タートルのサブメニューで該当する項目を選択することにより、タートルを見たり、従ったり、乗ることができます。 (タートル、パッチ、およびリンクモニタは、Tools menuから、またはinspect コマンドを使用して開くことができます。)
Some NetLogo models let you interact with the turtles and patches with your mouse by clicking and dragging in the View.
いくつかのNetLogoモデルでは、マウスを使ってビューでクリックしてドラッグすることによって、タートルやパッチとあなたとの間で相互作用することができます。
At the bottom of the window there are buttons to move the observer, or change the perspective from which you are looking at the world.
ウィンドウの下部にオブザーバを移動したり、世界を見て、そこから視点を変更するbuttonsがあります。

A blue cross appears at the current focus point as you adjust these settings. The little blue triangle will always point along the y-axis in the positive direction, so you can orient yourself in case you get lost.
これらの設定を調整すると青い十字は、現在のフォーカス·ポイントに表示されます。小さな青い三角形が常にy軸の正の方向に沿って指すので、向きが迷子になった場合に向きを判断することができます。

To look at the world from a different angle, press the "rotate" button, then click and drag the mouse. The observer will continue to face the same point as before (where the blue cross is) but its position in the relation to the xy-plane will change.
別の角度から世界を見て、"回転"ボタンを押して、クリックしてマウスをドラッグしてください。オブザーバは、前と同じポイントに直面しています(ブルーのクロスがあるところ)が、xy平面との関係でその位置は変更されます。
To move closer or farther away from the world or the agent you are watching, following or riding, press the "zoom" button and drag up and down. Note when you are in follow or ride mode zooming will switch you between ride and follow, since ride is just a special case of follow where the distance at which you are following is 0.
見たり、従ったり、乗ったりしているエージェントや世界に近づいたり遠ざかったりするには、"ズーム"ボタンを押すと、上下にドラッグします。乗るのは、従っているときの距離が0の特別なケースに過ぎないので、従うか乗るモードのとき、ズーミングは乗ると従うの間で切り替えられることに注意してください。
To change the position of the observer without changing the direction it is facing select the "move" button and drag the mouse inside the 3D View while holding down the mouse button.
向いている方向を変えることなく、"移動"ボタンを選択し、マウスボタンを押しながら 3Dビュー内でマウスをドラッグして観察者の位置を変更することができます。
To allow the mouse position and state to be passed to the model select the "interact" button and it will function just as the mouse does in the 2D view.
"相互作用"ボタンを選択して、マウスの位置と状態をモデルに渡せるようにすると、2Dビューでマウスと同様に機能します。
To return the observer and focus point to their default positions press the "Reset Perspective" button (or use the reset-perspective command).
観察者とフォーカスポイントを初期値の状態に戻すには、"リセット視点"ボタン(またはreset-perspectiveのコマンドを使用します)を押します。
Fullscreen Mode
To enter fullscreen mode, press the "Full Screen" button, to exit fullscreen mode, press the Esc key.
フルスクリーンモードに入るには、"フルスクリーン"buttonsを押します。フルスクリーンモードを終了するには、Escキーを押します。
Note: Fullscreen mode doesn't work on every computer. It depends on your graphics card. See the System Requirements for details.
注: フルスクリーンモードでは、すべてのコンピュータで動作するわけではありません。グラフィックカードに依存しています。詳細についてはSystem Requirementsを参照してください。
3D Shapes
Some shapes are automatically mapped to true 3D counterparts in the 3D view. For example, the 2D circle shape becomes a sphere in the 3D view.
いくつかの図形は、自動的に3Dビュー内で、真の3Dに対応して表示されます。たとえば、2Dの円の形状は、3Dビュー内で球になります。
| Shape name | 3D shape |
| default | 3D turtle shape |
| circle | sphere |
| dot | small sphere |
| square | cube |
| triangle | cone |
| line | 3D line |
| cylinder | 3D cylinder |
| line-half | 3D line-half |
| car | 3D car |
All other shapes are based on their 2D forms. If a shape is a rotatable shape, it is assumed to be a top view and it is extruded as if through a cookie cutter and oriented parallel to the xy-plane, as in Ants.
他のすべての図形は、2Dの形に基づいています。回転可能な形状であれば、それは上から見た図とみなされ、蟻のように、クッキー型で押したxy平面に平行に押し出されます。

Or, if a shape is non-rotatable, it is assumed to be a side view, and it is drawn always facing the observer, as in Wolf Sheep Predation.
形状が非回転である場合、横から見た図とみなされ、それは狼羊の捕食で見られたように、常に観察者に対面して描画されます。
The Command Center allows you to issue commands directly, without adding them to the model's procedures. This is useful for inspecting and manipulating agents on the fly.
command centerは、モデルの処理に追加することなく、直接コマンドを発行することができます。これは、その場でエージェントを検査して操作するのに便利です。
(Tutorial #2: Commands is an introduction to using commands in the Command Center.)
(Tutorial #2: Commands は、command centerでコマンドを使うための入門書です。)
Let's take a look at the design of the Command Center.
コマンド·センターの設計を見てみましょう。
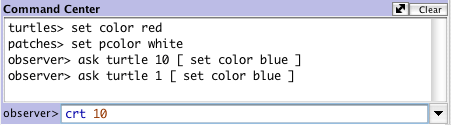
The smaller box, below the large box, is where you type a command. After typing it press the Return or Enter key to run it.
大型ボックスの下の小さなボックスは、コマンドを入力する場所です。入力したら実行するためには、ReturnキーかEnterキーを押します。
To the left of where you type is a popup menu that initially says "observer>". You can choose either observer, turtles, or patches, to specify which agents run the command you type.
タイプしたところの左は、最初に "観察者>"というポップアップメニューになっています。入力した命令を実行するエージェントを指定するために、オブザーバー、タートル、またはパッチのいずれかを選択できます。
Tip: a quicker way to change agent types is to use the Tab key.
ヒント:エージェント·タイプを変更する迅速な方法は、Tabキーを使用することです。
Reporters
If you enter a reporter into the Command Center, the show command will be inserted before it automatically.
コマンド·センターにレポーターを入力した場合は、showコマンドは、自動的にそれの前に挿入されます。
Accessing previous commands
After you type a command, it appears in the large scrolling box above the command line. You can use Copy on the Edit menu in this area to copy commands and then paste them elsewhere, such as the Code tab.
コマンドを入力した後、コマンドラインの上の大きなスクロールボックスに表示されます。コマンドをコピーして別の場所に貼り付けるには、このようなCodeタブをこの領域で編集メニューのコピーを使用することができます。
You can also access previous commands using the history popup, which is the small downward pointing triangle to the right of where you type commands. Click on the triangle and a menu of previously typed commands appears, so you can pick one to use again.
入力したコマンドの右にある小さな下向きの三角形の履歴ポップアップを使用して、前のコマンドにアクセスできます。三角形をクリックすると、以前に入力したコマンドのメニューが表示されます。再び使用するように1つを選択することができます。
Tip: a quicker way to access previous commands is with the up and down arrow keys on your keyboard.
ヒント:前のコマンドにアクセスするより速い方法は、キーボードの上下矢印キーを使用することです。
Clearing
To clear the large scrolling area containing previous commands and output, click "clear" in the top right corner.
前のコマンドと出力を含む大きなスクロール領域を消去するには、右上隅にある "クリア"をクリックします。
To clear the history popup menu, choose "Clear History" on that menu.
履歴ポップアップメニューをクリアするには、そのメニューの "履歴のクリア"を選択します。
Arranging
You can hide and show the command center using the Hide Command Center and Show Command Center items on the Tools menu.
ツールメニューの非表示コマンド·センターおよびShowコマンド·センターの項目を使用してコマンド·センターを表示することができます。
To resize the command center, drag the bar that separates it from the model interface. Or, click one of the little arrows on the right end of the bar to make the command center either very big or hidden altogether.
コマンド·センターのサイズを変更するには、モデルのインターフェイスから分かれているバーをドラッグします。または、完全に非常に大きくする、または非表示にするコマンド·センターを作るためのバーの右端の小さな矢印のいずれかをクリックします。
To switch between a vertical command center and a horizontal one, click the button with the double-headed arrow, just to the left of "Clear".
垂直方向と水平方向のコマンド·センターを切り替えるには、"クリア"のちょうど左側の二重矢印の付いたボタンをクリックします。
When the mouse pointer is over the white area of a plot, the x and y coordinates of the mouse location appear. (Note that the mouse location might not correspond exactly to any actual data points in the plot. If you need to know the exact coordinates of plotted points, use the Export Plot menu item and inspect the resulting file in another program.)
マウスポインタがプロットの白い部分の上にあるとき、マウス位置のx座標とy座標が表示されます。 (マウスの位置がプロット内の任意の実際のデータポイントに正確に対応していない可能性があることに注意してください。プロット点の正確な座標を知る必要がある場合には、エクスポートプロットメニュー項目を使用して、別のプログラムで生成されたファイルを検査してください)。
When you create a plot, as with all widgets, the edit dialog automatically appears.
プロットを作成する場合は、すべてのパーツと同様、編集ダイアログが自動的に表示されます。
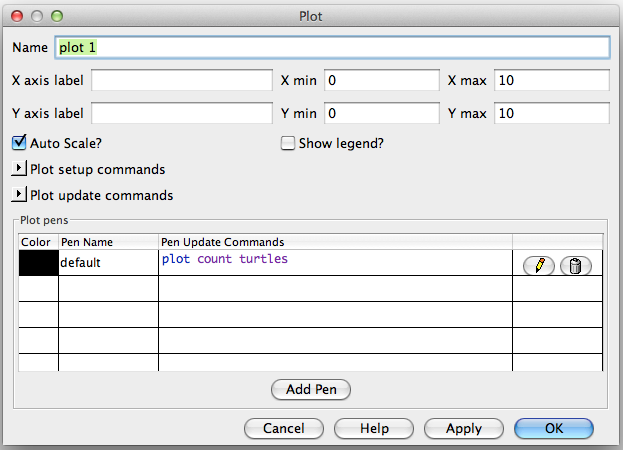
Many of the fields are fairly self-explanatory, such as the name of the plot, labels for the x and y axes, ranges for the axes, and the "Show legend?" checkbox.
プロットの名前、x軸とy軸のラベル、軸の範囲、" Show legend?"チェックボックスのように、フィールドの多くはかなり自己説明的です。
If Auto Scale? is checked the x and y changes will automatically readjust as points are added to the plot if they are outside the current range.
オートスケール?がチェックされると、xとyの変更は自動的に再調整されます。現在の範囲の外である場合、ポイントがプロットに追加されます。
Under "Plot setup commands" and "Plot update commands" you can enter commands that will automatically be run at appropriate times. Click the little triangle to open the text box for the commands. Plot commands are explained in more detail in the Plotting section of the Programming Guide.
"プロットのsetupコマンド"と "プロットの更新コマンド"の下には、自動的に適切なタイミングで実行されるコマンドを入力することができます。コマンドのテキストボックスを開くには、小さな三角形をクリックします。プロットコマンドは、プログラミングガイドのプロットセクションで詳しく説明されています。
In the plot pens section of the dialog, you can create and customize your plot's pens. Each table row represents a pen. By default there is one pen named "default". (You may wish to change it to a name that has meaning in your model.)
ダイアログのプロットペンセクションでは、プロットするペンを作成し、カスタマイズすることができます。テーブルの各行は、ペンを表しています。初期値では "default"という名前のペンが1つあります。 (あなたのモデルの中で意味を持っている名前に変更したいかもしれませんね。)
To edit the color of a pen click the colored rectangle to the left of the pen's name. This will bring up a dialog that allows you to set the color to one of the NetLogo base hues or a custom color using the color swatches.
ペンの色を編集するには、ペンの名前の左にある色付きの長方形をクリックします。色見本を使用して、NetLogoベースの色相またはカスタムカラーのいずれかに色を設定できるダイアログが表示されます。
To edit the pen's name, double click the name.
ペンの名前を編集するには、名前をダブルクリックします。
In the "Pen Update Commands" column you can enter commands
that will be run when reset-ticks, tick, or
update-plots commands are run. This is explained in more
detail in the Plotting section of the Programming Guide.
"ペンの更新コマンド"列には、reset-ticks、tick、またはupdate-plotsコマンドが実行されるときに実行されるコマンドを入力することができます。プログラミングガイドのプロットセクションで詳しく説明されています。
The last column has two buttons. Clicking the pencil icon will bring up an edit dialog with additional pen settings. The trash can button deletes the pen.
最後の列は2つのボタンがあります。鉛筆アイコンをクリックすると、追加のペンの設定ができる編集ダイアログが表示されます。ゴミ箱ボタンは、ペンを削除できます。
Clicking a pen's edit button will open this dialog:
ペンの編集ボタンをクリックすると、このダイアログボックスが開きます。
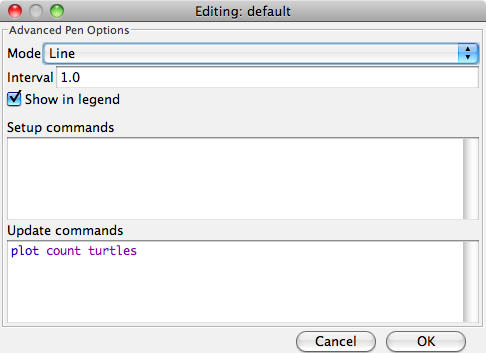
reset-ticks or
setup-plots runs.
tick or update-plots
runs. This field reappears in the advanced dialog to provide space
for editing lengthier sets of commands.
reset-ticksまたはsetup-plotsを実行させるコマンドを入力することができます。
tickやupdate-plotsが実行される時に実行させるコマンドを入力することができます。このフィールドは、コマンドのより長いセットを編集するためのスペースを提供する高度なダイアログを再表示します。
For more detailed information on how each of these features works you can see the Plotting Section of the Programming Guide.
これらの各機能がどのように動作するかの詳細についてはプログラミングガイドのプロットの項を参照することができます。
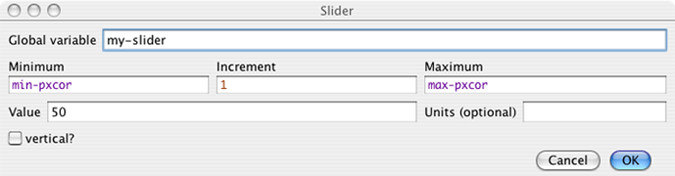
A slider has an associated global variable. Moving the slider changes the variable's value.
スライダーは、関連付けられたグローバル変数を持っています。スライダーを移動すると、変数の値を変更します。
When you place a slider in the Interface tab the edit dialog automatically opens, as with all widgets. Most of the fields will be familiar. However, it is important to notice the the minimum, maximum and increment fields will take any reporter, not just constants. So, for example, you could make the minimum min-pxcor and the maximum max-pxcor and the slider bounds will automatically adjust when you change the size of the world.
Interfaceタブにあるスライダを配置するとき、編集ダイアログが自動的にすべてのパーツと同様に開きます。フィールドのほとんどは、おなじみですね。しかし、最小値、最大値と増加したフィールドは任意のレポーターも取りえて、定数ではないことに注意することが重要です。したがって、たとえば、最小min-pxcorと最大max-pxcorを作ることができて、世界の大きさを変更したときにスライダーの範囲は自動的に調整されます。
Agent monitors display both the values of all the variables for a particular agent and a mini-view that shows the agent and a small area around it.
エージェントのモニタは、特定のエージェントのすべての変数と、エージェントとその周辺の小さな領域を示すミニビューの、両方の値を表示します。
You can open agent monitors through the Tools menu or the inspect command.
ツールメニューまたはinspectコマンドからエージェント·モニターを開くことができます。
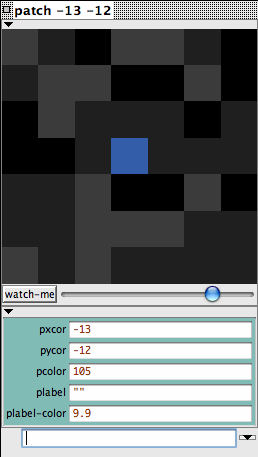
You can zoom in or out using the slider beneath the view and you can watch the agent in the main view using the watch-me button.
ビューの下のスライダーを使用してズームインまたはズームアウトすることができます。watchボタンを使用して、メインビューでエージェントを見ることができます。

Below the slider the current value of each agent variable is displayed. You can enter a new value. It will be as if, for example, the code set pcolor ... had run.
スライダーの下に各エージェント変数の現在値が表示されます。新しい値を入力することができます。たとえば、set pcolor blueのコードを実行すると次のようになります。
Below the agent variable area there is a mini-command center. Rather than running code as the observer, or talking to all of the turtles, patches, or links, the code entered in this command center is run only by this agent.
エージェント変数領域の下にミニコマンド・センターがあります。観察者としてCodeを実行するか、タートル、パッチ、またはすべてのリンクに話すか、このコマンド・センターに入力されたCodeは、このエージェントによってのみ実行されます。

You can close an agent monitor by clicking the box in the upper left corner, or by pressing the Esc key. If you hold down shift while you click the box all open agent monitors will close or you can close all the agent monitors using the "Close All Monitors" option in the Tools Menu.
左上隅にあるボックスをクリックするかEscキーを押すことによって、エージェントのモニタを閉じることができます。Shiftキーを押しながらボックスをクリックすると、開いているすべてのエージェントモニタが閉じます。またはツールメニューの " Close All Monitors "オプションを使用してすべてのエージェントモニタを閉じることができます。
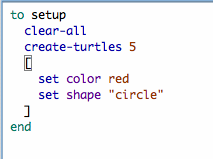
The Code tab is where the code for the model is stored. Commands you only want to use immediately go in the Command Center; commands you want to save and use later, over and over again, are found in the Code tab.
CodeタブにモデルのCodeが格納されています。すぐに使用したいコマンドは、コマンド·センターに行ってください。:何度も繰り返して、saveして後で使いたいコマンドは、Code タブに記載されています。
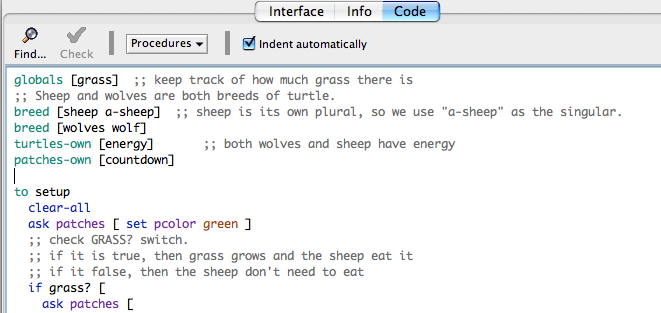
To determine if the code has any errors, you may press the "Check" button. If there are any syntax errors, the Code tab will turn red, the code that contains the error will be highlighted, and an error message will appear.
コードにエラーがあるかどうかを判断するには、 "チェック"ボタンを押します。構文エラーがある場合は、Codeタブが赤色に変わります。エラーを含むCodeが強調表示され、エラーメッセージが表示されます。
Switching tabs also causes the code to be checked, so if you just switch tabs, pressing the Check button first isn't necessary.
タブを切り替えるときには、Codeがチェックされます。タブを切り替えるなら、最初にチェックボタンを押す必要はありません。
To find a fragment of code in the procedures, click on the "Find" button in the Code toolbar and the Find dialog will appear.
プロシージャ内のCodeの断片を見つけるには、Code toolbarにある " Find "ボタンをクリックすると検索ダイアログが表示されます。
You may enter a word or phrase to find, and optionally also a new word or phrase to replace it with. The "Ignore case" checkbox controls whether the capitalization must be the same to indicate a match.
新しい単語やフレーズを入力して、見つけます。また、任意に新しい単語やフレーズを置き換えることもできます。" Ignore case "チェックボックスは、大文字が一致しなければならないかどうかを制御します。
If the "Wrap around" checkbox is checked, the entire Code tab will be checked for the phrase, starting at the cursor position. When it reaches the end it will return to the top, otherwise only the area from the cursor position to the end of the Code tab will be searched. The "Next" and "Previous" buttons will move down and up to find another occurrence of the search phrase.
" Wrap around "チェックボックスがチェックされている場合は、全体のCodeタブはカーソル位置から始まるフレーズがチェックされます。終わりに達すると先頭に戻ります。さもなければ、カーソル位置からCodeタブの最後までの領域のみが検索されます。"次"と "戻る"ボタンは、別の検索フレーズの出現を見つけるために上下に移動します。
"Replace" changes the currently selected phrase with the replace phrase and "Replace & Find" changes the selected phrase and moves to the next occurrence. "Replace All" will change all instances of the the find phrase in the search area with the replace phrase.
"置換"は、現在選択されているフレーズを置換語句と変更し、 "置換&検索"は、選択したフレーズを変更して次の出現箇所に移動します。 "すべて置換"は、検索エリアで見つけたフレーズのすべての要素を置換語句で置き換えます。
To find a particular procedure definition in your code, use the "Procedures" popup menu in the Code tab. The menu lists all procedures in alphabetical order.
"置換"は、現在選択されているフレーズを置換語句と変更し、 "置換&検索"は、選択したフレーズを変更して次の出現箇所に移動します。 "すべて置換"は、検索エリアで見つけたフレーズのすべての要素を置換語句で置き換えます。
The "Shift Left", "Shift Right", "Comment", and "Uncomment" items on the Edit menu are used in the Code tab to change the indentation level of your code or add and remove semicolons, which mark comments, from sections of code.
"置換"は、現在選択されているフレーズを置換語句と変更し、 "置換&検索"は、選択したフレーズを変更して次の出現箇所に移動します。 "すべて置換"は、検索エリアで見つけたフレーズのすべての要素を置換語句で置き換えます。
For more information about writing procedures, read Tutorial #3: Procedures and the Programming Guide.
プロシージャを作成する方法の詳細については、Tutorial #3: ProceduresとProgramming Guideをお読みください。
Caution: The includes facility is new and experimental.
注意:以下の項には新しい実験的なものが含まれています。
When you add the __includes keyword to a model a menu to the right of the procedures menu appears. This is the includes menu which lists all the NetLogo source files (.nls) included in this file.
__includesというキーワードをモデルに追加したときに、処理メニューが表示される右側にメニューが現れます。これは、このファイルに含まれるすべてのNetLogoソースファイル(NLS)がリストされているメニューです。
You can choose a file name from the menu to open a tab for that file, or you can open a new or existing file using New Source File and Open Source File, respectively.
ファイル名をそのファイルのタブを開いて選ぶことができます。または、新しいソースファイルとオープンソースファイルを使用して、新規または既存のファイルをそれぞれ開くことができます。
Once you've opened new tabs they become accessible from the Tabs menu, and you can use the keyboard to move from tab to tab (Command + number on Mac, Control + number on other operating systems).
一度新しいタブを開くと、タブメニューからアクセスできるようになります。そして、タブからタブに移動するのにキーボードを使用することができます。(Macではコマンド+数字、その他OSではコントロール+数字)
When the Indent Automatically checkbox is selected, NetLogo will automatically attempt to align your code in a logically structured format. For example, when you open a set of square brackets "[" (perhaps after an if statement), NetLogo will automatically add spaces so that the following lines of code are two spaces further indented than the bracket. When you close the square brackets the closing bracket will be lined up with the matching open bracket.
自動インデントチェックボックスが選択されていると、NetLogoは自動的に論理構造形式でCodeを整列しようとします。たとえば、角括弧のセットを開くときに(おそらくif文の後)NetLogoは自動的に次のCode行にブラケットよりさらに2文字のインデントになるようにスペースを追加します。角括弧を閉じたとき、閉じ括弧が対応する開き括弧と並んで表示されます。
NetLogo will try to indent the code as you type, but you can also press the tab key anywhere on any line to ask NetLogo to indent the line immediately. Or, you can select a whole region of code and press the tab key to re-indent all of it.
NetLogoは入力したCodeをインデントしようとしますが、NetLogoにすぐに行をインデントするように依頼するするには、任意の行の任意の場所でTabキーを押すことでできます。または、Codeの全体の領域を選択し、Tabキーを押すことですべてを再インデントすることができます。
NetLogo always saves and loads models in the UTF-8 character encoding, which includes a wide range of international characters.
NetLogoは常に保存され、国際的な文字の広い範囲を含むUTF-8文字エンコーディングでモデルを読み込みます。
If you are in a locale other than U.S. English, let us know if you have any trouble using your local character set.
アメリカ英語以外のローカルである場合、ローカル文字セットを使用して問題が発生したら私達に知らせてください。
The Transition Guide has advice on converting models containing international characters from earlier NetLogo versions.
移行ガイド は、以前のNetLogoバージョンから国際化文字を含むモデルを変換する際のアドバイスをしています。
Most of NetLogo's GUI, and some of its error messages, are now "internationalized". This means that it is now possible to display NetLogo in different languages.
NetLogoのGUIのほとんど、そしてそのエラーメッセージのいくつかは、今では "国際化"されています。異なる言語でNetLogoを表示することが可能になっていることを意味します。
We say "possible" here because the current release of NetLogo only supports English, Spanish, Chinese, and Russian.
NetLogoの現在のリリースは、英語、スペイン語、中国語、ロシア語でのみサポートしているため、ここでは "可能"と言います。
The work on internationalization is not complete. We are asking for help from the user community in helping us localize items such as the menus and error messages.
国際化の作業は完了していません。我々は、私たちは、メニューやエラーメッセージなどのアイテムをローカライズするためのユーザー·コミュニティからの助けを求めています。
By default, NetLogo uses the same language your operating system is set to, if available. (If unavailable, you get English.)
ある言語がNetLogoによってサポートされている場合、初期設定では、NetLogoは、OSの言語を使用しています。お使いのOSがスペイン語に設定されている場合、NetLogoをスペイン語で開く必要があります。これらの言語の翻訳を一度実行すると、同様に他の言語にもtrueになります。あなたの言語が現在サポートされていない場合は、NetLogoは英語に後退します。
You can record a preference for a different language by typing __change-language (that's two underscore characters at the start) into the Command Center. A dialog will open allowing you to choose from the supported languages. Once a new language is chosen you will have to restart NetLogo.
それらが追加されれば、英語のユーザーは他の言語を試してみたいかもしれません。これを行うには、一時的に使用のOSの言語設定を変更してすることができます。または、言語変更プリミティブを使用してもできます。(単にコマンド·センターにそれを入力して行います)サポートされている言語から選択できるダイアログを開きます。新しい言語が選択されると、NetLogoを再起動する必要があります。NetLogoを再起動すると、新しい言語で表示されます。この新しい言語の選択はNetLogoが起動するたびに、この選択を使用するように保存されます。通常の言語に戻すには、単に再び言語変更プリミティブを使用します。
We hope NetLogo will become available in many different languages. If you would like to translate NetLogo to your language, see this wiki page for instructions.
我々はNetLogoは多くの異なる言語で利用できるようになることを願っています。あなたの言語にNetLogoを翻訳したい場合は、手順については、このthis wiki pageを参照してください。