Tutorial #2: Commands
チュートリアルl #2: コマンド
NetLogo 5.0.3 User Manual
So far you've successfully navigated your way through opening and
running models, pressing buttons, changing sliders and switches, and
gathering information from a model using plots and monitors.
ここまでは、モデルを開いて実行し、ボタンを押す、スライダーやスイッチを変更し、プロットとモニターから情報を収集する方法を案内してきました。
In this section, the focus will start to shift from observing models
to manipulating models. You will start to see the inner workings of
the models and be able to change how they look.
このセクションでは、これまでのモデル観察から操作方法の学習に焦点を当てます。
モデル内部の動きを観察して、どう変化するか見てみましょう。
Sample Model: Traffic Basic
サンプルモデル: 交通基本モデル
- Open the Models Library (from the File menu).
- ファイルメニューからモデルライブラリーを開きます。
- Open Traffic Basic, found in the "Social Science"
section.
- "Social Science"のTraffic Basicを開きます
- Run the model for a while to get a feel for it.
- モデルを実行してしばらく観察してみましょう。
- Consult the Info tab for any questions you may have.
- このモデルの疑問についてインフォタブを調べて見ましょう
In this model, you will notice one red car in a stream of blue cars.
The stream of cars are all moving in the same direction. Every so
often they "pile up" and stop moving. This is modeling how
traffic jams can form without a specific cause like an accident.
このモデルでは、青い車の流れの中に1台の赤い車があります。
すべての車は同じ方向に流れています
時々、車が連なって車の動きが止まります。
これは事故のような特定の現象なしで、渋滞をモデル化しています。
You may alter the settings and observe a few runs to get a fuller
understanding of the model.
設定を変化させて何回かモデルを実行することでモデルを理解しましょう。
As you are using the Traffic Basic model, have you noticed any
additions you would like to make to the model?
Traffic Basic modelを実行して、モデルになにか追加したいものがありましたか。
Looking at the Traffic Basic model, you may notice the environment is
fairly simple; a black background with a white street and number of
blue cars and one red car. Changes that could be made to the model
include: changing the color and shape of the cars, adding a house or
street light, creating a stop light, or even creating another lane of
traffic. Some of these suggested changes are visual, to enhance the
look of the model, while others are more behavioral. We will be
focusing more on the simpler or cosmetic changes throughout most of
this tutorial. (Tutorial #3 will go into
greater detail about behavioral changes, which require changing the
Code tab.)
交通基本モデル(Traffic Basic model)は複数の青い車と1台の赤い車、黒い背景で構成されており、とても単純な環境です。
車の色や形を変えたり、家や街灯、信号機、他の車線を作るなど変えることができます。
これらは外観をきれい整えることができます。
このチュートリアルではモデルをシンプルにしたり外観を変えることに焦点を当てます。
(チュートリアル#3 では、コードタブの変更による行動変化について詳しく触れます。)
To make these simple changes we will be using the Command Center.
コマンドセンターを使って簡単な変更を行ってみましょう。
Command Center
コマンドセンター
The Command Center is found in the Interface tab. It allows you to
enter commands or directions to a model. Commands are instructions
you can give to NetLogo's agents: turtles, patches, links, and
the observer.
コマンドセンターはインターフェースタブに位置しており、直接モデルに命令を与えるすることができます。
コマンドはNetLogoのエージェントであるタートル、パッチ、リンク、オブザーバーに対して指示することができます
In Traffic Basic:
基本的な交通で:
- Press the "setup" button.
- "setup"ボタンを押す
- Locate the Command Center.
- コマンドセンターにカーソルを合わせる
- Click the mouse in the white box at the bottom of the Command
Center.
- >コマンドセンターの下の白い箱をクリックする
- Type the text shown here:
- 下記のように入力する
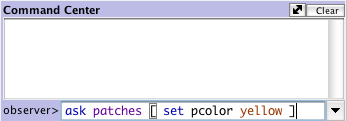
- Press the return key.
- リターンキーを押す
What happened to the View?
ビューに何が起こりましたか?
You may have noticed the background of the View has turned all
yellow and the street has disappeared.
背景が黄色になり、道が無くなったことを確認できましたか。
Why didn't the cars turn yellow too?
なぜ車は黄色にならなかったのでしょうか。
Looking back at the command that was written, we asked only the
patches to change their color. In this model, the cars are
represented by a different kind of agent, called
"turtles". Therefore, the cars did not receive these
instructions and thus did not change.
コマンドを読み返してみてください。色を変更するためにパッチにのみ
問い合わせています。
このモデルでは車はタートルという別種類のエージェントで表現されています。
従って、車は変更の指示を受けず、このように変わりませんでした。
What happened in the Command Center?
コマンドセンターは何が起きましたか?
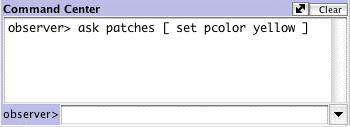
You may have noticed that the command you just typed is now
displayed in the Command Center as shown below:
下記のように今入力したコマンドがコマンドセンターに表示されていることが確認できます。
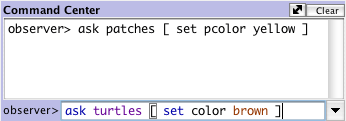
- Type in the bottom of the Command Center the text shown below:
- 下記のようにコマンドセンターの下の箱に入力してください
Was the result what you expected?
期待した結果が得られましたか?
The view should have a yellow background with a line of brown cars
in the middle:
真ん中に並んだ茶色い車と黄色の背景が確認できます。

The NetLogo world is a two dimensional world that is made up of
turtles, patches, links, and an observer. The patches are the ground
over which the turtles move. Links are connections between turtles.
And the observer is a being that oversees everything that is going
on. (For more specifics, refer to the NetLogo Programming Guide.)
NetLogoが構成する世界は二次元で、タートル、パッチ、リンク、オブザーバーで構成されます。
パッチはタートルが動くための地面です。
リンクはタートル間の接続を行います。
そしてオブーザーバーは起こっていること全てを見ることができます。
(詳しくはNetLogo Programming Guideを参照してください。)
In the Command Center you can give commands to any of these types of
agents. You choose which type to talk to by using the popup menu
located in the bottom left corner. You can also use the tab key on
your keyboard to cycle through the different types.
コマンドセンターでは、エージェントがこれらのタイプのいずれかにコマンドを与えることができます
左下に位置するポップアップメニューでタイプを選択することができます。タブキーを押すことで異なるタイプを選択することもできます。
- In the Command Center, click on the "observer>" in
the bottom left corner:
- コマンドセンターで左下にあるオブザーバーをクリックします。
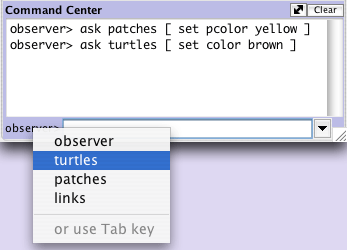
- Choose "turtles" from the popup menu.
- コマンドセンターのポップアップメニューから"turtles"を選択します。
- Type set color pink and press return.
- set color pinkと入力してリターンを押します。
- Press the tab key until you see "patches>" in the
bottom left corner.
- 左下に"patches>"が現れるまでタブキーを押します。
- Type set pcolor white and press return.
- set pcolor whiteと入力してリターンキーを押します。
What does the View look like now?
ビューに何が見えましたか?
Do you notice any differences between these two commands and the
observer commands from earlier?
以前のコマンド比較して2つのコマンドに違いはありましたか。
The observer oversees the world and therefore can give a command to
the patches or turtles using ask. Like in the first example
(observer> ask patches [set pcolor yellow]), the observer
has to ask the patches to set their pcolor to yellow. But when a
command is directly given to a group of agents like in the second
example (patches> set pcolor white), you only have to
give the command itself.
オブザーバーは世界を見渡すため、パッチやタートルにaskを使ってコマンドを与えることができます。
最初の例である (observer> ask patches [set pcolor yellow])の様に、オブザーバーはパッチに対して、pcolorを黄色にすることができます。
しかし、エージェントのグループに対して、2番目の例のように(patches> set pcolor white)
直接与える時は、コマンド自身を与える必要があります。
- Press "setup".
- "setup"を押します。
What happened?
何が起きましたか。
Why did the View revert back to the old version, with the black
background and white road? Upon pressing the "setup"
button, the model will reconfigure itself back to the settings
outlined in the Code tab. The Command Center doesn't permanently
change the model. It allows you to manipulate the NetLogo world
directly to further answer those "What if" questions that
pop up as you are investigating the models. (The Code tab is
explained in the next tutorial, and in the Programming Guide.)
なぜ黒い背景と白い道路に戻ったのでしょうか。
"setup"ボタンを押すとコードタブで設定された内容に自動的に再設設定されます。
コマンドセンターでは永久的にモデルを変更することはありません。
Netlogoの世界では、モデルを調査している際に疑問が出てきたときに、直接操作することができます。
(コードタブは次のチュートリアルであるProgramming Guideで詳しく触れます。)
Now that we have familiarized ourselves with the Command Center,
let's look at some more details about how colors work in NetLogo.
コマンドセンターの使い方を理解したので、Netlogoの色の使い方を詳しく見てみましょう
Working with colors
色を使った表現について
You may have noticed in the previous section that we used two
different words for changing color: color and pcolor.
前のセクションで色の変更について,2つの異なる言葉が使われていたことに気が付いたかもしれません.:
colorとpcolor
What is the difference between color and pcolor?
colorとpcolorの違いはなんでしょうか?
- Choose "turtles" from the popup menu in the Command
Center (or use the tab key).
- コマンドセンターのポップアップメニューから"turtles"を選択します。
(もしくはタブキーを使用します)
- Type set color blue and press return.
- set color blueと入力してリターンを押します。
What happened to the cars?
車に何がおこりましたか?
Think about what you did to make the cars turn blue, and try to
make the patches turn red.
どうやって車が青になったか考えてみましょう。次にパッチを赤に変更してみましょう。
If you try to ask the patches to set color red, an error
message occurs:
set color redを入力して、パッチにaskすると、次のエラーメッセージが出ます
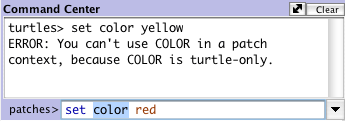
- Type set pcolor red instead and press return.
- 代わりにset pcolor redと入力してリターンを押します。
We call color and
pcolor
"variables". Some commands and variables are specific to
turtles and some are specific to patches. For example, the color variable is a turtle
variable, while the pcolor variable is a patch
variable.
colorとpcolor
は変数と呼びます。コマンドや変数はタートルやパッチ固有のものです。
例えば、colorはタートルの変数、pcolorはパッチの変数です
Go ahead and practice altering the colors of the turtles and patches
using the set command and
these two variables.
setコマンドを使ってタートルやパッチの色を変化させてみましょう。
To be able to make more changes to the colors of turtles and patches,
or shall we say cars and backgrounds, we need to gain a little
insight into how NetLogo deals with colors.
車や背景である,タートルやパッチの色にもっと変更を与えるには,
Netlogoの色の扱いについてもう少し詳しく知る必要があります.
In NetLogo, colors have a numeric value. In all of the exercises we
have been using the name of the color. This is because NetLogo
recognizes 16 different color names. This does not mean that NetLogo
only recognizes 16 colors. There are many shades in between these
colors that can be used too. Here's a chart that shows the whole
NetLogo color space:
Netlogoではすべての色に値を持っています。練習では色の名前を用いています。
Netlogoでは16種類の色の名前を識別することができますが、16種類しか
識別できないということではありません。
色の間に複数の明度を持っています。色空間のチャートは下記の通りです。
![[color chart]](images/colors.jpg)
To get an intermediate shade, you refer to it by a number instead, or
by adding or subtracting a number from a name. For example, when you
type set color red, this does the same thing as if you had
typed set color 15. And you can get a lighter or darker
version of the same color by using a number that is a little larger
or a little smaller, as follows.
中間の明度を得るには,値の代わりに,色の名前や値から,値を加算または減算してください.
例えば、set color redと入力するのとset color 15と入力するのは同じことです。
より明るく、または暗くしたい場合は、下記のように数字を使います。
- Choose "patches" from the popup menu in the Command
Center (or use the tab key).
- コマンドセンターのポップアップメニューから"patches"を選択する。(またはタブキーを使う)
- Type set pcolor red - 2 (The spacing around the
"-" is important.)
- set pcolor red - 2と入力する。("-"の前後の空白が大切)
By subtracting from red, you make it darker.
赤から数字を引くことで暗くなります。
- Type set pcolor red + 2
- set pcolor red + 2と入力します。
By adding to red, you make it lighter.
赤に数字を足すことで明るくなります.
You can use this technique on any of the colors listed in the chart.
このやり方はチャートに書かれた色のリストを使用してください。
Agent Monitors and Agent Commanders
エージェントモニターとエージェントコマンダー
In the previous activity, we used the set command to change
the colors of all the cars. But if you recall, the original model
contained one red car amongst a group of blue cars. Let's look at
how to change only one car's color.
前項でsetコマンドを使い,すべての車の色を変えるコマンドの練習をしました。
オリジナルのモデルには青い車の中に1台の赤い車があったことを思い出してください。
一台だけ色を変える方法を試してみましょう。
- Press "setup" to get the red car to reappear.
- "setup"を押して赤い車を再度表示させましょう。
- Right-click on the red car.
- 赤い車の上で右クリックします。
- If there is another turtle close to the red turtle you'll
see more than one turtle listed at the bottom of the menu. Move
your mouse over the turtle selections, notice when your mouse
highlights a turtle menu item that turtle is highlighted in the
view. Select "inspect turtle" from the sub-menu for the
red turtle.
- 赤いタートルの近くに別のタートルがいると、メニューに別のタートルもリストされます。
選択されたタートルの上にマウスを移動するとタートルメニューアイテムが強調されます。
赤いタートルのサブメニューから"inspect turtle"を選択してください。
A turtle monitor for that car will appear:
その車のタートルモニターが現れます:
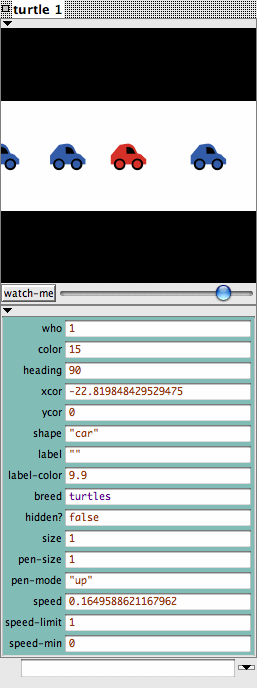
The mini-view at the top of the agent monitor will always stay
centered on this agent. You can zoom the view in and out using the
slider below the view and you can watch this turtle in the main view
by pressing the "watch-me" button.
エージェントモニターのトップにあるミニビューは常に選択したエージェントが中心にいます。
ビューのスライダーでズームイン・アウトができます。
"watch me"を押すとメインビューでこのタートルを見ることができます
Taking a closer look at this turtle monitor, we can see all of the
variables that belong to the red car. A variable is a location that
holds a value.
タートルモニターをよく見ると,赤い車に関するすべての変数を見ることができます.
位置に関する変数の値は固定されています.
Let's take a closer look at the turtle monitor:
タートルモニターをよく観察してみましょう
What is this turtle's who number?
このタートルの番号はいくつですか?
What color is this turtle?
このタートルの色は何ですか?
What shape is this turtle?
このタートルの形はなんですか?
This turtle monitor is showing a turtle who that has a who number of
0, a color of 15 (red -- see chart above), and the shape of a car.
このタートルモニターのwho numberはゼロで色は15(赤 -- 上記チャート参照)、
形は車であることを示しています。
There are two other ways to open a turtle monitor besides
right-clicking. One way is to choose "Turtle Monitor" from
the Tools menu, then type the who number of the turtle you want to
inspect into the "who" field and press return. The other
way is to type inspect turtle 0 (or other who number) into
the Command Center.
右クリック以外にもタートルモニターを開くには二つの方法があります,
一つはTools menuから"Turtle Monitor"を選択し,
"who"フィールドに確認したいタートルのwho numberを入力します.
他の方法は,inspect turtle 0(または,ほかのwho number)とコマンドセンターに入力することです.
You close a turtle monitor by clicking the close box in the upper
left hand corner (Mac) or upper right hand corner (other operating
systems).]
左上角(Mac)か右上角(他のOS)のクローズボックスをクリックして
タートルモニターを閉じます
Now that we know more about Agent Monitors, we have three ways to
change an individual turtle's color.
タートルの色を独立して変更する方法が3つあります。
One way is to use the box called an Agent Commander found at the
bottom of an Agent Monitor. You type commands here, just like in the
Command Center, but the commands you type here are only done by this
particular turtle.
ひとつの方法はエージェントモニターの下にあるエージェントコマンダーと呼ばれるボックスを使うことです.
ここへコマンドセンターと同じように入力できます。しかし、コマンドはある特定のタートルのみに作用します
- In the Agent Commander of the Turtle Monitor for turtle 0, type
set color pink.
- タートルモニターのエージェントコマンダーでturtle 0に対して、set color pinkと入力します。
What happens in the View?
ビューでは何が起きましたか?
Did anything change in the Turtle Monitor?
タートルモニターに変化はありましたか?
A second way to change one turtle's color is to go directly to
the color variable in the Turtle Monitor and change the value.
タートルの色を変える二つ目の方法として、タートルモニターの色の変数を直接変更する方法があります
- Select the text to the right of "color" in the Turtle
Monitor.
- タートルモニターの"color"の右のテキストを選択します。
- Type in a new color such as green + 2.
- 新しい色としてgreen + 2を入力します.
What happened?
何が起こりましたか?
The third way to change an individual turtle's or patch's
color is to use the observer. Since, the observer oversees the
NetLogo world, it can give commands that affect individual turtles,
as well as groups of turtles.
タートルやパッチの色を個別に変更する三番目の方法として、
オブザーバーはNetLogoの世界をすべて観察できるので、
グループのタートルと同じようにコマンドを与えることができます。
- In the Command Center, select "observer" from the
popup menu (or use the tab key).
- コマンドセンターのポップアップメニューの"observer"を選択する。(または,Tabキーで)
- Type ask turtle 0 [set color blue] and press return.
- ask turtle 0 [set color blue]と入力してリターンを押す。
What happens?
何が起こりましたか?
Just as there are Turtle Monitors, there are also Patch Monitors.
Patch monitors work very similarly to Turtle Monitors.
タートルモニターと同じようにパッチモニターが存在します。
パッチモニターはタートルモニターと非常に似た動きをします
Can you make a patch monitor and use it to change the color of a
single patch?
パッチモニターでひとつのパッチの色を変更できますか?
If you try to have the observer ask patch 0 [set pcolor
blue], you'll get an error message:
オブザーバーで ask patch 0 [set pcolor blue]を試すとエラーが出てきます
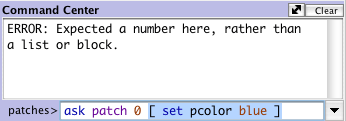
To ask an individual turtle to do something, we use its who number.
But patches don't have who numbers, therefore we need to refer to
them some other way.
特定のタートルにaskする場合はwho numberを使いますが
パッチにはそれがありませんので、別の方法が必要になります。
Remember, patches are arranged on a coordinate system. Two numbers
are needed to plot a point on a graph: an x-axis value and a y-axis
value. Patch locations are designated in the same way as plotting a
point.
パッチは座標系で表現されていることを思い出してください。
二つの値x軸、y軸はグラフにプロットするのに必要です。
パッチの位置はプロットするポイントと同じように指定します。
- Open a patch monitor for any patch.
- いくつかパッチモニターを開いてみましょう
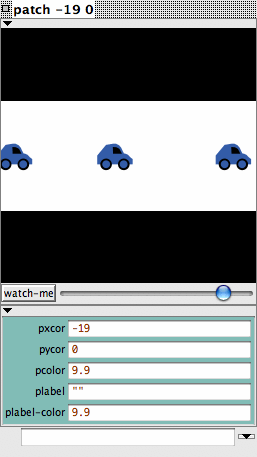
The monitor shows that for the patch in the picture, its pxcor variable is -19 and its
pycor variable is 0.
If we go back to the analogy of the coordinate plane and wanted to
plot this point, the point would be found on the x axis left of the
origin, where x=-19 and y=0.
パッチモニターはpxcorの変数が-19
pycorの変数が0であることを表しています。
この点は、座標面x=-19のy=0にあります。
To tell this particular patch to change color:
特定のパッチの色を変更したい場合:
- In the bottom of the patch monitor, enter set pcolor
blue and press return.
- パッチモニターの下にset pcolor blueと入力してリターンしてください。
Typing a command in a turtle or patch monitor addresses only that
turtle or patch.
タートルモニターまたはパッチモニターでタートルやパッチにコマンドを入力その,タートルやパッチのみに対応します.
You can also talk to a single patch from the Command Center:
コマンドセンターから一つのパッチに命令を与えることもできます。
- In the Command Center, enter ask patch -19 0 [set pcolor
green] and press return.
- コマンドセンターでask patch -19 0 [set pcolor green]と入力しリターンしてください。
What's Next?
次は?
At this point, you may want to take some time to try out the
techniques you've learned on some of the other models in the
Models Library.
モデルライブラリの他のモデルからテクニックを学ぶことをお勧めします.
In Tutorial #3: Procedures you can learn
how to alter and extend existing models and build your own models.
Tutorial #3: Proceduresでは
既存のモデルを拡張したり、新たにモデル作成する方法を学びます。