This tutorial leads you through the process of building a complete model, built up in stages, with every step explained along the way.
このチュートリアルでは、順を追って全てのステップについて解説を加えながら、1つのモデルを完成させます。
In Tutorial #2, you learned how to use the command center and agent monitors to inspect and modify agents and make them do things. Now you're ready to learn about the real heart of a NetLogo model: the Code tab.
チュートリアル#2では、エージェントを調査し、修正し、行動させるための、 コマンドセンターとエージェント・モニターの使用法について学習しました。 これでNetLogoモデルの核心(Codeタブ)について学習する準備ができています。
You've seen that agents in NetLogo are divided into patches, turtles, links, and the observer. Patches are stationary and arranged in a grid. Turtles move over that grid. Links connect two turtles. The observer oversees everything that's going on and does whatever the turtles, patches and links can't do for themselves.
NetLogo上のエージェントはパッチ、タートル、リンク、オブザーバーに分類できます。 パッチは動かず、グリッド状に配置されます。タートルはパッチ上を動き回ります。リンクは2つのタートルを繋げます。 オブザーバーは、行われていること全てを観察し、タートルとパッチとリンクが自分自身でできないことを全てやります。
All four types of agents can run NetLogo commands. All four can also run "procedures". A procedure combines a series of NetLogo commands into a single new command that you define.
これらの全4タイプのエージェントは、NetLogoコマンドを実行可能です。 また、「procedures」の実行も可能です。 プロシージャは、一連のNetLogoコマンドを新たに定義したコマンドと一体化します。
You will now learn to write procedures that make turtles move, eat, reproduce, and die. You will also learn how to make monitors, sliders, and plots. The model we'll build is a simple ecosystem model not unlike Wolf Sheep Predation from Tutorial #1.
これからタートルを動かし、食事させ、繁殖させ、死なせるというプロシージャの記述を学習します。 また、モニター、スライダー、プロットを作成する方法も学習します。 これから作成するモデルは、チュートリアル #1の狼・羊捕食モデルとよく似た単純な生態系モデルです。
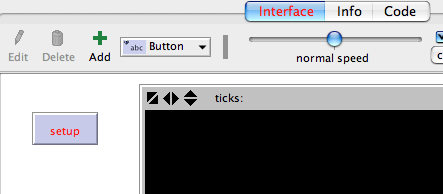
To start a new model, select "New" from the File menu. Then begin by creating a setup button:
新たなモデルの作成を始めるために、ファイルメニューから「New」を選択します。 そしてまずsetupボタンを作成します。
- Click the "Add" icon in the toolbar at the top of the Interface tab.
- On the menu next to Add, select Button (if it isn't already selected).
- Click wherever you want the button to appear in the empty white area of the Interface tab.
- A dialog box for editing the button opens. Type setup in the box labeled "Commands".
- Press the OK button when you're done; the dialog box closes.
- Interfaceタブの最上位にあるツールバーの「Add」アイコンをクリックします。
- 「Add」の横のメニューで、ボタンを選択します(まだ選択されていない場合)。
- Interfaceタブの空白の領域のうち、ボタンを設定したい場所をどこでもいいのでクリックします。
- ボタンを編集するためのダイアログボックスが開きます。 「Commands」とラベル付けされたボックス内でsetupと入力します。
- 完了したら、OKボタンをクリックします。:ダイアログボックスが閉じます。
Now you have a setup button. Pressing the button runs a procedure called "setup". A procedure is a sequence of NetLogo commands that we assign a new name. We'll define that procedure soon, but we haven't yet. The button refers to a procedure that doesn't exist, so the button turns red:
これでsetupボタンができました。このボタンで「setup」と呼ばれるプロシージャを行います。 このプロシージャは新たな名称を割り当てる一連のNetLogoコマンドです。プロシージャはこの後すぐ定義します。 ボタンはまだ存在しないプロシージャを参照しており、そのためボタンは赤に変わります。:
If you want to see the actual error message, click the button.
実際のエラーメッセージを見たければ、ボタンをクリックします。
Now we'll create the "setup" procedure, so the error message will go away:
「setup」プロシージャを行えば、エラーメッセージは消えます。:
- Switch to the Code tab.
- Type the following:
- Codeタブに切り替えます。
- 以下のように入力します。:
to setup
  clear-all
  create-turtles 100 [ setxy random-xcor random-ycor ]
  reset-ticks
end
When you're done, the Code tab looks like this:
完了すると、Codeタブはこのように見えます。:
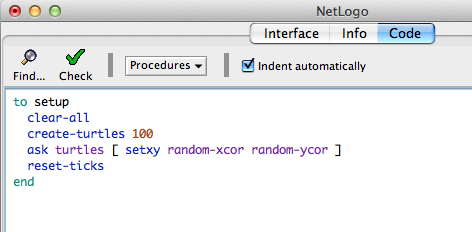
Note that some lines are indented. Most people find it helpful to indent their code. It isn't mandatory, but it makes the code easier to read and change.
いくつかの行が字下がりになっていることに注意して下さい。 このようにコードのインデントを変えておくことは必須ではありませんが、こうしておくとコードの読解や変更が容易になります。
Your procedure begins with to and ends with end. Every procedure begins and ends with these words.
プロシージャはtoで開始し、 endで終了します。 これから作成する全てのプロシージャがそうです。
Let's look at what you typed in and see what each line of your procedure does:
入力した各行がどのようなプロシージャであるか見てみます。:
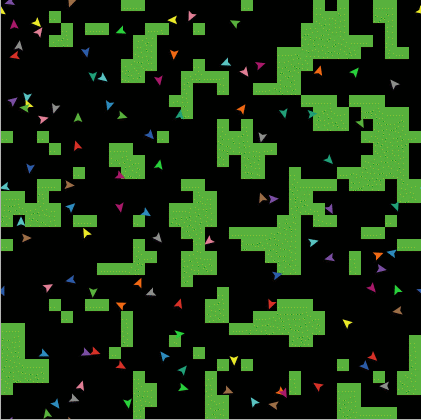
When you're done typing, switch to the Interface tab and press the setup button you made before. You will see the turtles scattered around the world:
入力を完了したら、Interfaceタブに切り替え、先に作成したsetupボタンをクリックします。 タートルがワールド中に散らばります。:
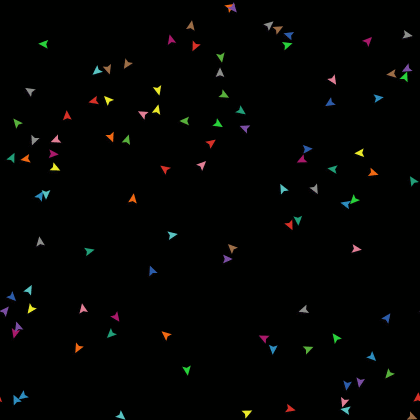
Press setup a couple more times, and see how the arrangement of turtles is different each time. Note that some turtles may be right on top of each other.
続けて何回かsetupボタンをクリックし、タートルの配列がどのように異なるか確認します。 いくつかのタートルが重なっていることに注意して下さい。
Think a bit about what you needed to do to make this happen. You needed to make a button in the Interface and make a procedure that the button uses. The button only worked once you completed both of these separate steps. In the remainder of this tutorial, you will often have to complete two or more similar steps to add another feature to the model. If something doesn't appear to work after you completed what you thought is the final step for that new feature, continue to read ahead to see if there is still more to do. After reading ahead for a couple of paragraphs, you should then go back over the directions to see if there is any step you might have missed.
以上を実行するにあたって必要な条件について少し考えてみます。 Interface上でボタンを作成して、ボタンが行うプロシージャを設定する必要がありました。 これらの別々のステップを完了して初めてボタンは作動しました。 続くチュートリアルでは、別の機能をモデルに追加するために、2つ以上の同様のステップを経なければなりません。 新しい機能のためのステップを完了したはずなのに作動しない場合、 まだすべきことが残っているかどうか確認する前に、先のパートに進んで下さい。 ステップを見落としていないか確認のために戻るのは、この先のいくつかのパートの学習の後にして下さい。
Now that we're using the tick counter (with reset-ticks), we should tell NetLogo that it only needs to update the view once per tick, instead of continuously updating it.
今、(reset-ticksによって)動作カウンターを使用していますが、ビュー更新を連続的にではなく 各動作ごとに1回ずつ行う必要があるとNetLogoに伝えなければなりません。
- Find the view updates menu. It's above the view and by default says "continuous".
- Choose "on ticks" instead.
- ビュー更新メニューを探します。ビューの真上にあり、初期設定では「continuous」となっています。
- 「on ticks」に変更します。
This makes your model run faster and ensures a consistent appearance (since the updates will happen at consistent times). See the Programming Guide for a fuller discussion of view updates.
これでモデルの実行が速くなり、決められた時点でのビュー表示が可能になります(その時点でのみビューが更新されるためです)。 ビュー更新のより詳細な説明は、プログラミングガイドを参照して下さい。
Now make a button called "go". Follow the same steps you used to make the setup button, except:
「go」ボタンを作成します。 下記以外は、setupボタンの作成と同様のステップに従います。:
- For Commands enter go instead of setup.
- Check the "Forever" checkbox in the edit dialog.
- Check the "Disable until ticks start" checkbox too.
- setupの代わりにgoを挿入します。
- 編集ダイアログ内の「Forever」チェックボックスをチェックします。
- 「Disable until ticks start」チェックボックスもチェックします。
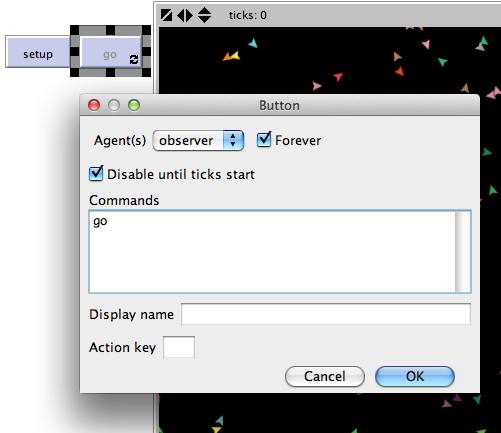
The "Forever" checkbox makes the button stay down once pressed, so its commands run over and over again, not just once.
「Forever」チェックボックスは一度ボタンをクリックすれば押したままにでき、そのためコマンドは続けて何度も実行されます。
The "Disable until ticks start" prevents you from pressing go before setup.
「Disable until ticks start」はセットアップの前にgoボタンを押すことを防止します。
- Then add a go procedure to the Code tab:
- goプロシージャをCodeタブに追加します。:
to go
  move-turtles
  tick
end
tick is a primitive that advances the tick counter by one tick.
tick は 各動作ごとに動作カウンターを進める組込みの(言い換えると、NetLogoに初めから組込まれた)プロシージャです。
But what is move-turtles? Is it a primitive (in other words, built-in to NetLogo)? No, it's another procedure that you're about to add. So far, you have introduced two procedures that you added yourself: setup and go.
move-turtlesは組込のプロシージャではなく、 これから追加するプロシージャです。これまでに、2つのプロシージャ(setupとgo)を追加しました。
- Add the move-turtles procedure after the go procedure:
- goプロシージャの後にmove-turtlesプロシージャを追加します。:
to go
  move-turtles
  tick
end

to move-turtles
  ask turtles [
    right random 360
    forward 1
  ]
end
Note there are no spaces around the hyphen in move-turtles. In Tutorial #2 we used red - 2, with spaces, in order to subtract two numbers, but here we want move-turtles, without spaces. The "-" combines "move" and "turtles" into a single name.
move-turtlesの「-」の両側にスペースがないことに注意して下さい。 チュートリアル#2の、「redから2を減ずる」を表すred - 2にはスペースがありますが、move-turtlesにはありません。 「-」は「move」と「turtles」とを結合します。
Here is what each command in the move-turtles procedure does:
以下が、move-turtlesプロシージャで各コマンドが実行するプロシージャです。:
Why couldn't we have just written all of these commands in go instead of in a separate procedure? We could have, but during the course of building your project, it's likely that you'll add many other parts. We'd like to keep go as simple as possible, so that it is easy to understand. Eventually, it will include many other things you want to have happen as the model runs, such as calculating something or plotting the results. Each of these things to do will have its own procedure and each procedure will have its own unique name.
別々にプロシージャするのではなく、goプロシージャ内でこれら全てのコマンドを記述することもできるのですが、 プロジェクトを立ち上げる過程では往々にして他の多くのパーツを追加することになります。 理解を容易にするために、記述を可能な限りシンプルにしています。結局は、例えば何らかの計算や結果のプロットといった、 モデルで実行したい他の多くの記述を含むことになります。各記述は独自のプロシージャであり、各プロシージャには独自の名称があります。
The 'go' button you made in the Interface tab is a forever button, meaning that it will continually run its commands until you shut it off (by clicking on it again). After you have pressed 'setup' once, to create the turtles, press the 'go' button. Watch what happens. Turn it off, and you'll see that all the turtles stop in their tracks.
Interfaceタブで作成した「go」ボタンはforeverボタンです。これは、(ボタンを再度クリックすることによって)オフにするまで、 コマンドを絶えず実行することを意味します。「setup」ボタンをクリックした後、タートルを作成するために「go」ボタンをクリックします。 ボタンをオフにすると、トラック内の全てのタートルが停止します。
Note that if a turtle moves off the edge of the world, it "wraps", that is, it appears on the other side. (This is the default behavior. It can be changed; see the Topology section of the Programming Guide for more information.)
タートルがワールドの端まで来ると消えることに注意して下さい。これを「wraps」と呼び、タートルは他の端から出現します。 (このふるまいは初期設定であり、変更が可能です。プログラミングガイドの Topologyの章を参照して下さい。)
We suggest you start experimenting with other turtle commands.
タートルへの他のコマンドを実験します。
Type commands into the Command Center (like turtles> set color red), or add commands to setup, go, or move-turtles.
コマンドセンターにコマンドを入力するか(turtles> set color redのように)、 setupやgoやmove-turtlesコマンドを追加します。
Note that when you enter commands in the Command Center, you must choose turtles>, patches>, links>, or observer> in the popup menu on the left, depending on which agents are going to run the commands. It's just like using ask turtles or ask patches, but saves typing. You can also use the tab key to switch agent types, which you might find more convenient than using the menu.
コマンドセンターにコマンドを入力する際、左側のポップアップメニューから turtles>や patches>やlinks>やobserver>を選択しなければならないことに注意して下さい。 それに従いエージェントはコマンドを実行します。 ask turtlesやask patchesと似ていますが、入力の手間を省いてくれます。 エージェントタイプを変更する際にもタブキーが使用できます。メニューを使用するより便利です。
You might try typing turtles> pen-down into the Command Center and then pressing the go button.
コマンドセンターにturtles> pen-downと入力してからgoボタンをクリックします。
Also, inside the move-turtles procedure you can try changing right random 360 to right random 45.
また、move-turtlesプロシージャ内をright random 360からright random 45に変更してみます。
Play around. It's easy and the results are immediate and visible -- one of NetLogo's many strengths.
いろいろ試してみましょう。簡単に変更でき、結果をすぐに確認することができます。これはNetLogoの利点の一つです。
When you feel you've done enough experimenting for now, you're ready to continue improving the model you are building.
十分に実験すれば、作成中のモデルを続けて改善することが可能になります。
Now we've got 100 turtles aimlessly moving around, completely unaware of anything else around them. Let's make things a little more interesting by giving these turtles a nice background against which to move.
今、100個のタートルは何の目的もなく動いており、周りに何かあるかどうかは関知しません。 タートルの動きを規制する背景を与えることで、もう少し面白くしてみます。
- Go back to the setup procedure. We can rewrite it as follows:
- setupプロシージャまで戻り、以下のように書き換えます。
to setup
  clear-all
  setup-patches
  setup-turtles
  reset-ticks
end
- The new definition of setup refers to two new procedures. To define setup-patches, add this:
- 新たなsetupは2つのプロシージャを参照します。setup-patchesを定義するために、以下のように追加します。
to setup-patches
  ask patches [ set pcolor green ]
end
The setup-patches procedure sets the color of every patch to green to start with. (A turtle's color variable is color; a patch's is pcolor.)
setup-patchesプロシージャで、まず全てのパッチをgreenにセットします。 (タートルの色変数はcolor、 パッチの色変数はpcolorです。)
The only part remaining in our new 'setup' that is still undefined is setup-turtles.
未定義のまま新たな「setup」プロシージャの中に残されているのは、setup-turtlesの部分だけです。
- Add this procedure too:
- 以下のプロシージャも追加します。
to setup-turtles
  create-turtles 100
  ask turtles [ setxy random-xcor random-ycor ]
end
Did you notice that the new setup-turtles procedure has most of the same commands as the old setup procedure?
新たなsetup-turtlesプロシージャのコマンドのほとんどが以前のsetupプロシージャと同じであると気付きましたか?
- Switch back to the Interface tab.
- Press the setup button.
- Interfaceタブを戻します。
- setupボタンをクリックします。
Voila! A lush NetLogo landscape complete with turtles and green patches appears:
タートルとgreenのパッチによるみずみずしいNetLogoのランドスケープが完成しました。

After seeing the new setup procedure work a few times, you may find it helpful to read through the procedure definitions again.
新たなsetupプロシージャを数回実行した後、再度プロシージャの定義を通読することが有用であるとわかるでしょう。
So we have some turtles running around on a landscape, but they aren't doing anything with it. Let's add some interaction between the turtles and the patches.
ランドスケープ上にいくつかのタートルを走り回らせていますが、他に何かをしている訳ではありません。 タートルとパッチとの間に若干の相互作用を追加しましす。
We'll make the turtles eat "grass" (the green patches), reproduce, and die. The grass will gradually grow back after it is eaten.
タートルに「grass」(greenのパッチ)を食べさせ、繁殖させ、死なせます。 grassは食べられた後、再び徐々に成長を始めます。
We'll need a way of controlling when a turtle reproduces and dies. We'll determine that by keeping track of how much "energy" each turtle has. To do that we need to add a new turtle variable.
タートルがいつ繁殖して、死ぬかについて制御しなければなりません。各タートルがどれくらいの「energy」を持つか経過を追跡して決定します。 そのためには新たなタートルの変数が必要です。
You've already seen built-in turtle variables like color. To make a new turtle variable, we add a turtles-own declaration at the top of the Code tab, before all the procedures. Call it energy:
color のような組込のタートルの変数にはすでに触れました。 新たなタートルの変数を作成するために、 まずCodeタブの最上位でturtles-ownの宣言を追加します。 それをenergyと定義します。:
turtles-own [energy]

to go
  move-turtles
  eat-grass
  tick
end
Let's use this newly defined variable (energy) to allow the turtles to eat.
タートルにgrassを食べさせるために、この新しく定義した変数(energy)を使用します。
- Switch to the Code tab.
- Rewrite the go procedure as follows:
- Codeタブを切り替えます。
- goプロシージャを以下のように書き換えます。
to go
  move-turtles
  eat-grass
  tick
end
- Add a new eat-grass procedure:
- 新しくeat-grassプロシージャを追加します。
to eat-grass
  ask turtles [
    if pcolor = green [
      set pcolor black
      set energy energy + 10
    ]
  ]
end
We are using the if command for the first time. Look at the code carefully. Each turtle, when it runs these commands, compares the value of the patch color it is on (pcolor) to the value for green. (A turtle has direct access to the variables of the patch it is standing on.) If the patch color is green, the comparison reports true, and only then will the turtle run the commands inside the brackets (otherwise it skips them). The commands make the turtle change the patch color to black and increase its own energy by 10. The patch turns black to signify that the grass at that spot has been eaten. And the turtle is given more energy, from having just eaten.
ここで初めてifコマンドを使用します。 コードを慎重に見て下さい。各タートルはこれらのコマンドを実行するとき、 (pcolor)で パッチの色がgreenかどうかを確認します。(タートルはパッチの変数に直接アプローチします。) パッチの色がgreenであるならばtrueと返し、その場合だけ[]内のコマンドを実行します(そうでなければスキップします)。 このコマンドでタートルはパッチの色をblackに変え、自身のenergyの値を10増加させます。 パッチはその地点のgrassが食べられたことを示すためにblackに変化します。タートルは食事をしたことでenergyを獲得します。
Next, let's make the movement of turtles use up some of the turtle's energy.
次に、タートルの移動によってタートルのenergyを消費させます。
- Rewrite move-turtles as follows:
- move-turtlesを以下のように書き換えます。
to move-turtles
  ask turtles [
    right random 360
    forward 1
    set energy energy - 1
  ]
end
As each turtle wanders, it will lose one unit of energy at each step.
各タートルが動き、各ステップでエネルギーを1単位消費します。
- Switch to the Interface tab now and press the setup button and the go button.
- Interfaceタブに切り替え、setupボタンとgoボタンをクリックします。
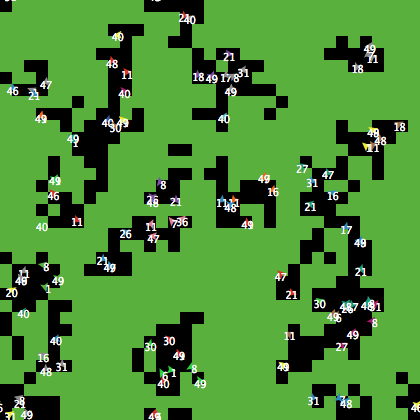
You'll see the patches turn black as turtles travel over them.
タートルが移動するに従い、パッチがblackになってゆくのが分かります。
Next you will create two monitors in the Interface tab with the toolbar. (You make them just like buttons and sliders, using the Add icon on the toolbar.) Let's make the first monitor now.
次に、ツールバーのInterfaceタブで2つのモニターを作成します。 (ツールバーのAddアイコンを使用して、ボタンやスライダーのように作成します。) まず最初のモニターを作成しましす。
- Create a monitor by clicking the Add icon on the toolbar, selecting Monitor next to it, and clicking on an open spot in the Interface.
- ツールバーのAddアイコンをクリックし、その横のMonitorを選択し、Interface上の空いているところをクリックしてモニターを作成します。
A dialog box will appear.
ダイアログボックスが現れます。
- In the dialog type: count turtles (see image below).
- Press the OK button to close the dialog.
- ダイアログボックス内:count turtles(下の画像を参照)
- OKボタンをクリックして、ダイアログボックスを閉じます。
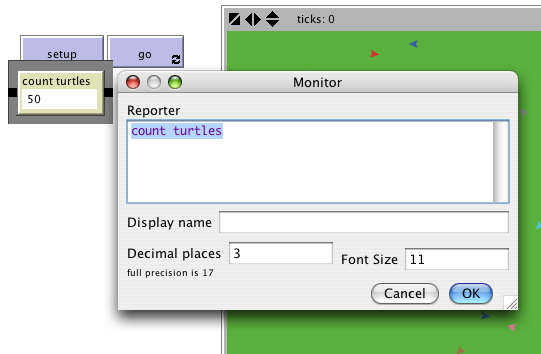
turtles is an "agentset", the set of all turtles. count tells us how many agents are in that set.
turtlesは「agentset」 で、全てのタートルのセットです。 countは、いくつのエージェントがセット内にあるかを示します。
Let's make the second monitor now:
2番目のモニターを作成します。
- Create a monitor by clicking the Add icon on the toolbar, selecting Monitor next to it, and clicking on an open spot in the Interface.
- ツールバーのAddアイコンをクリックし、その横のMonitorを選択し、Interface上の空いているところをクリックしてモニターを作成します。
A dialog box will appear.
ダイアログボックスが現れます。
- In the Reporter section of the dialog box type: count patches with [pcolor = green] (see image below).
- In the Display name section of the dialog box type: green patches
- Press the OK button to close the dialog box.
- ダイアログボックス内Reporter部分: count patches with [pcolor = green](下の画像を参照)
- ダイアログボックス内Display name部分:green patches
- OKボタンをクリックして、ダイアログボックスを閉じます。
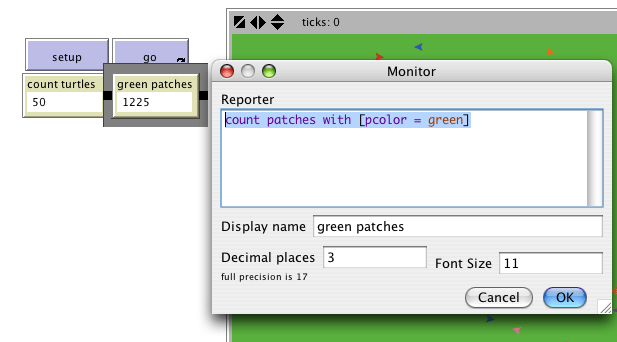
Here we're using count again to see how many agents are in an agentset. patches is the set of all the patches, but we don't just want to know how many patches there are total, we want to know how many of them are green. That's what with does; it makes a smaller agentset of just those agents for whom the condition in the brackets is true. The condition is pcolor = green, so that gives us just the green patches.
agentset内にエージェントがいくつあるか確認するために再度 countを使用します。 patchesは全部のパッチのセットですが、 知りたいのは合計のパッチの数ではなく、greenのパッチの数です。 それを行うのがwithです。 []内の状態がtrueであるエージェントのみの小さいagentsetを作成します。状態はpcolor = greenなのでgreenのパッチのみを通知します。
Now we have two monitors that will report how many turtles and green patches we have, to help us track what's going on in our model. As the model runs, the numbers in the monitors will automatically change.
タートルの数とgreenのパッチの数を示す2つのモニターがあり、モデル内で起こっていることを知る助けになります。 モデルの実行に従って、モニター内の数値も自動的に変化します。
- Use the setup and go buttons and watch the numbers in the monitors change.
- setupボタンとgoボタンを使用してモニター内の数値が変化するのを見てみましょう。
The turtles aren't just turning the patches black. They're also gaining and losing energy. As the model runs, try using a turtle monitor to watch one turtle's energy go up and down.
タートルはパッチをblackに変化させているだけではありません。energyの獲得と消費も行っています。 モデルの実行に従ってタートルのenergyがどのように増減するのか確認するために、タートルのモニターを利用します。
It would be nicer if we could see every turtle's energy all the time. We will now do exactly that, and add a switch so we can turn the extra visual information on and off.
常時、全てのタートルのenergyを確認できるようにします。スイッチを追加すると、 別の情報の表示をオンにしたりオフにしたりできます。
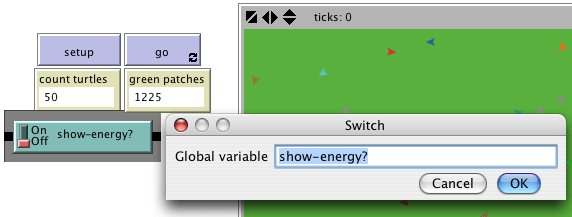
- Click on the Add icon on the toolbar (in the Interface tab).
- Select Switch from the menu next to Add.
- Click on an open spot in the nterface.
- (Interfaceタブ内の)ツールバーのAddアイコンをクリックします。
- メニューからAddの横のSwitchを選択します。
- Interface上の空いているところをクリックします。
A dialog will appear.
ダイアログボックスが現れます。
- Into the Global variable field, type show-energy? Don't forget to include the question mark in the name. (See image below.)
- ダイアログボックス内のGlobal variable部分にshow-energy?と入力します。 ?を入れるのを忘れないで下さい。 (下の画像を参照)
- Now go back to the 'go' procedure using the Code tab with the toolbar.
- Rewrite the eat-grass procedure as follows:
- ツールバーのCodeタブを使用して「go」プロシージャに戻ります。
- 以下のようにeat-grassプロシージャを書き換えます。:
to eat-grass
  ask turtles [
    if pcolor = green [
      set pcolor black
      set energy energy + 10
    ]
  ifelse show-energy?
    [ set label energy ]
    [ set label "" ]
  ]
end
The eat-grass procedure introduces the ifelse command. Look at the code carefully. Each turtle, when it runs these new commands, checks the value of show-energy? (determined by the switch). If the switch is on, comparison is true and the turtle will run the commands inside the first set of brackets. In this case, it assigns the value for the energy to the label of the turtle. If the comparison is false (the switch is off) then the turtle runs the commands inside the second set of brackets. In this case, it removes the text labels (by setting the label of the turtle to be nothing).
eat-grassプロシージャはifelseコマンドを導入します。 コードを注意深く見て下さい。各タートルがこれらの新たなコマンドを実行するとき、(スイッチによって決定された)show-energy?の値をチェックします。 スイッチがオンならば、参照はtrueでタートルは最初の[]内のコマンドを実行します。この場合、タートルのラベルにenergyの値が与えられます。 参照がfalse(スイッチがオフ)ならば、タートルは2番目の[]内のコマンドを実行します。 この場合、(タートルのラベルは何もないと設定されて)テキストラベルは削除されます。
(In NetLogo, a piece of text is called a "string", short for string of characters. A string is a sequence of letters or other characters, written between double quotes. Here we have two double quotes right next to each other, with nothing in between them. That's an empty string. If a turtle's label is an empty string, no text is attached to the turtle.)
(NetLogoでは、テキストの一部を「string」と呼びます、これはstring of charactersの短縮形です。 stringは一連の文字と記号からなり、「""」の間に記述します。 間に何もなく、「""」とだけ記述した場合、空白のstringになります。 タートルのラベルが空白のstringであれば、タートルにテキストは付きません。)
- Test this in the Interface tab, by running the model (using the setup and go buttons) switching the show-energy? switch back and forth.
- Interfaceタブ内で、(setupボタンとgoボタンを使用して)show-energy?スイッチの切り替えを繰り返すモデルを実行してテストします。
When the switch is on, you'll see the energy of each turtle go up each time it eats grass. You'll also see its energy going down whenever it moves.
スイッチがオンの場合、各タートルがgrassを食べるたびにenergyが増加するのが分かります。
Now our turtles are eating. Let's make them reproduce and die, too. And let's make the grass grow back. We'll add all three of these of these behaviors now, by making three separate procedures, one for each behavior.
今やタートルは食事をしています。さらにこれから繁殖させ、死なせます。 また、grassを復活させます。 3つのプロシージャを別々に作成することで、これら3つのふるまいの全てを追加します。
- Go to the Code tab.
- Rewrite the go procedure as follows:
- Codeタブを開きます。
- goプロシージャを以下のように書き換えます。
to go
  move-turtles
  eat-grass
  reproduce
  check-death
  regrow-grass
  tick
end
- Add the procedures for reproduce, check-death, and regrow-grass as shown below:
- reproduce、check-death、regrow-grassプロシージャを以下のように追加します。
to reproduce
  ask turtles [
    if energy > 50 [
      set energy energy - 50
      hatch 1 [ set energy 50 ]
    ]
  ]
end

to check-death
  ask turtles [
    if energy <= 0 [ die ]
  ]
end

to regrow-grass
  ask patches [
    if random 100 < 3 [ set pcolor green ]
  ]
end
Each of these procedures uses the if command. Each turtle, when it runs check-death it will check to see if its energy is less or equal to 0. If this is true, then the turtle is told to die (die is a NetLogo primitive).
各プロシージャがifコマンドを使用します。 各タートルは、check-deathを実行しているときにそのenergyが0以下かどうかチェックします。 それがtrueであれば、そのタートルはdie となります。 (dieはNetLogoの組込の関数です。)
When each turtle runs reproduce, it checks the value of the turtle's energy variable. If it is greater than 50, then the turtle runs the commands inside the first set of brackets. In this case, it decreases the turtle's energy by 50, then 'hatches' a new turtle with an energy of 50. The hatch command is a NetLogo primitive which looks like this: hatch number [ commands ]. This turtle creates number new turtles, each identical to its parent, and asks the new turtle(s) that have been hatched to run commands. You can use the commands to give the new turtles different colors, headings, or whatever. In our case we run one command. We set the energy for the newly hatched turtle to be 50.
各タートルがreproduceを実行しているときは、タートルのenergy変数の値をチェックします。 50より大きければ、タートルは最初の[]内のコマンドを実行します。この場合、タートルのenergyが50減少し、 新しいタートルをenergyが50の状態で「hatch(=生成)」します。 hatchコマンドはNetLogoの組込の関数で、 「hatch 数値 [コマンド ]」のように使用します。 このタートルは『数値』個だけ新たにタートルを作り(これらの各タートルは親と同一の性質です)、 生成した新しいタートルに『コマンド』を実行するよう要求します。 新しいタートルには違った色や見出しなどあらゆる性質を与えるコマンドを使用できます。今回は1つコマンドを実行します。 新しく生成するタートルのenergyを50と設定します。
When each patch runs regrow-grass it will check to see if a random integer from 0 to 99 is less than 3. If so, the patch color is set to green. This will happen 3% of the time (on average) for each patch, since there are three numbers (0, 1, and 2) out of 100 possible that are less than 3.
各パッチがregrow-grassを実行しているときは、0から99までのランダム整数が3未満かどうかチェックします。 そうであれば、パッチの色はgreenと設定されます。 これは、100個の数値の中で3未満であるのが0と1と2の3つであるため、各パッチに(平均で)3%の確率で起こります。
- Switch to the Interface tab now and press the setup and go buttons.
- Interfaceタブに切り替え、setupボタンとgoボタンをクリックします。
You should see some interesting behavior in your model now. Some turtles die off, some new turtles are created (hatched), and some grass grows back. This is exactly what we set out to do.
モデル上でいくつかの面白い振る舞いが見られます。いくつかのタートルが死に、いくつかのタートルが作られ(生成して)、 grassがblackになります。これこそがしようと試みたことです。
If you continue to watch your monitors in your model, you will see that the count turtles and green patches monitors both fluctuate. Is this pattern of fluctuation predictable? Is there a relationship between the variables?
モデルのモニターを見ていれば、count turtlesとgreen patchesのモニターが両方とも変動しているのが分かります。 変動のパターンは予想可能でしょうか? 変数間に関連はあるのでしょうか?
It'd be nice if we had a easier way to track the changes in the model behavior over time. NetLogo allows us to plot data as we go along. That will be our next step.
時間の経過に従いモデルの変化を追跡するもっと簡単な方法があれば便利です。 NetLogoではそのようにデータをプロットすることが可能です。 次のステップで学習します。
To make plotting work, we'll need to create a plot in the Interface tab and put some commands inside it.
プロット作業を行うためには、Interfaceタブ内でプロットを作成し、その内部でいくつかコマンドを入力する必要があります。
The commands we put in the plots will run automatically when our setup procedure calls reset-ticks and when our go procedure calls tick.
プロット内に入力したコマンドは、setupプロシージャがreset-ticksを呼び出すときと goプロシージャがtickを呼び出すときに自動的に実行されます。
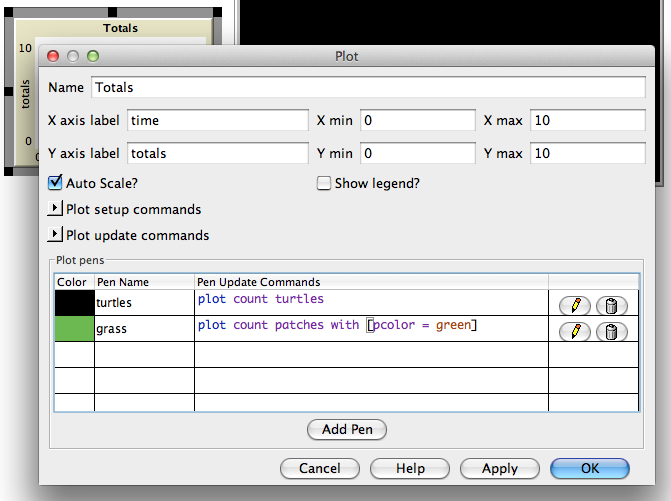
- Create a plot by clicking the Add icon on the toolbar, selecting Plot next to it, and clicking on an open spot in the Interface.
- Set its Name to "Totals" (see image below)
- Set the X axis label to "time"
- Set the Y axis label to "totals"
- Change the name of the "default" pen to "turtles".
- Enter plot count turtles under Pen Update Commands.
- Press the "Add Pen" button.
- Change the name of the new pen to "grass".
- Enter plot count patches with [pcolor = green] under Pen Update Commands.
- ツールバーのAddアイコンをクリックし、その横のPlotを選択し、Interface上の空いているところをクリックしてプロットを作成します。
- Nameを「Totals」と設定します。(下の画像を参照)
- X軸ラベルを「time」と設定します。
- Y軸ラベルを「totals」と設定します。
- 「default」ペンの名称を「turtles」に変更します。
- Pen Update Commandsの下にplot count turtlesと入力します。
- 「Add Pen」ボタンをクリックします。
- 新しいペンの名称を「grass」に変更します。
- Pen Update Commandsの下にplot count patches with [pcolor = green]と入力します。
When you're done, the dialog should look like this:
完了したら、ダイアログはこのように見えるはずです。
- Press OK in the Plot dialog to finish editing.
- 編集を終了するためにPlotダイアログ内のOKをクリックします。
Note that when you create the plot you can also set the minimum and maximum values on the X and Y axes. You'll want to leave the "Auto Scale?" checkbox checked, so that if anything you plot exceeds the minimum and maximum values for the axes, the axes will automatically grow so you can see all the data.
プロット作成の際、X軸上とY軸上に最小値と最大値を設定することができることに注意して下さい。 「Auto Scale」チェックボックスをチェックしたままにしておけば、 プロットが各軸の最小値または最大値を超えた場合にも、全てのデータを確認できるように、自動的に軸が伸びます。
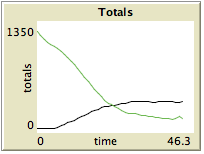
Note that we used the plot command to add the next point to a plot. This command moves the current plot pen to the point that has an X coordinate equal to 1 greater than the previously plotted X coordinate and a Y coordinate equal to the value given in the plot command (in the first case, the number of turtles, and in the second case, the number of green patches). As the pens move they each draw a line.
プロットに次の点を追加するためにplotコマンドを 使用することに注意して下さい。このコマンドは、X座標に関しては先にプロットされたX座標より1だけ大きい数値、 Y座標に関してはプロットコマンド(最初のケースではタートルの数、2番目のケースではgreenのパッチの数に関して) で与えられた数値の座標へプロットペンを移動させます。ペンが移動し線が描かれます。
- Setup and run the model again.
- モデルを再度セットアップ、実行します。
You can now watch the plot being drawn as the model is running. Your plot should have the general shape of the one below, though your plot might not look exactly the same.
モデルの実行に従って、プロットが描かれるのが確認できます。 完全に一致しないかもしれませんが、概形は下の画像のようになるはずです。
Remember that we left "Auto Scale?" on. This allows the plot to readjust itself when it runs out of room.
「Auto Scale?」がオンなら、プロットがはみ出しそうな場合でも再調整されます。
If you forget which pen is which, you can edit the plot and check the "Show legend?" checkbox.
どのペンが何を示すのか忘れてしまった場合、プロットを編集し「Show legend?」チェックボックスをクリックします。
You might try running the model several times to see what aspects of the plot are the same and which are different from run to run.
プロットの特徴を確認するために何度かモデルを実行してみましょう。
To make comparisons between plots from one model run and another, it is often useful to do the comparison for the same length of model run. Learning how to stop or start an action at a specific time can help make this happen by stopping the model at the same point each model run. Keeping track of how many times the go procedure is run is a useful way to cue these actions. That's what the tick counter does.
あるモデルと別のモデルの実行のプロットを比較するには、実行時間が同じモデルを比較することが有効です。 特定の時点で動作を停止したり開始できれば、各モデルの実行を同時に停止することでそのような比較が可能になります。 そのように動作を指示するには、goプロシージャが何回実行されるか継続的に追跡することが有効です。 それを行うのが動作カウンターです。
You're already using the tick counter in your model, with the reset-ticks and tick commands, which also trigger plotting.
既にモデル内で、プロット開始の際のreset-ticksコマンドとtickコマンドとともに動作カウンターを使用しています。
You can also use the tick counter for other things, such as to set a limit on the total length of a run.
動作カウンターは、コマンド実行の全体の長さを制限する等、他の目的にも使用できます。
- Change the go procedure:
- goプロシージャを変更します。:
to go
  if ticks >= 500 [ stop ]
  move-turtles
  eat-grass
  check-death
  reproduce
  regrow-grass
  tick
end
- Now setup and run the model.
- モデルのセットアップと実行を行います。
The graph and model won't keep running forever. They should stop automatically when the tick counter in the Interface tab's toolbar reaches 500.
グラフとモデルは継続的には実行されません。 Interfaceタブのツールバーの動作カウンターが500に達すれば、自動的に停止します。
The tick command advances the tick counter by 1. ticks is a reporter which reports the current value of the tick counter. reset-ticks, in your setup procedure, takes care of restarting the tick counter at 0 when a new run is set up and ready to begin.
tickコマンドは動作カウンターを1刻みで進めます。 ticksは操作カウンターの現在の数値を返すreporterです。 reset-ticksコマンドはsetupプロシージャ内で 新たな実行が設定、開始される際に動作カウンターを0から再開させます。
First, instead of always using 100 turtles, you can have a varying number of turtles.
いつもの100個のタートルではなく、タートルの数を変化させることもできます。
- Create a slider named "number": click the Add icon on the toolbar, select Slider next to it, and click on an open spot in the Interface.
- Try changing the minimum and maximum values in the slider.
- Then inside of setup-turtles, instead of create-turtles 100 you can type:
- 「number」というスライダー変数を作成します。:ツールバーのAddアイコンをクリックし、その横のSliderを選択し、 Interface上の空いているところをクリックします。
- スライダー上で最小値と最大値を変化させます。
- setup-turtles内で、create-turtles 100ではなく以下のように入力します。:
to setup-turtles
  create-turtles number [ setxy random-xcor random-ycor ]
end
Test this change and compare how having more or fewer turtles initially affect the plots over time.
初期のタートルの数を増やしたり減らしたりして、時間の経過とともにプロットにどのように影響するか確認しましょう。
Second, wouldn't it be nice to adjust the energy the turtles gain and lose as they eat grass and reproduce?
次に、タートルがgrassを食べ、繁殖するときに獲得、消費するenergyを調節します。
- Make a slider called energy-from-grass.
- Make another slider called birth-energy.
- Then, inside of eat-grass, make this change:
- energy-from-grassスライダーを作成します。
- birth-energyスライダーを作成します。
- eat-grass内を以下のように変更します。:
to eat-grass
  ask turtles [
    if pcolor = green [
      set pcolor black
      set energy (energy + energy-from-grass)
    ]
    ifelse show-energy?
      [ set label energy ]
      [ set label "" ]
  ]
end
- And, inside of reproduce, make this change:
- reproduce内を以下のように変更します。:
to reproduce
  ask turtles [
    if energy > birth-energy [
      set energy energy - birth-energy
      hatch 1 [ set energy birth-energy ]
    ]
  ]
end
Finally, what other slider could you add to vary how often grass grows back? Are there rules you can add to the movement of the turtles or to the newly hatched turtles that happen only at certain times? Try writing them.
最後に、どれくらいの頻度でgrassがblackになるかを変化させるスライダーを追加しましょう。 特定の時点だけにタートルの移動や新たな生成が起こるようにルールを追加しましょう。
So now you have a simple model of an ecosystem. Patches grow grass. Turtles wander, eat the grass, reproduce, and die.
単純な生態系モデルが完成しました。パッチにはgrassが育ちます。タートルが動き回り、grassを食べ、繁殖し、死にます。
You have created an interface containing buttons, sliders, switches, monitors, and a plot. You've even written a series of procedures to give the turtles something to do.
ボタン、スライダー、スイッチ、モニター、プロットのあるインターフェースも作成しました。 タートルに何か行動させるための一連のプロシージャも記述しました。
That's where this tutorial leaves off.
これでこのチュートリアルは終了です。
If you'd like to look at some more documentation about NetLogo, the Interface Guide section of the manual walks you through every element of the NetLogo interface in order and explains its function. For a detailed description and specifics about writing procedures, refer to the Programming Guide. All of the primitives are listed and described in the the NetLogo Dictionary.
NetLogoに関するさらなる資料については、マニュアルのInterface Guideの章が 適切にNetLogoインターフェースのあらゆる要素とその機能を説明しています。プロシージャの記述に関する詳細な説明は、 Programming Guideを参照して下さい。 全ての組込の関数は、 NetLogo Dictionaryでリスト化して説明されています。
Also, you can continue experimenting with and expanding this model if you'd like, experimenting with different variables and behaviors for the agents.
また、このモデルに別の変数やエージェントのふるまいを導入することで、実験したり、拡張したりすることも可能です。
Alternatively, you may want to revisit the first model in the tutorial, Wolf Sheep Predation. This is the model you used in Tutorial #1. In the Wolf Sheep Predation model, you saw sheep move around, consume resources that are replenished occasionally (grass), reproduce under certain conditions, and die if they ran out of resources. But that model had another type of creature moving around -- wolves. The addition of wolves requires some additional procedures and some new primitives. Wolves and sheep are two different "breeds" of turtle. To see how to use breeds, study Wolf Sheep Predation.
あるいは、Tutorial #1で最初に使用した狼・羊捕食モデルに戻るのもいいでしょう。 狼・羊捕食モデルでは羊が動き回り、時折補充される資源(grass)を消費し、ある状況では繁殖したり死んだりしました。 しかしこのモデルでは狼というもう一種の生きものが動き回っています。狼の追加にはいくつかのプロシージャの追加と新たな初期設定が必要です。 狼と羊は2つの異なる「breeds(=品種)」のタートルです。breedsを使用する方法は狼・羊捕食モデルで学習しましょう。
Alternatively, you can look at other models (including the many models in the Code Examples section of the Models Library) or even go ahead and build your own model. You don't even have to model anything. It can be interesting just to watch patches and turtles forming patterns, to try to create a game to play, or whatever.
あるいは、他のモデルを見たり(モデル・ライブラリーのコード例の章に沢山のモデルがあります)、自分自身のモデルを作成するのもいいでしょう。 モデルを全く作成しなくても構いません。パッチとタートルが模様を作るのを見たり、ゲームを作成したりするのも楽しいものです。
Hopefully you have learned some things, both in terms of the NetLogo language and about how to go about building a model. The entire set of procedures that was created above is shown below.
NetLogo言語とモデル作成の両方を学習してきました。 作成したプロシージャの全体像を以下に記します。
The complete model is also available in NetLogo's Models Library, in the Code Examples section. It's called "Tutorial 3".
完成モデルはコード例の章のNetLogoモデル・ライブラリーにもあります。「チュートリアル#3」の部分です。
Notice that this listing is full of "comments", which begin with semicolons. Comments let you mix an explanation the code right in with the code itself. You might use comments to help others understand your model, or you might use them as notes to yourself.
「;」で始まる部分は全て「コメント」であることに注意して下さい。コメントを使用すればはコードの中でコードの説明が可能です。 コメントは他人があなたのモデルを理解するための助けとして、あるいは注意書きとして使用できます。
In the Code tab, comments are gray, so your eyes can pick them out easily.
Codeタブではコメントはグレーで表示され、容易に識別可能です。
turtles-own [energy] ;; for keeping track of when the turtle is ready
                     ;; to reproduce and when it will die

to setup
  clear-all
  setup-patches
  setup-turtles
  reset-ticks
end

to setup-patches
  ask patches [ set pcolor green ]
end

to setup-turtles
  create-turtles number    ;; uses the value of the number slider to create turtles
  ask turtles [ setxy random-xcor random-ycor ]
end

to go
  if ticks >= 500 [ stop ]  ;; stop after 500 ticks
  move-turtles
  eat-grass
  check-death
  reproduce
  regrow-grass
  tick                    ;; increase the tick counter by 1 each time through
end

to move-turtles
  ask turtles [
    right random 360
    forward 1
    set energy energy - 1  ;; when the turtle moves it looses one unit of energy
  ]
end

to eat-grass
  ask turtles [
    if pcolor = green [
      set pcolor black
           ;; the value of energy-from-grass slider is added to energy
      set energy energy + energy-from-grass
    ]
  ifelse show-energy?
    [ set label energy ] ;; the label is set to be the value of the energy
    [ set label "" ]     ;; the label is set to an empty text value
  ]
end

to reproduce
  ask turtles [
    if energy > birth-energy [
      set energy energy - birth-energy  ;; take away birth-energy to give birth
      hatch 1 [ set energy birth-energy ] ;; give this birth-energy to the offspring
    ]
  ]
end

to check-death
  ask turtles [
    if energy <= 0 [ die ] ;; removes the turtle if it has no energy left
  ]
end

to regrow-grass
  ask patches [ ;; 3 out of 100 times, the patch color is set to green
    if random 100 < 3 [ set pcolor green ]
  ]
end