![[color chart]](images/colors.jpg)
This section describes the NetLogo programming language in detail.
このセクションではNetLogoプログラミング言語について詳しく解説します。
The Code Example models mentioned throughout can be found in the Code Examples section of the Models Library.
ここで説明されているモデルのコード例は、[File] メニューの [Models Library] の中にある「Code Examples」セクションで確認することができます。
The NetLogo world is made up of agents. Agents are beings that can follow instructions.
NetLogoのワールドはエージェントで構成されています。エージェントは命令に従う存在です。
In NetLogo, there are four types of agents: turtles, patches, links, and the observer.
NetLogoには4種類のエージェントがいます。タートル、パッチ、リンク、オブザーバーです。
Turtles are agents that move around in the world. The world is two dimensional and is divided up into a grid of patches. Each patch is a square piece of "ground" over which turtles can move. Links are agents that connect two turtles. The observer doesn't have a location -- you can imagine it as looking out over the world of turtles and patches.
タートルはワールドを動き回ることができるエージェントです。ワールドは二次元の平面で、パッチと呼ばれる格子に分割されています。パッチとは四角い形をした「地面」の一部です。この上をタートルが動きます。リンクは2つのタートルを結びつけるエージェントです。オブザーバーには位置という概念がありません。タートルとパッチがいるワールド全体を見渡すことができる存在と考えるとよいでしょう。
The observer doesn't observe passively -- it gives instructions to the other agents.
オブサーバは何もしないでただワールドを眺めているわけではありません。オブザーバーは他のエージェントに対して指示を与えます。
When NetLogo starts up, there are no turtles. The observer can make new turtles. Patches can make new turtles too. (Patches can't move, but otherwise they're just as "alive" as turtles.)
NetLogoを開始した状態ではタートルはまだいません。オブザーバーはタートルを新たに作ることができます。パッチも新しいタートルを作ることができます。(パッチは移動することはできませんが、タートルやオブザーバーと同じように「生きている」ものです。)
Patches have coordinates. The patch at coordinates (0, 0) is called the origin and the coordinates of the other patches are the horizontal and vertical distances from this one. We call the patch's coordinates pxcor and pycor. Just like in the standard mathematical coordinate plane, pxcor increases as you move to the right and pycor increases as you move up.
パッチは座標で表されます。座標(0, 0)にあるパッチは原点です。それ以外のパッチの座標は原点からの水平方向の距離と垂直方向の距離で表されます。NetLogoではパッチの座標はpxcorとpycorで表現します。一般的な数学の座標平面と同じで、右に進むとpxcorが増え、上に進むとpycorが増えます。
The total number of patches is determined by the settings
min-pxcor,
max-pxcor,
min-pycor, and
max-pycor. When NetLogo starts up,
min-pxcor,
max-pxcor,
min-pycor, and
max-pycor are -16, 16, -16, and 16 respectively. This means that
pxcor and
pycor both range from -16 to 16, so there are 33 times 33, or 1089 patches total. (You can change the number of patches with the Settings button.)
パッチの全体の数はmin-pxcor,
max-pxcor,
min-pycor,
max-pycorで設定できます。NetLogoの開始時にはmin-pxcor,
max-pxcor,
min-pycor,
max-pycorはそれぞれ-16, 16, -16, 16に設定されています。ですから、pxcorとpycorの範囲がどちらも-16から16までだとすると、そこには33×33、合計1089のパッチがあることになります。(パッチの数は「Settings」ボタンで変更することができます。)
Turtles have coordinates too: xcor and ycor. A patch's coordinates are always integers, but a turtle's coordinates can have decimals. This means that a turtle can be positioned at any point within its patch; it doesn't have to be in the center of the patch.
タートルもまた座標を持ちます。xcorとycorです。パッチの座標はいつも整数ですが、タートルの座標は小数も使えます。つまり、タートルはパッチの範囲内であればどの位置にでも置くことができます。パッチの中央である必要はありません。
Links do not have coordinates. Every link has two ends, and each end is a turtle. If either turtle dies, the link dies too. A link is represented visually as a line connecting the two turtles.
リンクは座標を持ちません。リンクには2つの端点があり、それぞれの端点はタートルです。もし、どちらかのタートルが死ぬと、リンクも死にます。リンクは2つのタートルを結ぶ線を視覚的に表現したものです。
In NetLogo, commands and reporters tell agents what to do. A command is an action for an agent to carry out, resulting in some effect. A reporter is instructions for computing a value, which the agent then "reports" to whoever asked it.
NetLogoでエージェントに指示を与えるときに使うのは、コマンドとレポーターです。コマンドはエージェントが実行するアクションで、結果としてなんらかの影響を及ぼします。レポーターは何かの値を求めるための命令で、指示されたエージェントは指示をした相手に対してその値を返します。
Typically, a command name begins with a verb, such as "create", "die", "jump", "inspect", or "clear". Most reporter names are nouns or noun phrases.
一般的にコマンドの先頭は動詞(「create」「die」「jump」「inspect」「clear」)の形をしています。レポーターの名前の多くは名詞または名詞句の形をしています。
Commands and reporters built into NetLogo are called primitives. The NetLogo Dictionary has a complete list of built-in commands and reporters.
NetLogoに組み込まれているコマンドとレポーターはプリミティブと呼ばれます。NetLogoディクショナリには組み込みのコマンドとレポーターがすべて記述されています。
Commands and reporters you define yourself are called procedures. Each procedure has a name, preceded by the keyword to or to-report, depending on whether it is a command procedure or a reporter procedure. The keyword end marks the end of the commands in the procedure. Once you define a procedure, you can use it elsewhere in your program.
ユーザーが新しく定義したコマンドやレポーターは、プロシージャと呼ばれます。プロシージャはプロシージャ名を持ち、予約語toまたはto-reportで始まります。プロシージャの中に記述されているコマンドの終わりは予約語endで表されます。一度プロシージャを定義したら、プログラムの中のどこからでも使うことができます。
Many commands and reporters take inputs -- values that the command or reporter uses in carrying out its actions or computing its result.
コマンドやレポーターの多くは入力値を受け取ります。コマンドやレポーターは、処理を実行したり、結果を計算するためにこの入力値を使用します。
Here are two command procedures:
コマンドプロシージャの例を2つ示します:
to setup
  clear-all
  create-turtles 10
  reset-ticks
end

to go
  ask turtles [
    fd 1  ;; forward 1 step
    rt random 10    ;; turn right右に曲がる
    lt random 10    ;; turn left左に曲がる
  ]
  tick
end
Note the use of semicolons to add "comments" to the program. Comments can make your code easier to read and understand, but they don't affect its behavior.
セミコロン(;)を使うとプログラムに「コメント」を書くことができます。コメントはプログラムコードを読みやすくしたり、理解しやすくしたりしますが、プログラムの動作には何も影響を与えません。
In this program,
このプログラムの場合、
setup and go are user-defined commands.clear-all,
create-turtles,
reset-ticks,
ask,
lt ("left turn"),
rt ("right turn") and
tick,
are all primitive commands.random and turtles are primitive reporters. random takes a single number as an input and reports a random integer that is less than the input (in this case, between 0 and 9). turtles reports the agentset consisting of all the turtles. (We'll explain about agentsets later.)setupとgoはユーザーが定義したコマンドです。clear-all,
create-turtles,
reset-ticks,
ask,
lt(左に曲がる),
rt(右に曲がる),
tickはすべてプリミティブコマンドです。randomとturtlesはプリミティブレポーターです。randomは、入力値を一つだけ受け取り、入力値より小さい整数値の乱数を返します。(この例では0から9の値となります)turtlesは、すべてのタートルの集合からなるエージェント集合を返します。(エージェント集合については後で説明します。)setup and go can be called by other procedures, or by buttons, or from the Command Center.
setupとgoは、他のプロシージャやボタン、コマンドセンターから呼び出すことができます。
Many NetLogo models have a once button that calls a procedure called setup and a forever button that calls a procedure called go.
多くのNetLogoのモデルは、setupと呼ばれるプロシージャを呼ぶためのワンスボタンと、goと呼ばれるプロシージャを呼ぶためのフォーエバーボタンを持ちます。
In NetLogo, you may specify which agents -- turtles, patches, or links -- are to run each command. If you don't specify, the code is run by the observer. In the code above, the observer uses ask to make the set of all turtles run the commands between the square brackets.
NetLogoでは、どのエージェント(タートル、パッチ、リンク)がコマンドを実行するか指定することができます。指定しない場合には、オブザーバーによってコードが実行されます。上のコードの例では、オブザーバーはaskというコマンド(四角いかっこ[ ]で囲まれた部分)を、すべてのタートルが含まれる集合に対して実行します。
clear-all and create-turtles can only be run by the observer. fd, on the other hand, can only be run by turtles. Some other commands and reporters, such as set and ticks, can be run by different agent types.
clear-allとcreate-turtlesは、オブザーバーのみが実行できます。一方で、fdは、タートルのみが実行できます。その他のコマンドやレポーター、たとえばsetやticksは、他の種類のエージェントでも実行できます。
Here are some more advanced features you can take advantage of when defining your own procedures.
さらに、あなたがプロシージャを定義するときに利用することができる、より進んだ機能もあります。
Procedures with inputs
入力値を受け取るプロシージャ
Procedures can take inputs, just like many primitives do. To create a procedure that accepts inputs, put their names in square brackets after the procedure name. For example:
プロシージャは、多くのプリミティブと同じように、入力値を受け取ることができます。入力値を受け取るプロシージャを定義するためには、プロシージャ名のあとの四角いかっこ[ ]の中に入力値の名前を書きます。たとえば、
to draw-polygon [num-sides len]  ;; turtle procedureタートルプロシージャ
  pen-down
  repeat num-sides [
    fd len
    rt 360 / num-sides
  ]
end
Elsewhere in the program, you might use the procedure by asking the turtles to each draw an octagon with a side length equal to its who number:
プログラムのどこか別のところから、すべてのタートルに対して、タートル自身のwho番号と同じ長さの辺をもつ正八角形を書くように指示するためには、プロシージャを次のように使います:
ask turtles [ draw-polygon 8 who ]
Reporter procedures
レポータープロシージャ
Just like you can define your own commands, you can define your own reporters. You must do two special things. First, use to-report instead of to to begin your procedure. Then, in the body of the procedure, use report to report the value you want to report.
コマンドを定義するように、レポーターを定義することもできます。そのためには2つのことをする必要があります。1つ目は、プロシージャの先頭でtoの代わりにto-reportを使用することです。2つ目は、プロシージャの内部で、あなたが必要とするデータを出力するためにreportという命令を使うことです。
to-report absolute-value [number]
  ifelse number >= 0
    [ report number ]
    [ report (- number) ]
end
Agent variables
エージェント変数
Agent variables are places to store values (such as numbers) in an agent. An agent variable can be a global variable, a turtle variable, a patch variable, or a link variable.
エージェント変数は、エージェントの中に値(数値など)を保管する場所です。エージェント変数は、グローバル変数、タートル変数、パッチ変数、リンク変数のどれかになります。
If a variable is a global variable, there is only one value for the variable, and every agent can access it. You can think of global variables as belonging to the observer.
もし、ある変数がグローバル変数ならば、それはただ一つだけの変数の値を持ち、すべてのエージェントがアクセスできる変数になります。グローバル変数はオブザーバーが持つ変数と考えることもできます。
Turtle, patch, and link variables are different. Each turtle has its own value for every turtle variable. The same goes for patches and links.
タートル変数、パッチ変数、リンク変数はこれとは違います。それぞれのタートルは、タートル変数として自分自身の値を持ちます。パッチ変数とリンク変数も同様です。
Some variables are built into NetLogo. For example, all turtles and links have a color variable, and all patches have a pcolor variable. (The patch variable begins with "p" so it doesn't get confused with the turtle variable, since turtles have direct access to patch variables.) If you set the variable, the turtle or patch changes color. (See next section for details.)
いくつかの変数はNetLogoの中に組み込まれています。たとえば、すべてのタートルとリンクは、color変数を持ちます。また、すべてのパッチはpcolor変数を持ちます。(パッチ変数は「p」で始まります。タートルは、パッチ変数に直接アクセスできますが、パッチ変数の先頭に「p」が付いていることでタートル変数と間違えずに済みます。)これらの変数を設定するとタートルやパッチの色が変化します。(詳細は次の節を参照。)
Other built-in turtle variables including
xcor,
ycor, and
heading. Other built-in patch variables include
pxcor and
pycor. (There is a complete list here.)
それ以外の組み込みタートル変数にはxcor,
ycor,
headingなどがあります。その他の組み込みパッチ変数にはpxcorとpycorなどがあります。(組み込み変数の完全なリストはこちらにあります。)
You can also define your own variables. You can make a global variable by adding a switch, slider, chooser, or input box to your model, or by using the globals keyword at the beginning of your code, like this:
ユーザー自身で変数を定義することもできます。ユーザーが作成しているモデルにスイッチ、スライダー、チューザー、インプットボックスを追加することで、グローバル変数を作ることができます。また次の例のように、コードの最初に予約語globalsを指定することでもグローバル変数を作ることができます:
globals [score]
You can also define new turtle, patch and link variables using the
turtles-own ,
patches-own and
links-own keywords, like this:
新しいタートル変数、パッチ変数、リンク変数を定義するには、予約語turtles-own,
patches-own,
links-ownを次のように使います:
turtles-own [energy speed]
patches-own [friction]
links-own [strength]
These variables can then be used freely in your model. Use the set command to set them. (Any variable you don't set has a starting value of zero.)
これらの変数はモデルの中で自由に使うことができます。変数に値を設定するにはsetコマンドを使います。(ユーザーが値を設定していない変数は、初期値としてゼロが設定されます。)
Global variables can be read and set at any time by any agent. As well, a turtle can read and set patch variables of the patch it is standing on. For example, this code:
グローバル変数は、いつでも、どのエージェントからでも読んだり書いたりすることができます。同様に、タートルは、自分が今いるパッチのパッチ変数を読んだり書いたりすることができます。たとえば、このコードは:
ask turtles [ set pcolor red ]
causes every turtle to make the patch it is standing on red. (Because patch variables are shared by turtles in this way, you can't have a turtle variable and a patch variable with the same name.)
すべてのタートルが今いる場所のパッチの色を赤くします。(この例のようにパッチ変数はタートルにも共有されているので、タートル変数とパッチ変数に同じ名前を使うことはできません。)
In other situations where you want an agent to read a different agent's variable, you can use of. Example:
また、あるエージェントが別のエージェントの変数を読もうとする場合はofを使います。たとえば:
show [color] of turtle 5
;; prints current color of turtle with who number 5
show [color] of turtle 5
;; 5番のタートルの現在のcolorの値を表示
You can also use of with a more complicated expression than just a variable name, for example:
単に変数名を書くのではなく複雑な書き方をしたい場合にもofを使うことができます。たとえば:
show [xcor + ycor] of turtle 5
;; prints the sum of the x and y coordinates of
;; turtle with who number 5
show [xcor + ycor] of turtle 5
;; 5番のタートルのx座標とy座標の合計を表示
Local variables
ローカル変数
A local variable is defined and used only in the context of a particular procedure or part of a procedure. To create a local variable, use the let command. If you use let at the top of a procedure, the variable will exist throughout the procedure. If you use it inside a set of square brackets, for example inside an "ask", then it will exist only inside those brackets.
ローカル変数は、特定のプロシージャもしくはプロシージャの一部のコンテキストだけで定義され使用されます。ローカル変数を作るには、letコマンドを使います。プロシージャの上部でletを使った場合は、その変数はプロシージャの全体で使うことができます。四角いかっこ[ ]の中で使った場合、たとえば「ask」の内側で使った場合は、その変数はかっこの中だけで使えます。
to swap-colors [turtle1 turtle2]
  let temp [color] of turtle1
  ask turtle1 [ set color [color] of turtle2 ]
  ask turtle2 [ set color temp ]
end
In many NetLogo models, time passes in discrete steps, called "ticks". NetLogo includes a built-in tick counter so you can keep track of how many ticks have passed.
多くのNetLogoモデルでは、時間は「ティック」と呼ばれる離散的なステップで刻まれます。NetLogoには、組み込みのティックカウンターが含まれているため、どれくらいのティックが経過したかをいつでも知ることができます。
The current value of the tick counter is shown above the view. (You can use the Settings button to hide the tick counter, or change the word "ticks" to something else.)
現在のティックカウンターの値はビューの上の方に表示されています。(「Settings」ボタンを使うとティックカウンターを隠すことができます。表示されている「ticks」という単語を別のものに変えることもできます。)
In code, to retrieve the current value of the tick counter, use the ticks reporter. The tick command advances the tick counter by 1. The clear-all command clears the tick counter along with everything else.
プログラムコードの中で、現在のティックカウンターの値を取得したいときは、ticksレポーターを使います。tickコマンドは、ティックカウンターを1ずつ進めます。clear-allコマンドは、他のものと一緒にティックカウンターもクリアします。
When the tick counter is clear, it's an error to try to read or modify it. Use the reset-ticks command when your model is done setting up, to start the tick counter.
ティックカウンターをクリアしたあとに、ティックカウンターを読んだり書き換えたりしようとするとエラーになります。モデルをセットアップしたときに、ティックカウンターをスタートさせるためには、reset-ticksコマンドを使います。
If your model is set to use tick-based updates, then the tick command will usually also update the view. See the later section, View Updates.
モデルがティックベース更新を行うように設定されている場合は、tickコマンドはビューの更新も行います。詳しくはこのあとのセクション、ビューの更新を参照してください。
Use reset-ticks at the end of your setup procedure.
setupプロシージャの最後でreset-ticksを使います。
Use tick at the end of your go procedure.
goプロシージャの最後でtickを使います。
to setup
  clear-all
  create-turtles 10
  reset-ticks
end

to go
  ask turtles [ fd 1 ]
  tick
end
In most models, the tick counter starts at 0 and goes up 1 at a time, from integer to integer. But it's also possible for the tick counter to take on in-between floating point values.
多くのモデルではティックカウンターはゼロから始まり、整数から整数へと1ずつ増えます。しかし、ティックカウンターは整数と整数の間の値、つまり小数値をとることもできます。
To advance the tick counter by a fractional amount, use the tick-advance command. This command takes a numeric input specifying how far to advance the tick counter.
ティックカウンターを小数値だけ進めるためにはtick-advanceコマンドを使います。このコマンドはティックカウンターをどれくらい進めるかを指定するための数値の入力値をとります。
A typical use of fractional ticks is to approximate continuous or curved motion. See, for example, the GasLab models in the Models Library (under Chemistry & Physics). These models calculate the exact time at which a future event is to occur, then advance the tick counter to exactly that time.
小数のティックの典型的な使い方としては、連続的な値や、カーブを描くような動きを近似するケースがあります。たとえば、モデルライブラリのGasLabモデルなどがあります(Chemistry & Physicsの中にあります)。このようなモデルでは、将来イベントの発生する時間を正確に計算します。そのためティックカウンターをその目的の時間ぴったりに進めます。
NetLogo represents colors in different ways. A color can be number in the range 0 to 140, with the exception of 140 itself. Below is a chart showing the range of such colors you can use in NetLogo.
NetLogoは様々な方法で色を表現します。ある特定の色は0以上140未満の範囲の数値になります。下の図はNetLogoで使われるこれらの色の範囲を示したものです。
The chart shows that:
図は次のことを示しています:
Code Example: The color chart was made in NetLogo with the Color Chart Example model.
Code Example: このカラーチャートはNetLogoのColor Chart Exampleモデルで作成されました。
If you use a number outside the 0 to 140 range, NetLogo will repeatedly add or subtract 140 from the number until it is in the 0 to 140 range. For example, 25 is orange, so 165, 305, 445, and so on are orange too, and so are -115, -255, -395, etc. This calculation is done automatically whenever you set the turtle variable color or the patch variable pcolor. Should you need to perform this calculation in some other context, use the wrap-color primitive.
もし、0から140の範囲外の数値を指定した場合には、NetLogoはその数から140を繰り返し足したり引いたりして、その数が0から140の範囲になるようにします。たとえば、25はorangeですが、165, 305, 445もorangeです。また、-115, -255, -395などもorangeです。この計算はタートル変数colorやパッチ変数pcolorを設定するときに、いつも自動的に計算されます。もし、別のコードの部分でこの計算を行う必要があるときには、wrap-colorプリミティブを使います。
If you want a color that's not on the chart, more exist between the integers. For example, 26.5 is a shade of orange halfway between 26 and 27. This doesn't mean you can make any color in NetLogo; the NetLogo color space is only a subset of all possible colors. It contains only a fixed set of discrete hues (one hue per row of the chart). Starting from one of those hues, you can either decrease its brightness (darken it) or decrease its saturation (lighten it), but you cannot decrease both brightness and saturation. Also, only the first digit after the decimal point is significant. Thus, color values are rounded down to the next 0.1, so for example, there's no visible difference between 26.5 and 26.52 or 26.58.
図にのっていない色を使いたいのであれば、整数と整数の間にもっとたくさんの色があります。たとえば26.5は26と27の間の中間色になります。これはNetLogoではどんな色でも作り出せるという意味ではありません。NetLogo色空間は表現可能な色の一部分にすぎません。NetLogo色空間には、色の集合(図の行に表現されている1つの色相の集合)がいくつか含まれているだけです。これらの色相のどこか一つから始めて、明度を下げる(暗くする)ことや、彩度を下げる(明るくする)ことはできますが、明度と彩度を同時に下げることはできません。また、小数点以下第1位の数だけが有効です。つまり色の値は0.1単位で切り捨てられます。たとえば、26.5と26.52や26.58との間には視覚的な違いはありません。
Color primitives
色に関するプリミティブ
There are a few primitives that are helpful for working with colors.
色を扱うために便利なプリミティブがいくつかあります。
We have already mentioned the wrap-color primitive.
wrap-colorプリミティブについてはすでに紹介しました。
The scale-color primitive is useful for converting numeric data into colors.
scale-colorプリミティブは数値を色に変換するのに便利です。
shade-of? will tell you if two colors are both "shades" of the same basic hue. For example, shade-of? orange 27 is true, because 27 is a lighter shade of orange.
shade-of?は2つの色が同じ色調かどうかを調べます。たとえばshade-of? orange 27はtrueを返します。なぜならば27という色はorangeを明るくした色にあたるからです。
Code Example: Scale-color Example demonstrates the scale-color reporter.
Code Example: Scale-color Example ではスケールカラーレポーターの例を示しています。
RGB and RGBA Colors
RGBカラーとRGBAカラー
NetLogo also represents colors as RGB (red/green/blue) lists and RGBA (red/green/blue/alpha) lists. When using RGB colors the full range of colors is available to you. RGBA colors allow all the colors that RGB allows and you can also vary the transparency of a color. RGB and RGBA lists are made up of three or four integers, respectively, between 0 and 255 if a number is outside that range 255 is repeatedly subtracted until it is in the range. You can set any color variables in NetLogo (color for turtles and links and pcolor for patches) to an RGB list and that agent will be rendered appropriately. So you can set the color of patch 0 0 to pure red using the following code:
NetLogoは色をRGB(赤/緑/青)やRGBA(赤/緑/青/アルファ)の色コードとして表現することもできます。RGBカラーを使うとすべての色の範囲を扱うことができます。RGBAカラーを使うと色の透過度を変えることができます。RGBとRGBAは3つまたは4つの、0から255の範囲の整数で構成されます。もし、255を超える数値が指定された場合は、0から255の範囲に収まるように繰り返し256を引き算します。NetLogoの中の色変数(タートルやリンクのcolor変数や、パッチのpcolor変数)はRGBリストで指定することができ、これによりエージェントはどのような色でも表現されます。パッチ 0 0 の色を赤の純色に変更するには次のように書きます:
set pcolor [255 0 0]
Turtles, links, and labels can all contain RGBA lists as their color variables, however, patches cannot have RGBA pcolors You can set the color of a turtle to be approximately half transparent pure red with the following code:
タートルとリンク、ラベルのcolor変数にRGBA色コードを使うことができますが、パッチのpcolor変数にはRGBA色コードを使うことができません。タートルの色コードを赤の純色に設定し、透過度を約半分に設定する場合は次のコードのように書きます:
set color [255 0 0 125]
You can convert from a NetLogo color to RGB or HSB (hue/saturation/brightness) using extract-hsb and extract-rgb. You can use rgb to generate rgb lists and hsb to convert from an HSB color to RGB.
NetLogoの色をRGBカラーやHSBカラー(色相/彩度/明度)に変換するにはextract-hsbやextract-rgbを使います。RGBのカラーリストを生成するにはrgbを使います。HSBカラーをRGBカラーに変換するにはhsbを使います。
Since many colors are missing from the NetLogo color space, approximate-hsb and approximate-rgb often can't give you the exact color you ask for, but they try to come as close as possible.
NetLogo色空間からは多くの色が抜け落ちているので、approximate-hsbやapproximate-rgbは、しばしばユーザーが求めている正確な色を返すことができません。しかし、できるだけ近い色を返すようにしています。
Example: you can change any turtle from it's existing NetLogo color to a half transparent version of that color using:
例:タートルの色を現在のNetLogoカラーから半分の透過度に変更するには次のように書きます:
set color lput 125 extract-rgb color
Code Examples: HSB and RGB Example (lets you experiment with the HSB and RGB color systems), Transparency Example
Code Examples: HSB and RGB Example (HSBカラーとRGBカラーの仕組みを試してみてください), Transparency Example
Color Swatches dialog
色見本ダイアログ
The Color Swatches dialog helps you experiment with and choose colors. Open it by choosing Color Swatches on the Tools Menu.
色見本ダイアログでは色を試したり、選んだりすることができます。Toolsメニューから色見本を選択してください。
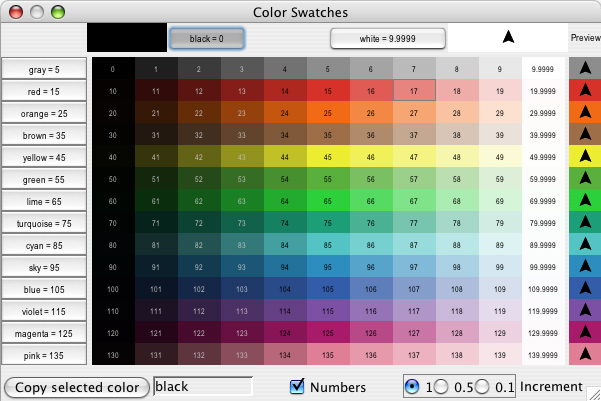
When you click on a color swatch (or a color button), that color will be shown against other colors. In the bottom left, the code for the currently selected color is displayed (for example, red + 2) so you can copy and paste it into your code. On the bottom right there are three increment options, 1, 0.5, and 0.1. These numbers indicate the difference between two adjacent swatches. When the increment is 1 there are 10 different shades in each row; when the increment is 0.1 there are 100 different shades in each row. 0.5 is an intermediate setting.
色見本(または色ボタン)の上でクリックすると、その色は他の色から区別され、選択されている状態にあることが分かります。ダイアログの左下部に、現在選択されている色のコードが表示されます(たとえば、red + 2)。これをコピーしてあなたのプログラムコードに貼り付けることができます。ダイアログの右下部にincrementオプションがあり、1, 0.5, 0.1という数字が書いてあります。これらの番号は、隣接する2つの色の差を表しています。incrementの値が1のとき、それぞれの横の並びには、10種類の異なる色の階調があることになります。incrementの値が0.1のときは100種類の色の階調があります。incrementの値が0.5のときはその中くらいということです。
NetLogo uses the ask command to give commands to turtles, patches, and links. All code to be run by turtles must be located in a turtle "context". You can establish a turtle context in any of three ways:
NetLogoでは、タートルやパッチ、リンクに命令するときにはaskコマンドを使います。タートルに実行させるコードはすべて、タートルの「コンテキスト」の中で使います。タートルコンテキストを確立する方法は3通りあります:
ask turtles, hatch, or other commands which establish a turtle context.ask turtlesや hatch、あるいはタートルコンテキストを確立するその他のコマンドを使う方法。The same goes for patches, links, and the observer, except that you cannot ask the observer. Any code that is not inside any ask is by default observer code.
オブザーバーに対してaskを使えない点をのぞけば、パッチやリンク、オブザーバーに対しても同様です。どのaskの中にも含まれていないコードは、特に指定しなければオブザーバーに対するコードになります。
Here's an example of the use of ask in a NetLogo procedure:
次に示すのはNetLogoプロシージャにおけるaskの使い方です:
to setup
  clear-all
  create-turtles 100   ;; create 100 turtles with random headings
  ask turtles
    [ set color red    ;; turn them red
 fd 50 ]     ;; spread them around
  ask patches
    [ if pxcor > 0    ;; patches on the right side
   [ set pcolor green ] ]  ;; of the view turn green
  reset-ticks
end
to setup
  clear-all
  create-turtles 100   ;; バラバラの向きで100匹のタートルを作る。
  ask turtles
    [ set color red    ;; 色を赤くする。
 fd 50 ]     ;; 周囲に散らばらせる。
  ask patches
    [ if pxcor > 0    ;; ビューの右側のパッチの色を
   [ set pcolor green ] ]  ;; 緑にする。
  reset-ticks
end
The models in the Models Library are full of other examples. A good place to start looking is in the Code Examples section.
Models Libraryの中のモデルにはその他にもたくさんの例があります。はじめにCode Examplesを見るとよいでしょう。
Usually, the observer uses ask to ask all turtles, all patches or all links to run commands. You can also use ask to have an individual turtle, patch or link run commands. The reporters turtle, patch, link and patch-at are useful for this technique. For example:
通常は、オブザーバーはすべてのタートルや、すべてのパッチ、すべてのリンクに対してコマンドを実行させるためにaskを使います。また、ある特定のタートルやパッチ、リンクに対してコマンドを実行させるためにaskを使うこともできます。turtle, patch, link, patch-atレポーターはこの方法を行ううえで役立ちます。たとえば:
to setup
  clear-all
  crt 3       ;; make 3 turtles
  ask turtle 0     ;; tell the first one...
    [ fd 1 ]       ;; ...to go forward
  ask turtle 1     ;; tell the second one...
    [ set color green ]      ;; ...to become green
  ask turtle 2     ;; tell the third one...
    [ rt 90 ]      ;; ...to turn right
  ask patch 2 -2   ;; ask the patch at (2,-2)
    [ set pcolor blue ]      ;; ...to become blue
  ask turtle 0     ;; ask the first turtle
    [ ask patch-at 1 0  ;; ...to ask patch to the east
 [ set pcolor red ] ]   ;; ...to become red
  ask turtle 0     ;; tell the first turtle...
    [ create-link-with turtle 1 ] ;; ...make a link with the second
  ask link 0 1     ;; tell the link between turtle 0 and 1
    [ set color blue ]  ;; ...to become blue
  reset-ticks
end
to setup
  clear-all
  crt 3       ;; タートルを3匹作る。
  ask turtle 0     ;; 最初のタートルに対して...
    [ fd 1 ]       ;; ...前に進め
  ask turtle 1     ;; 2番目のタートルに対して...
    [ set color green ]      ;; ...緑色になれ
  ask turtle 2     ;; 2番目のタートルに対して...
    [ rt 90 ]      ;; ...右に曲がれ
  ask patch 2 -2   ;; (2,-2)のパッチに対して
    [ set pcolor blue ]      ;; ...青くなれ
  ask turtle 0     ;; 最初のタートルに対して
    [ ask patch-at 1 0  ;; ...東側(右側)のパッチに対して
 [ set pcolor red ] ]   ;; ...赤くなれ
  ask turtle 0     ;; 最初のタートルに対して...
    [ create-link-with turtle 1 ] ;; ...2番目のタートルとリンクを結べ
  ask link 0 1     ;; タートル0とタートル1を結んでいるリンクに対して
    [ set color blue ]  ;; ...青くなれ
  reset-ticks
end
Every turtle created has a who number. The first turtle created is number 0, the second turtle number 1, and so forth.
作られたタートルにはすべてwho番号が付いています。最初に作られたタートルにはwho番号0が、2番目に作られたタートルにはwho番号1がついています。以下同様にwho番号が付きます。
The turtle primitive reporter takes a who number as an input, and reports the turtle with that who number. The patch primitive reporter takes values for pxcor and pycor and reports the patch with those coordinates. The link primitive takes two inputs, the who numbers of the two turtles it connects. And the patch-at primitive reporter takes offsets: distances, in the x and y directions, from the first agent. In the example above, the turtle with who number 0 is asked to get the patch east (and no patches north) of itself.
turtleレポーターに対して入力としてwho番号を指定すると、そのwho番号を持つタートルの情報をレポートします。patchレポーターに対してpxcorとpycorの2つの値を指定すると、その座標にあるパッチの情報をレポートします。linkレポーターに対しては、結びついている2匹のタートルのwho番号を入力として指定します。patch-atレポーターに対しては、オフセット(fromで指定された最初のエージェントからのx方向とy方向の距離)を指定します。上に示した例では、who番号0のタートルは、自分自身が今いるパッチから一つ東側に進んだパッチ(北側には進みません)の情報を得るように指示されています。
You can also select a subset of turtles, or a subset of patches, or a subset of links and ask them to do something. This involves using agentsets. The next section explains them in detail.
タートルの集合や、パッチの集合、リンクの集合を選択して、それらに対して指示を与えることも可能です。このようなときはエージェント集合を使います。エージェント集合については次の節で詳しく説明します。
When you ask a set of agents to run more than one command, each agent must finish before the next agent starts. One agent runs all of the commands, then the next agent runs all of them, and so on. For example, if you write:
エージェントの集合に対して2つ以上のコマンドを実行させるとき、それぞれのエージェントは、次のエージェントが動き始める前に、動きを終わらせていなければなりません。1つのエージェントがすべてのコマンドを実行し終えたあとに、次のエージェントがすべてのコマンドを実行し、またその次のエージェントが・・・といった形になります。たとえば、次のように書いた場合:
ask turtles
  [ fd 1
    set color red ]
first one turtle moves and turns red, then another turtle moves and turns red, and so on.
最初のタートルが動いてから赤に変わり、そして別のタートルが動いてから赤に変わり、次のタートルが・・・といった形になります。
But if you write it this way:
しかし、このように書いた場合には:
ask turtles [ fd 1 ]
ask turtles [ set color red ]
first all the turtles move, then they all turn red.
最初に全てのタートルが動いて、次に全てのタートルが赤くなります。
An agentset is exactly what its name implies, a set of agents. An agentset can contain either turtles, patches or links, but not more than one type at once.
エージェント集合は、その名前のとおりエージェントの集合です。エージェント集合には、タートル、パッチ、リンクを含むことができますが、同時に含むことができるのは単一の種類だけです。
An agentset is not in any particular order. In fact, it's always in a random order. And every time you use it, the agentset is in a different random order. This helps you keep your model from treating any particular turtles, patches or links differently from any others (unless you want them to be). Since the order is random every time, no one agent always gets to go first.
エージェント集合には特別な順番というものはありません。実際にランダムな順番で構成されています。エージェント集合を使うときは、毎回異なるランダムな順番になります。こうすることで、あるタートルやパッチ、リンクを他と区別して特別扱いすることはなくなります。(どれかを特別扱いしたい場合は別です。)順番はいつでもランダムなので、いつも一番に動くエージェントというのは存在しません。
You've seen the turtles primitive, which reports the agentset of all turtles, the patches primitive, which reports the agentset of all patches and the links primitive which reports the agentset of all links.
これまでに、turtlesプリミティブ(すべてのタートルが含まれるエージェント集合を返します)、patchesプリミティブ(すべてのパッチが含まれるエージェント集合を返します)、linksプリミティブ(すべてのリンクが含まれるエージェント集合を返します)について述べてきました。
But what's powerful about the agentset concept is that you can construct agentsets that contain only some turtles, some patches or some links. For example, all the red turtles, or the patches with pxcor evenly divisible by five, or the turtles in the first quadrant that are on a green patch or the links connected to turtle 0. These agentsets can then be used by ask or by various reporters that take agentsets as inputs.
しかし、エージェント集合の特徴として優れているのは、いくつかのタートルや、いくつかのパッチ、いくつかのリンクだけが含まれるエージェント集合を作ることができるという点です。たとえば、すべての赤いタートルのエージェント集合、pxcorが5で割り切れるパッチのエージェント集合、第一象限にある緑色のパッチの上にいるタートルのエージェント集合、タートル0と結ばれているリンクのエージェント集合などです。これらのエージェント集合はaskや、入力値としてエージェント集合を取る各種のレポーターで使用されます。
One way is to use turtles-here or turtles-at, to make an agentset containing only the turtles on my patch, or only the turtles on some other patch at some x and y offsets. There's also turtles-on so you can get the set of turtles standing on a given patch or set of patches, or the set of turtles standing on the same patch as a given turtle or set of turtles.
turtles-hereやturtles-atの使い方の一例として、そのパッチの上にいるタートルだけのエージェント集合、あるいはそのパッチからxとyの値だけ離れたパッチの上にいるタートルだけのエージェント集合などがあります。同様に、turtles-onは、1つまたは複数のパッチの上にいるタートルの集合や、特定の1匹のタートルもしくは複数のタートルと同じパッチの上にいるタートルの集合などを表すことができます。
Here are some more examples of how to make agentsets:
それでは、エージェント集合の作り方の例をいくつか示します:
;; all other turtles:
other turtles
;; all other turtles on this patch:
other turtles-here
;; all red turtles:
turtles with [color = red]
;; all red turtles on my patch
turtles-here with [color = red]
;; patches on right side of view
patches with [pxcor > 0]
;; all turtles less than 3 patches away
turtles in-radius 3
;; the four patches to the east, north, west, and south
patches at-points [[1 0] [0 1] [-1 0] [0 -1]]
;; shorthand for those four patches
neighbors4
;; turtles in the first quadrant that are on a green patch
turtles with [(xcor > 0) and (ycor > 0)
    and (pcolor = green)]
;; turtles standing on my neighboring four patches
turtles-on neighbors4
;; all the links connected to turtle 0
[my-links] of turtle 0
;; 自分以外のタートル
other turtles
;; このパッチの上にいる自分以外のタートル
other turtles-here
;; すべての赤いタートル
turtles with [color = red]
;; このパッチの上にいるすべての赤いタートル
turtles-here with [color = red]
;; ビューの右半分にいるタートル
patches with [pxcor > 0]
;; ここから3パッチ以内にいるタートル
turtles in-radius 3
;; 東、北、西、南にあるパッチ、合計4個分
patches at-points [[1 0] [0 1] [-1 0] [0 -1]]
;; これら4つのパッチを簡単に表す方法
neighbors4
;; 第一象限の緑色のパッチの上にいるタートル
turtles with [(xcor > 0) and (ycor > 0)
    and (pcolor = green)]
;; 自分のまわりの4つのパッチの上にいるタートル
turtles-on neighbors4
;; タートル0につながっているすべてのリンク
[my-links] of turtle 0
Note the use of other to exclude this agent. This is common.
otherは、コマンドを実行するエージェントを除きます。これは、どのエージェントタイプにも共通です。
Once you have created an agentset, here are some simple things you can do:
一度エージェント集合を作成すると、次のようなことが簡単に行えます:
ask to make the agents in the agentset do somethingany? to see if the agentset is emptyall? to see if every agent in an agentset satisfies a condition.count to find out exactly how many agents are in the setaskは、そのエージェント集合の中にいるエージェントに何か動作をさせます。any?は、そのエージェント集合の中身が空かどうか調べます。all?は、エージェント集合の各エージェントがある条件を満たしているかどうかを調べます。countは、その集合の中にエージェントがいくつあるかを調べます。And here are some more complex things you can do:
それでは、少し複雑な内容について説明します:
one-of. For example, we can make a randomly chosen turtle turn green:
ask one-of turtles [ set color green ]Or tell a randomly chosen patch to
sprout a new turtle:
ask one-of patches [ sprout 1 ]
one-ofを使うことによって、エージェント集合からランダムに1つのエージェントを選ぶことができます。たとえば、ランダムに選んだタートルを緑に変えるにはこのように書きます:
ask one-of turtles [ set color green ]あるいは、次のように書くと、ランダムに選んだパッチに対して、新しいタートルを生み出す(
sprout)ように指示します:
ask one-of patches [ sprout 1 ]
max-one-of or min-one-of reporters to find out which agent is the most or least along some scale. For example, to remove the richest turtle, you could say
ask max-one-of turtles [sum assets] [ die ]
max-one-ofやmin-one-ofレポーターは、ある基準に従って、最大/最小のエージェントを見つけ出します。たとえば、最も金持ちのタートルを取り去るには次のように書きます。
ask max-one-of turtles [sum assets] [ die ]
histogram command (in combination with of).ofを組み合わせたhistogramコマンドを使うことによって、エージェント集合のヒストグラムを描くことができます。of to make a list of values, one for each agent in the agentset. Then use one of NetLogo's list primitives to do something with the list. (See the "Lists" section below.) For example, to find out how rich turtles are on the average, you could say
show mean [sum assets] of turtles
ofは、エージェント集合の中の各エージェントの値のリストを作るのに使います。リストに関しての処理をしたい場合は、NetLogoのリストに関するプリミティブを使います。(下記の「リスト」の節を参照。)たとえば、タートルの金持ちの程度の平均を知りたいときは次のように書きます。
show mean [sum assets] of turtles
turtle-set, patch-set and link-set reporters to make new agentsets by gathering together agents from a variety of possible sources.turtle-set, patch-set, link-setレポーターは、元々ある様々なエージェントをひとまとめにすることによって、新しいエージェント集合を作ります。no-turtles, no-patches and no-links reporters to make empty agentsets.no-turtles, no-patches, no-linksレポーターは、空のエージェント集合を作ります。= or !=.=や!=を使います。member? to see whether a particular agent is a member of an agentset.member?を使います。This only scratches the surface. See the Models Library for many more examples, and consult the NetLogo Dictionary for more information about all of the agentset primitives.
これは、まだほんの一部分です。もっと多くのサンプルを見たい場合はモデルライブラリを見てください。エージェント集合に関するプリミティブについて詳しく知りたい場合はNetLogoディクショナリを調べてください。
More examples of using agentsets are provided in the individual entries for these primitives in the NetLogo Dictionary.
NetLogoディクショナリの各項目にはエージェント集合の使い方に関するサンプルが多数用意されています。
The agentsets turtles and links have special behavior because they always hold the sets of all turtles and all links. Therefore, these agentsets can grow.
turtlesエージェント集合やlinksエージェント集合は、すべてのタートルやすべてのリンクを含んでいるため特別な動きをします。ゆえにこれらのエージェント集合の大きさは変化します。
The following interaction shows the special behavior. Assume the Code tab has globals [g]. Then:
次の相互作用は特別な動きをします。コードタブの中にglobals [g]という記述があるとします:
observer> clear-all
observer> create-turtles 5
observer> set g turtles
observer> print count g
5
observer> create-turtles 5
observer> print count g
10
observer> set g turtle-set turtles
observer> print count g
10
observer> create-turtles 5
observer> print count g
10
observer> print count turtles
15
The turtles agentset grows when new turtles are born, but other agentsets don't grow. If I write turtle-set turtles, I get a new, normal agentset containing just the turtles that currently exist. New turtles don't join when they're born.
turtlesエージェント集合は、新しいタートルが生まれると大きくなります。しかし、それ以外のエージェント集合は大きくなりません。turtle-set turtlesと書くとその時点に存在するタートルだけが含まれる通常のエージェント集合が作られます。新しいタートルが生まれてもこのエージェント集合には加わりません。
Breed agentsets are special in the same way as turtles and links. Breeds are introduced and explained below.
品種エージェント集合は、turtlesやlinksと同じ意味で、特殊なエージェント集合です。品種についてはこのあと紹介します。
Earlier, we said that agentsets are always in random order, a different random order every time. If you need your agents to do something in a fixed order, you need to make a list of the agents instead. See the Lists section below.
ここまでの説明で、エージェント集合は毎回異なるランダムな順番で動作すると述べました。もし、エージェントを決まった順番で動かしたい場合には、エージェントのリストを作ります。この方法については後で述べるListの章を見てください。
Code Example: Ask Ordering Example
NetLogo allows you to define different "breeds" of turtles and breeds of links. Once you have defined breeds, you can go on and make the different breeds behave differently. For example, you could have breeds called sheep and wolves, and have the wolves try to eat the sheep or you could have link breeds called streets and sidewalks where foot traffic is routed on sidewalks and car traffic is routed on streets.
NetLogoでは「品種」の異なるタートルやリンクを定義することができます。いったん品種を定義すると、それを使うことができますし、それぞれに異なる動きをさせることができます。たとえば、ヒツジという品種とオオカミという品種を定義して、オオカミはヒツジを食べるようにすることができます。また、車道と歩道というリンクの品種を定義し、歩行者は歩道を歩かせ、車は車道を走らせるようにできます。
You define turtle breeds using the breed keyword, at the top of the Code tab, before any procedures:
タートル品種を定義するには、コードタブの一番はじめの、プロシージャを書く前の部分で予約語breedを使います:
breed [wolves wolf]
breed [sheep a-sheep]
You can refer to a member of the breed using the singular form, just like the turtle reporter. When printed, members of the breed will be labeled with the singular name.
turtleレポーターのように、単数形を使うことによって、品種の中の一つのメンバーを参照することができます。表示するときには、品種の中の個々のメンバーは単数形でラベルづけされています。
Some commands and reporters have the plural name of the breed in them, such as create-<breeds>. Others have the singular name of the breed in them, such as <breed>
いくつかのコマンドやレポーターは、create-<breeds>のように、品種の複数形を持ちます。それ以外は、<breed>のように単数形を持ちます。
The order in which breeds are declared is also the order in which they are layered in the view. So breeds defined later will appear on top of breeds defined earlier; in this example, sheep will be drawn over wolves.
品種を定義する順番はビューの中で表示される順番でもあります。つまりあとで定義される品種は先に定義される品種の上に表示されます。この例ではsheepはwolfを上書きします。
When you define a breed such as sheep, an agentset for that breed is automatically created, so that all of the agentset capabilities described above are immediately available with the sheep agentset.
sheepのような品種を定義すると、その品種のエージェント集合は自動的に作られます。上記のエージェント集合の機能はsheepエージェント集合に関してもすぐに有効になります。
The following new primitives are also automatically available once you define a breed:
次のプリミティブもまた、いったん品種を定義すれば自動的に使うことができます:
create-sheep
hatch-sheep
sprout-sheep
sheep-here
sheep-at
sheep-on
is-a-sheep?
Also, you can use sheep-own to define new turtle variables that only turtles of the given breed have. (It's allowed for more than one breed to own the same variable.)
また、sheep-ownと記述することによって、ある品種のタートルだけが持つタートル変数を定義することができます。(1つ以上の品種で、同じ変数を持つことができます。)
A turtle's breed agentset is stored in the breed turtle variable. So you can test a turtle's breed, like this:
タートルの品種のエージェント集合は、タートル変数のbreedにセットされています。タートルの品種を調べたいときは、次のように書きます。:
if breed = wolves [ ... ]
Note also that turtles can change breeds. A wolf doesn't have to remain a wolf its whole life. Let's change a random wolf into a sheep:
タートルは品種を変えることができます。オオカミは一生の間、オオカミである必要はありません。ランダムに選んだ一匹のオオカミをヒツジに変えてみます:
ask one-of wolves [ set breed sheep ]
The set-default-shape primitive is useful for associating certain turtle shapes with certain breeds. See the section on shapes below.
set-default-shapeプリミティブは、ある品種に特定のタートルの形状を割り当てるのに便利です。詳しくは、このあとの形状の節で述べます。
Who numbers are assigned irrespective of breeds. If you already have a frog 0, then the first mouse will be mouse 1, not mouse 0, since the who number 0 is already taken.
who番号は品種に関係なく割り当てられます。すでにfrog 0があるなら、その後の最初のmouseはmouse 1になり、mouse 0にはなりません。なぜならwho番号 0 はすでに使われているからです。
Here is a quick example of using breeds:
品種を使うときの簡単な例を示します:
breed [mice mouse]
breed [frogs frog]
mice-own [cheese]
to setup
  clear-all
  create-mice 50
    [ set color white
 set cheese random 10 ]
  create-frogs 50
    [ set color green ]
  reset-ticks
end
Code Example: Breeds and Shapes Example
Link breeds are very similar to turtle breeds, however, there are a few differences.
リンク品種はタートル品種とたいへんよく似ています。しかし、いくつかの点で異なります。
When you declare a link breed you must declare whether it is a breed of directed or undirected links by using the directed-link-breed and undirected-link-breed keywords.
リンク品種を定義するとき、それが有向であるか無向であるかをdirected-link-breedやundirected-link-breedの予約語を使って指定します。
directed-link-breed [streets street]
undirected-link-breed [friendships friendship]
Once you have created a breeded link you cannot create unbreeded links and vice versa. (You can, however, have directed and undirected links in the same world, just not in the same breed)
いったんリンクに品種を定義したら、品種のないリンクを定義することはできなくなります。逆もまた同じです。(しかし、有向リンクと無向リンクが同じ品種でないならば、同じワールドの中で両方を使うことができます。)
Unlike with turtle breeds the singular breed name is required for link breeds, as many of the link commands and reports use the singular name, such as <link-breed>-neighbor?.
リンクに関するコマンドやレポーターの多くが単数形を使うのと同様に、リンク品種には単数形の品種名を使います。この点、タートル品種とは違います。たとえば、<link-breed>-neighbor?のような形式になります。
The following primitives are also automatically available once you define a directed link breed:
次に示すプリミティブは、有向リンク品種を定義すると自動的に使うことができるようになります:
create-street-from
create-streets-from
create-street-to
create-streets-to
in-street-neighbor?
in-street-neighbors
in-street-from
my-in-streets
my-out-streets
out-street-neighbor?
out-street-neighbors
out-street-to
And the following are automatically available when you define an undirected link breed:
また、次に示すプリミティブは、無向リンク品種を定義すると自動的に使うことができるようになります:
create-friendship-with
create-friendships-with
friendship-neighbor?
friendship-neighbors
friendship-with
my-friendships
Multiple link breeds may declare the same -own variable, but a variable may not be shared between a turtle breed and a link breed.
複数のリンク品種の間で同じ-own変数を定義することができます。しかし、変数はタートル品種とリンク品種との間では共有されません。
Just as with turtle breeds the order in which link breeds are declared defines the order in which the links are drawn, so the friendships will always be on top of streets (if for some reason these breeds were in the same model). You can also use <link-breeds>-own to declare variables of each link breed separately.
タートル品種と同じように、リンク品種が定義された順番は、リンクが描かれる順番を決定します。たとえば何らかの理由でstreetとfriendshipというリンクが同じモデルの中にあった場合、friendshipはいつでもstreetの上に描かれます。それぞれのリンク品種の変数を別々に定義する場合には予約語<link-breeds>-ownを使います。
You can change the breed of a link with set breed. (However, you cannot change a breeded link to an unbreeded one, to prevent having breeded and unbreeded links in the same world.)
set breedを使うことによって、リンク品種を変更することができます。(しかし、同じワールドの中に品種ありリンクと品種なしリンクが混在するのを避けるために、品種ありリンクを品種なしリンクに変更することはできません。)
ask one-of friendships [ set breed streets ]
ask one-of friendships [ set breed links ] ;; produces a runtime error実行時エラーが発生する
set-default-shape may also be used with link breeds to associate it with a particular link shape.
リンク品種にある特定のリンクの形状を対応させるためにはset-default-shapeを使います。
Code Example: Link Breeds Example
Buttons in the interface tab provide an easy way to control the model. Typically a model will have at least a "setup" button, to set up the initial state of the world, and a "go" button to make the model run continuously. Some models will have additional buttons that perform other actions.
インターフェイスタブのボタンを使うと、簡単にモデルをコントロールすることができます。一般的なモデルには、ワールドを初期設定するための「setup」ボタンと、モデルを連続的に動かすための「go」ボタンが用意されています。また、その他のアクションを行わせるためのボタンが追加されているモデルもあります。
A button contains some NetLogo code. That code is run when you press the button.
ボタンにはNetLogoのコードが記述されています。ボタンが押されるとこれらのコードが実行されます。
A button may be either a "once button", or a "forever button". You can control this by editing the button and checking or unchecking the "Forever" checkbox. Once buttons run their code once, then stop and pop back up. Forever buttons keep running their code over and over again.
ボタンは「ワンスボタン」か「フォーエバーボタン」のいずれかとなります。これはボタンを編集して「Forever」チェックボックスのチェックをつけたり外したりして変更することができます。ワンスボタンはコードを一度だけ実行し、実行が終了すると元に戻ります。フォーエバーボタンはコードを何回も繰り返し実行します。
A forever button stops if the user presses the button again to stop it. The button waits until the current iteration has finished, then pops up.
フォーエバーボタンはユーザーがもう一度ボタンを押すと停止します。ボタンは現在の反復が完了するまで待ったうえでポップアップします。
A forever button can also be stopped from code. If the forever button directly calls a procedure, then when that procedure stops, the button stops. (In a turtle or patch forever button, the button won't stop until every turtle or patch stops -- a single turtle or patch doesn't have the power to stop the whole button.)
フォーエバーボタンはコードから停止させることもできます。フォーエバーボタンが直接にプロシージャを呼び出している場合は、プロシージャが停止すればボタンも停止します。(タートルもしくはパッチのフォーエバーボタンでは、すべてのタートルもしくはパッチが停止するまでボタンは停止しません。単位地のタートルもしくはパッチではボタン全体を停止させられません。)
Normally, a button is labeled with the code that it runs. For example, a button that says "go" on it usually contains the code "go", which means "run the go procedure". (Procedures are defined in the Code tab; see below.) But you can also edit a button and enter a "display name" for the button, which is a text that appears on the button instead of the code. You might use this feature if you think the actual code would be confusing to your users.
通常は、ボタンの名称には実行されるコードと同じ名前が付けられます。たとえば、通常「go」というボタンには、「goプロシージャを実行する」という意味の「go」というコードが記述されています。(プロシージャはコードタブの中で定義されます。詳しくはあとで説明します。)しかし、コードに書く代わりに、ボタンの上に表示される文字を編集して修正することもできます。この機能は、そのままの名前だとユーザーが混乱するような場合に便利です。
When you put code in a button, you must also specify which agents you want to run that code. You can choose to have the observer run the code, or all turtles, or all patches, or all links. (If you want the code to be run by only some turtles or some patches, you could make an observer button, and then have the observer use the ask command to ask only some of the turtles or patches to do something.)
ボタンにコードを記述するときには、とのエージェントに対してコードを実行するかを特定しなければなりません。オブザーバーに対してなのか、タートルすべてに対してなのか、パッチに対してなのか、リンクに対してなのかを選択します。(もし、特定のタートルや特定のパッチに対してコードを実行させたいのならば、まずオブザーバーボタンを作成して、その中でオブザーバーから特定のタートルやパッチに対してaskコマンドを実行させて、何らかの動作をさせるようにします。)
When you edit a button, you have the option to assign an "action key". This makes that key on the keyboard behave just like a button press. If the button is a forever button, it will stay down until the key is pressed again (or the button is clicked). Action keys are particularly useful for games or any model where rapid triggering of buttons is needed.
ボタンを編集するときに「action key」を設定することもできます。これは、キーボードの何かのキーに、ボタンを押したときと同じ動きを割り付けるものです。フォーエバーボタンの場合であれば、キーボードのキーがもう一度押されるまで(あるいはボタンがクリックされるまで)ボタンが押されている状態になります。アクションキーはゲームや、動きの速いボタン操作が必要なモデルの場合に、特に便利です。
Buttons take turns
ボタンが実行される順番
More than one button can be pressed at a time. If this happens, the buttons "take turns", which means that only one button runs at a time. Each button runs its code all the way through once while the other buttons wait, then the next button gets its turn.
2つ以上のボタンが同時に押された場合はどうなるでしょうか。この場合、ボタンは順番に実行されます。つまり同時には一つのボタンしか実行できないということです。他のボタンが待っている間に、そのボタンは一通りの処理を実行します。そして、終わると次のボタンが実行される番になります。
In the following examples, "setup" is a once button and "go" is a forever button.
次の例では「setup」ボタンはワンスボタンで「go」ボタンはフォーエバーボタンです。
Example #1: The user presses "setup", then presses "go" immediately, before the "setup" has popped back up. Result: "setup" finishes before "go" starts.
例1:「setup」ボタンを押してから元に戻る前に「go」ボタンを続けて押した場合。結果:「setup」が終了してから「go」が実行されます。
Example #2: While the "go" button is down, the user presses "setup". Result: the "go" button finishes its current iteration. Then the "setup" button runs. Then "go" starts running again.
例2:「go」ボタンが押されている間に「setup」ボタンを押した場合。結果:「go」ボタンが今行っている繰り返しの処理は中断され、「setup」ボタンが実行されます。そして「go」ボタンの処理が再び実行されます。
Example #3: The user has two forever buttons down at the same time. Result: first one button runs its code all the way through, then the other runs its code all the way through, and so on, alternating.
例3:フォーエバーボタンが2つあって、同時に押した場合。結果:一方のボタンが一連の処理を行った後、もう一方のボタンが一連の処理を行います。これが交互に繰り返されます。
Note that if one button gets stuck in an infinite loop, then no other buttons will run.
このとき、一方のボタンが無限ループに陥った場合には、他のボタンは実行されなくなります。
Turtle, patch, and link forever buttons
タートル、パッチ、リンクのフォーエバーボタン
There is a subtle difference between putting commands in a turtle, patch or link forever button, and putting the same commands in an observer button that does ask turtles, ask patches or ask links. An "ask" doesn't complete until all of the agents have finished running all of the commands in the "ask". So the agents, as they all run the commands concurrently, can be out of sync with each other, but they all sync up again at the end of the ask. The same isn't true of turtle, patch and link forever buttons. Since ask was not used, each turtle or patch runs the given code over and over again, so they can become (and remain) out of sync with each other.
タートルやパッチ、リンクのフォーエバーボタンに対してコマンドを実行させる場合と、同じコマンドをオブサーバーに対してask turtles, ask patches, ask linksを実行させる場合とでは若干の違いがあります。「ask」はすべてのコマンドが実行し終わるまで処理は完結しません。そのため、それぞれのエージェントは同時にコマンドを実行するので同期がとれていない状態になりますが、「ask」の処理が終了すればエージェントはすべて同期がとれた状態になります。しかし、タートル、パッチ、リンクのフォーエバーボタンの場合はこのようにはいきません。askは使われないので、それぞれのタートルやパッチは、指示されたコードを何回もただ繰り返し実行するので、エージェント同士は互いに同期がとれていない状態のままとなります。
At present, this capability is very rarely used in the models in our Models Library. A model that does use the capability is the Termites model, in the Biology section of Sample Models. The "go" button is a turtle forever button, so each termite proceeds independently of every other termite, and the observer is not involved at all. This means that if, for example, you wanted to add ticks and/or a plot to the model, you would need to add a second forever button (an observer forever button), and run both forever buttons at the same time. Note also that a model like this cannot be used with BehaviorSpace.
現段階では、この機能はモデルライブラリの中のモデルにはあまり使われていません。この機能を使ったモデルとしてはBiology節の中のシロアリモデルがあります。「go」ボタンはタートルのフォーエバーボタンで、それぞれのシロアリは他のシロアリとは独立して処理を続けます。そのためオブザーバーは処理には介入しません。これは、たとえば、ティックと描画を行おうとして2つ目のフォーエバーボタン(オブザーバーのフォーエバーボタン)を追加して、これら2つのフォーエバーボタンを同時に実行したような場合です。このようなモデルの場合には、BehaviorSpaceは使うことはできない点に注意する必要があります。
Code Example: State Machine Example shows how Termites can be recoded in a tick-based way, without using a turtle forever button.
Code Example: State Machine Exampleでは、タートルのフォーエバーボタンを使用せずに、ティックベースでシロアリがどのように記録されているかを示しています。
At present, NetLogo has no way for one forever button to start another. Buttons are only started when you press them.
現在NetLogoでは、一方のフォーエバーボタンから別のフォーエバーボタンを起動することはできません。ボタンはユーザーが押すことによってのみ動作が開始します。
In the simplest models, each variable holds only one piece of information, usually a number or a string. Lists let you store multiple pieces of information in a single value by collecting that information in a list. Each value in the list can be any type of value: a number, or a string, an agent or agentset, or even another list.
シンプルなモデルの場合は、変数には数値や文字列のように一つの情報だけを持ちます。リストは、一つの変数の中に複数の情報をまとめて保持することができます。リストの中の値には数値、文字列、エージェント、エージェント集合などを入れることができます。リストの中にさらにリストを持つこともできます。
Lists allow for the convenient packaging of information in NetLogo. If your agents carry out a repetitive calculation on multiple variables, it might be easier to have a list variable, instead of multiple number variables. Several primitives simplify the process of performing the same computation on each value in a list.
NetLogoでは、リストは便利な情報のパッケージとしても利用されます。エージェントが多数の変数に対して繰り返しの計算を行うような場合、多数の変数を準備するよりも、リスト変数を使えば簡単に行うことができます。いくつかのプリミティブはリストの中のそれぞれの変数に対して同じ計算を行うことによって処理を簡潔にしています。
The NetLogo Dictionary has a section that lists all of the list-related primitives.
NetLogoディクショナリには、リストに関する節があり、リスト関連のすべてのプリミティブについて書かれています。
Constant lists
定数のリスト
You can make a list by simply putting the values you want in the list between brackets, like this: set mylist [2 4 6 8]. Note that the individual values are separated by spaces. You can make lists that contain numbers and strings this way, as well as lists within lists, for example [[2 4] [3 5]].
リストを作るためには、カッコの中にリストに入れたい値を単純に並べていきます。たとえばset mylist [2 4 6 8]とします。個々の値はスペースによって区切ります。数値や文字を含めてリストを作ることができますし、リストの中にリストを含めることもできます。たとえば[[2 4] [3 5]]とします。
The empty list is written by putting nothing between the brackets, like this: [].
カッコの中に何も書かなければ空のリストになります。たとえば[]のように書きます。
Building lists on the fly
リストを作る
If you want to make a list in which the values are determined by reporters, as opposed to being a series of constants, use the list reporter. The list reporter accepts two other reporters, runs them, and reports the results as a list.
もし、レポーターによって決定された値を使ってリストを作る場合には、listレポーターを使用します。listレポーターは別の2つのレポーターを受け取り、それらを実行し、その結果をリストとしてレポートします。
If I wanted a list to contain two random values, I might use the following code:
もし、2つの乱数値を持つリストが欲しいときには次のコードを使います:
set random-list list (random 10) (random 20)
This will set random-list to a new list of two random integers each time it runs.
このコードは、random-listに、実行するたびに値が変わる2つの整数を含むリストを設定します。
To make longer or shorter lists, you can use the list reporter with fewer or more than two inputs, but in order to do so, you must enclose the entire call in parentheses, e.g.:
長いリストや短いリストを作る場合には、入力が2個のリストではなく、それよりも入力が多い、あるいは少ないlistレポーターを使います。しかし、このような場合にはかっこを使って全体を囲む必要があります。たとえば:
(list random 10)
(list random 10 random 20 random 30)
For more information, see Varying number of inputs.
さらに詳しい説明は入力データの数の変更を見てください。
Some kinds of lists are most easily built using the n-values reporter, which allows you to construct a list of a specific length by repeatedly running a given reporter. You can make a list of the same value repeated, or all the numbers in a range, or a lot of random numbers, or many other possibilities. See dictionary entry for details and examples.
いくつかの種類のリストはn-valuesレポーターを使うことによって、簡単に作ることができます。たとえば、ある種類のレポーターを繰り返し使うことによって、 特定の長さのリストを作ることができます。同じ値を繰り返すリストや、ある範囲の数値だけで構成されるリスト、たくさんの乱数で構成されるリストなど、他にもいろいろなリストを作ることができます。詳細や例はディクショナリを参照してください。
The of primitive lets you construct a list from an agentset. It reports a list containing each agent's value for the given reporter. (The reporter could be a simple variable name, or a more complex expression -- even a call to a procedure defined using to-report.) A common idiom is
ofプリミティブを使うことによってエージェント集合からリストを作ることができます。これは、指定されたレポーターに向けて、それぞれのエージェントの値を含んだリストをレポートします。(レポーターは単純な変数名でもよいですし、複雑な表現でも構いません。また、to-reportを使って定義されたプロシージャでも可能です。)一般的な書き方は、
max [...] of turtles
sum [...] of turtles
and so on.
のようになります。
You can combine two or more lists using the sentence reporter, which concatenates lists by combining their contents into a single, larger list. Like list, sentence normally takes two inputs, but can accept any number of inputs if the call is surrounded by parentheses.
sentenceレポーターを使うことによって、2つ以上のリストを結合することができます。これによりリストは一つの内容(大きいリスト)に連結されます。listと同じように、sentenceも通常、2つの入力値を持ちます。しかし、かっこで囲めば、入力値は何個でも指定することができます。
Changing list items
リストの内容の変更
Technically, lists can't be modified, but you can construct new lists based on old lists. If you want the new list to replace the old list, use set. For example:
リストを変更することは技術的にできません。しかし、古いリストをベースにして新しいリストを作ることはできます。古いリストに代えて、新しいリストが欲しいときにはsetを使います。例を挙げます:
set mylist [2 7 5 Bob [3 0 -2]]
; mylist is nowは現在 [2 7 5 Bob [3 0 -2]]
set mylist replace-item 2 mylist 10
; mylist is nowは現在 [2 7 10 Bob [3 0 -2]]
The replace-item reporter takes three inputs. The first input specifies which item in the list is to be changed. 0 means the first item, 1 means the second item, and so forth.
replace-itemレポーターは3つの入力を取ります。一つ目の入力はリストの中のどの要素を変更するかを指定します。0は最初の要素、1は2番目の要素、以下同様です。
To add an item, say 42, to the end of a list, use the lput reporter. (fput adds an item to the beginning of a list.)
リストの最後に、たとえば42という値を加える場合には、lputレポーターを使います。(リストの先頭に要素を付け加える場合はfputを使います。)
set mylist lput 42 mylist
; mylist is nowは現在 [2 7 10 Bob [3 0 -2] 42]
But what if you changed your mind? The but-last (bl for short) reporter reports all the list items but the last.
しかし、やはり気が変わったという場合はどうすればよいでしょうか。but-last(省略形bl)レポーターは、最後を除いたすべての要素を含むリストを返します。
set mylist but-last mylist
; mylist is nowは現在 [2 7 10 Bob [3 0 -2]]
Suppose you want to get rid of item 0, the 2 at the beginning of the list.
要素の1番目、つまりリストの先頭の値2を取り去る場合は次のようになります。
set mylist but-first mylist
; mylist is nowは現在 [7 10 Bob [3 0 -2]]
Suppose you wanted to change the third item that's nested inside item 3 from -2 to 9? The key is to realize that the name that can be used to call the nested list [3 0 -2] is item 3 mylist. Then the replace-item reporter can be nested to change the list-within-a-list. The parentheses are added for clarity.
要素の3番目にネストされている内側のリストの値を、-2から9に変更するにはどうしたらよいでしょうか。ポイントは、ネストされているリスト[3 0 -2]は、mylistの要素の3番目であるということです。そのため、replace-itemレポーターは、リストの中のリストを変更するめにネストする必要があります。分かりやすくするためにカッコを付け加えました。
set mylist (replace-item 3 mylist
   (replace-item 2 (item 3 mylist) 9))
; mylist is nowは現在 [7 10 Bob [3 0 9]]
Iterating over lists
リスト上のデータの繰り返し処理
If you want to do some operation on each item in a list in turn, the foreach command and the map reporter may be helpful.
リスト上の要素に対して順番に何かの操作をしたい場合には、foreachコマンドやmapレポーターが役立ちます。
foreach is used to run a command or commands on each item in a list. It takes an input list and a command name or block of commands, like this:
foreachは、リストの各要素に対してコマンドを実行するのに使います。書き方は、入力用のリストと、コマンド名またはコマンドのブロックを記述します。例を示します:
foreach [1 2 3] show
=> 1
=> 2
=> 3
foreach [2 4 6]
  [ crt ?
    show (word "created " ? " turtles") ]
=> created 2 turtles
=> created 4 turtles
=> created 6 turtles
In the block, the variable ? holds the current value from the input list.
ブロックの中の変数?は、入力リストの中の現在の値を表しています。
Here are some more examples of foreach:
foreachのいくつかの例を示します:
foreach [1 2 3] [ ask turtles [ fd ? ] ]
;; turtles move forward 6 patchesタートルが6パッチ前に進む
foreach [true false true true] [ ask turtles [ if ? [ fd 1 ] ] ]
;; turtles move forward 3 patchesタートルが3パッチ前に進む
map is similar to foreach, but it is a reporter. It takes an input list and a reporter name or reporter block. Note that unlike foreach, the reporter comes first, like this:
mapはforeachとほとんど同じですが、レポーターであるという点が異なります。mapには、入力リストと、レポーターの名前もしくはレポーターのブロックを指定します。foreachとは違って、mapの場合はレポーターが先頭に来ます。書き方は次のようになります:
show map round [1.2 2.2 2.7]
;; prints [1 2 3]
show map round [1.2 2.2 2.7]
;; [1 2 3] と表示される
map reports a list containing the results of applying the reporter to each item in the input list. Again, use ? to refer to the current item in the list.
map は、入力リストの各要素に対してレポーターを適用して得られた結果を含むリストをレポートします。前にも述べましたが、リストの中の現在の値を参照するためには?を使います。
Here are a couple more examples of map:
さらにいくつかmapの例を示します:
show map [? < 0] [1 -1 3 4 -2 -10]
;; prints [false true false false true true]
show map [? * ?] [1 2 3]
;; prints [1 4 9]
show map [? < 0] [1 -1 3 4 -2 -10]
;; [false true false false true true] と表示される
show map [? * ?] [1 2 3]
;; [1 4 9] と表示される
Besides map and foreach, other primitives for processing whole lists in a configurable way include filter, reduce, and sort-by.
map や foreachの他に, リスト全体を処理するように記述するプリミティブには、filterや、reduce、sort-byなどがあります。
These primitives aren't always the solution for every situation in which you want to operate on an entire list. In some situations, you may need to use some other technique such as a loop using repeat or while, or a recursive procedure.
これらのプリミティブは、リスト全体を処理しようとしたときに、常に解決策になるとは限りません。場合によっては、repeatやwhileなどのループ処理や、再帰処理のような方法を使う必要があるかもしれません。
The blocks of code we're giving to map and foreach in these examples are actually tasks. Tasks are explained in more detail in Tasks, below.
これらの例の中でmapやforeachに指定したコードのブロックは、実際にはtaskとなります。タスクは後述するTasksの中で詳しく説明します。
Varying number of inputs
入力データの数の変更
Some commands and reporters involving lists and strings may take a varying number of inputs. In these cases, in order to pass them a number of inputs other than their default, the primitive and its inputs must be surrounded by parentheses. Here are some examples:
リストや文字列を含むコマンドやレポートでは、入力データの数を変えることもできます。このような場合、デフォルトの個数以外の数に設定するためにはプリミティブとその入力データはかっこで囲まなければなりません。例を示します:
show list 1 2
=> [1 2]
show (list 1 2 3 4)
=> [1 2 3 4]
show (list)
=> []
Note that each of these special primitives has a default number of inputs for which no parentheses are required. The primitives which have this capability are
list,
word,
sentence,
map,
foreach,
run,
runresult.
かっこが書かれていないときは、それぞれのプリミティブの入力値の数はデフォルトで決まっています。この使い方ができるのは、
list,
word,
sentence,
map,
foreach,
run,
runresultです。
Lists of agents
エージェントのリスト
Earlier, we said that agentsets are always in random order, a different random order every time. If you need your agents to do something in a fixed order, you need to make a list of the agents instead.
これまでのところで、エージェント集合はバラバラの順番になっていて、毎回異なる順番であると述べました。もし、エージェントにある決まった順番で何かをさせたい場合には、エージェントのリストを作ります。
There are two primitives that help you do this, sort and sort-by.
このようなときには、sortとsort-byというプリミティブが役に立ちます。
Both sort and sort-by can take an agentset as input. The result is always a new list, containing the same agents as the agentset did, but in a particular order.
sortもsort-byも、入力としてエージェント集合を受け取ります。sortやsort-byの結果はいつも新規のリストです。この中にはエージェント集合として入力と同じエージェントが含まれていますが、順番は異なっています。
If you use sort on an agentset of turtles, the result is a list of turtles sorted in ascending order by who number.
タートルのエージェント集合にsortを使うと、who番号の小さい順(昇順)に並べ替えられたタートルのリストが結果として返されます。
If you use sort on an agentset of patches, the result is a list of patches sorted left-to-right, top-to-bottom.
パッチのエージェント集合にsortを使うと、左から右、上から下に並べられたパッチのリストが結果として返されます。
If you use sort on an agentset of links, the result is a list of links, sorted in ascending order first by end1 then by end2 any remaining ties are resolved by breed in the order they are declared in the Code tab.
リンクのエージェント集合にsortを使うと、end1順のend2順で小さい順に並べ替えられたリンクのリストが返されます。end1、end2以降の細かい並びはコードタブの中で宣言された品種の順番のとおりになります。
If you need descending order instead, you can combine reverse with sort, for example reverse sort turtles.
これとは反対に大きい順(降順)に並べたいときには、sortコマンドにreverseを付けます。たとえば、タートルを反対に並べるには、reverse sort turtlesと書きます。
If you want your agents to be ordered by some other criterion than the standard ones sort uses, you'll need to use sort-by instead.
もし、通常のsortとは違う順番でエージェントを並べ替えたいときには、代わりにsort-byを使います。
Here's an example:
例を示します:
sort-by [[size] of ?1 < [size] of ?2] turtles
This returns a list of turtles sorted in ascending order by their turtle variable size.
これは、タートル変数 sizeの順番に並べられたタートルのリストを返します。
There's a common pattern to get a list of agents in a random order, using a combination of of and self, in the rare case that you cannot just use ask:
askが使えない場合に、ofとselfを組み合わせてランダムな順序のエージェントのリストを得るには次のようにします:
[self] of my-agentset
Asking a list of agents
エージェントのリストへのAsk
Once you have a list of agents, you might want to ask them each to do something. To do this, use the foreach and ask commands in combination, like this:
エージェントのリストを作ると、そのエージェントそれぞれに何かをさせたいと思うこともあるでしょう。そのようなときには、foreachとaskコマンドを組み合わせて使います。このように書きます:
foreach sort turtles [
  ask ? [
    ...
  ]
]
This will ask each turtle in ascending order by who number. Substitute "patches" for "turtles" to ask patches in left-to-right, top-to-bottom order.
これは、who番号の小さい順に、それぞれのタートルにaskをします。パッチに対して左から右、上から下の順番でaskをしたいときには、「turtles」の代わりに「patches」と書きます。
Note that you can't use ask directly on a list of turtles. ask only works with agentsets and single agents.
タートルのリストに直接askをかけることはできません。askはエージェント集合か一つのエージェントに対してのみ使うことができます。
Performance of lists
リストの動作
The data structure underlying NetLogo's lists is a sophisticated tree-based data structure on which most operations run in near-constant time. That includes fput, lput, butfirst, butlast, length, item, and replace-item.
NetLogoのリストに採用されているデータ構造は、精巧に作られたツリー型のデータ構造です。これはほとんどの操作に対してほぼ一定の時間で動作します。たとえばfput, lput, butfirst, butlast, length, item, replace-itemなどです。
One exception to the fast-performance rule is that concatenating two lists with sentence requires traversing and copying the whole second list. (This may be fixed in a future version.)
高速動作の例外は、文が格納された2つのリストを結合する場合です。この動作の場合、2つ目のリスト全体を読みながらコピーするという作業をしなければなりません。(これは、将来的に修正される可能性があります。)
Technically, "near-constant time" is actually logarithmic time, proportional to the depth of the underlying tree, but these trees have large nodes and a high branching factor, so they are never more than a few levels deep. This means that changes can be made in at most a few steps. The trees are immutable, but they share structure with each other, so the whole tree doesn't need to be copied to make a changed version.
技術的にいうと、「ほぼ一定の時間」というのは、実際には深さのバランスがとれたツリーに対して、対数的であるということです。バランスがとれているというのは多くのノードと枝分かれがあっても、深さが数段階程度というような場合です。この場合、ツリーに変更があっても、数ステップで対応することができます。ツリーは不変ですが、互いに構造を共有します。そのため、異なるバージョンを作るためにツリー全体をコピーする必要はありません。
The actual data structure used is the immutable Vector class from the Scala collections library. These are 32-wide hash array mapped tries, as implemented by Tiark Rompf, based in part on work by Phil Bagwell and Rich Hickey.
実際のデータ構造は、スカラーのコレクションライブラリの中の不変ベクタクラスが使われています。これらはPhil BagwellとRich Hickeyasの研究をもとに、Tiark Rompfにより実装された幅32のハッシュアレイマップのトライ木です。
All numbers in NetLogo are stored internally as double precision floating point numbers, as defined in the IEEE 754 standard. They are 64 bit numbers consisting of one sign bit, an 11-bit exponent, and a 52-bit mantissa. See the IEEE 754 standard for details.
NetLogoで使われているすべての数値は、内部的にはIEEE 754標準で定義された倍精度浮動小数点数として格納されています。これらは、64ビットの数値で、符号ビットが1ビット、指数部が11ビット、仮数部が52ビットで構成されています。詳しくはIEEE 754 標準をみてください。
An "integer" in NetLogo is simply a number that happens to have no fractional part. No distinction is made between 3 and 3.0; they are the same number. (This is the same as how most people use numbers in everyday contexts, but different from some programming languages. Some languages treat integers and floating point numbers as distinct types.)
NetLogoの「整数」は単に小数部がないという単純な数値です。そのため3と3.0では違いはありません。これらは同じ数値です。(多くの人々が日常生活の中で同じと考えているようなものです。しかし、いくつかのプログラミング言語ではそうではありません。このようなプログラミング言語では、整数と浮動小数点数を異なる型として扱います。)
Integers are always printed by NetLogo without the trailing ".0":
NetLogoでは整数の後ろには「.0」が付きません:
show 1.5 + 1.5
observer: 3
If a number with a fractional part is supplied in a context where an integer is expected, the fractional part is simply discarded. So for example, crt 3.5 creates three turtles; the extra 0.5 is ignored.
整数が指定されるべきところに、小数部分のある数値が指定された場合、小数部分は単純に無視されます。たとえば、crt 3.5は、3匹のタートルを作ります。余分な0.5は無視されます。
The range of integers is +/-9007199254740992 (2^53, about 9 quadrillion). Calculations that exceed this range will not cause runtime errors, but precision will be lost when the least significant (binary) digits are rounded off in order fit the number into 64 bits. With very large numbers, this rounding can result in imprecise answers which may be surprising:
整数の範囲は +/-9007199254740992 (2^53, およそ 9quadrillion)です。この範囲を超えた計算を行っても実行時にはエラーとなりません。しかし、その数値が64ビットに収まるように、最下位ビットが切り捨てられたときに精度が失われます。大きな数字の場合に、この動作を行うと、正確でない驚くような結果を出すことがあります:
show 2 ^ 60 + 1 = 2 ^ 60
=> true
Calculations with smaller numbers can also produce surprising results if they involve fractional quantities, since not all fractions can be precisely represented and roundoff may occur. For example:
小数部分を持つ値の場合もまた、小さい値の計算をすると驚くような結果を返すことがあります。これは、小数はいつでも必ず正確に表現されるわけではなく、切り捨てが行われる可能性があるからです。たとえば:
show 1 / 6 + 1 / 6 + 1 / 6 + 1 / 6 + 1 / 6 + 1 / 6
=> 0.9999999999999999
show 1 / 9 + 1 / 9 + 1 / 9 + 1 / 9 + 1 / 9 + 1 / 9 + 1 / 9 + 1 / 9 + 1 / 9
=> 1.0000000000000002
Any operation which produces the special quantities "infinity" or "not a number" will cause a runtime error.
「無限大」や「非数」のような結果を返す処理をした場合は、実行時エラーとなります。
Scientific notation
科学的指数表記
Very large or very small floating point numbers are displayed by NetLogo using "scientific notation". Examples:
とても大きい、あるいはとても小さい浮動小数点数は、NetLogoでは科学的指数表記によって表現されます。たとえば:
show 0.000000000001
=> 1.0E-12
show 50000000000000000000
=> 5.0E19
Numbers in scientific notation are distinguished by the presence of the letter E (for "exponent"). It means "times ten to the power of", so for example, 1.0E-12 means 1.0 times 10 to the -12 power:
科学的指数表記で表された数は、E(指数の意味)という文字があることによって区別できます。これは10の何乗倍かを意味しています。たとえば、1.0E-12は、1.0の、10の-12乗倍のことを表しています。
show 1.0 * 10 ^ -12
=> 1.0E-12
You can also use scientific notation yourself in NetLogo code:
また、NetLogoのコードの中で科学的指数表現を使うこともできます:
show 3.0E6
=> 3000000
show 8.123456789E6
=> 8123456.789
show 8.123456789E7
=> 8.123456789E7
show 3.0E16
=> 3.0E16
show 8.0E-3
=> 0.0080
show 8.0E-4
=> 8.0E-4
These examples show that numbers with fractional parts are displayed using scientific notation if the exponent is less than -3 or greater than 6. Numbers outside of NetLogo's integer range of -9007199254740992 to 9007199254740992 (+/-2^53) are also always shown in scientific notation:
これらの例をみると、小数は指数が-3より小さい場合と6より大きい場合に、科学的指数表記で表現されていることがわかります。また、-9007199254740992 to 9007199254740992 (+/-2^53)の範囲外の整数も、科学的指数表記で表現されます:
show 2 ^ 60
=> 1.15292150460684698E18
When entering a number, the letter E may be either upper or lowercase. When printing a number, NetLogo always uses an uppercase E:
数値を入力するときには、Eの文字は大文字で書いても小文字で書いても構いません。NetLogoが数値を表現する場合は、いつも大文字のEが使われます:
show 4.5e20
=> 4.5E20
Floating point accuracy
浮動小数点数の精度
Because numbers in NetLogo are subject to the limitations of how floating point numbers are represented in binary, you may get answers that are slightly inaccurate. For example:
NetLogoでは、数値を2進数で表現しているという制約があるため、正確さに欠ける結果を受け取ることがあります。たとえば:
show 0.1 + 0.1 + 0.1
=> 0.30000000000000004
show cos 90
=> 6.123233995736766E-17
This is an inherent issue with floating point arithmetic; it occurs in all programming languages that use floating point numbers.
これは浮動小数点数に由来する問題で、浮動小数点数を利用している全てのプログラム言語に起こります。
If you are dealing with fixed precision quantities, for example dollars and cents, a common technique is to use only integers (cents) internally, then divide by 100 to get a result in dollars for display.
正確な精度を持つ値を表現したい場合、たとえばドルとセントを扱う場合には、よく使われる方法として、内部的にはセント換算の整数だけで表現するようにして、表示するときに100で割ってドル換算するということが行われます。
If you must use floating point numbers, then in some situations you may need to replace a straightforward equality test such as if x = 1 [ ... ] with a test that tolerates slight imprecision, for example if abs (x - 1) < 0.0001 [ ... ].
浮動小数点数を使う場合、if x = 1 [ ... ]という条件判断を行う場合に、特定の状況では、不正確さが伴っていても処理できるように、たとえばif abs (x - 1) < 0.0001 [ ... ]といった条件判断にする必要があるかもしれません。
Also, the precision primitive is handy for rounding off numbers for display purposes. NetLogo monitors round the numbers they display to a configurable number of decimal places, too.
また、precisionというプリミティブを使えば、表示目的のために数値を切り捨てることが簡単に行えます。NetLogoモニタは、設定数値を10進数で表示するために数値を丸めています。
The random numbers used by NetLogo are what is called "pseudo-random". (This is typical in computer programming.) That means they appear random, but are in fact generated by a deterministic process. "Deterministic" means that you get the same results every time, if you start with the same random "seed". We'll explain in a minute what we mean by "seed".
NetLogoで使われている乱数は「疑似乱数」と呼ばれているものです。(これはコンピュータプログラミングではよく使われています。)これは、バラバラに出現してはいますが、実際には決定的な処理によって生成されています。「決定的」とは、同じ乱数「シード」を用いて処理を開始すれば、いつでも同じ結果が得られるという意味です。簡単に「シード」とは何かを説明します。
In the context of scientific modeling, pseudo-random numbers are actually desirable. That's because it's important that a scientific experiment be reproducible -- so anyone can try it themselves and get the same result that you got. Since NetLogo uses pseudo-random numbers, the "experiments" that you do with it can be reproduced by others.
科学的モデリングにおいて、疑似乱数は実際に必要性があるものです。科学的な実験では再現性ということが重要です。再現性があれば誰でもそれを試して、同じ結果を得ることができます。そのため、NetLogoでは疑似乱数を使っています。疑似乱数を使った実験は別の人でも再現できます。
Here's how it works. NetLogo's random number generator can be started with a certain seed value, which must be an integer in the range -2147483648 to 2147483647. Once the generator has been "seeded" with the random-seed command, it always generates the same sequence of random numbers from then on. For example, if you run these commands:
どのように動くか示しましょう。NetLogoの乱数ジェネレータはあるシードからスタートします。シードは-2147483648から2147483647までの間の整数である必要があります。ひとたび乱数生成器にrandom-seedコマンドでシードが設定されれば、いつでも同じ並びの乱数を生成します:
random-seed 137
show random 100
show random 100
show random 100
You will always get the numbers 79, 89, and 61 in that order.
この場合、いつでも79, 89, 61の順で乱数が生成されます。
Note, however, that you're only guaranteed to get those same numbers if you're using the same version of NetLogo. Sometimes when we make a new version of NetLogo the random number generator changes. (Presently, we use a generator known as the Mersenne Twister.)
ただし、これはNetLogoの同じバージョンを使った場合にのみ、同じ数値を得ることができることを示しています。NetLogoがバージョンアップをするときに、乱数生成器が変更になることがあります。(現在のNetLogoでは、メルセンヌツイスターと呼ばれる乱数生成器が使用されています。)
To create a number suitable for seeding the random number generator, use the new-seed reporter. new-seed creates a seed, evenly distributed over the space of possible seeds, based on the current date and time. It never reports the same seed twice in a row.
乱数生成器に適したシードを生成するためには、new-seedレポーターを使います。new-seedは、現在の日付と時間を元にして、可能なシードの範囲から、均等な分布になるようにしてシードの値を生成します。このようにすれば、連続して同じ値のシードになることはありません。
Code Example: Random Seed Example
If you don't set the random seed yourself, NetLogo sets it to a value based on the current date and time. There is no way to find out what random seed it chose, so if you want your model run to be reproducible, you must set the random seed yourself ahead of time.
乱数シードを自分で設定しなかった場合は、NetLogoは現在の日付と時間を元にして、乱数シードを設定します。この場合、どの乱数シードが選択されたかを知ることはできません。もし、モデルの動きを再現したい場合には、自分自身で前もって乱数シードを設定しておく必要があります。
The NetLogo primitives with "random" in their names (random, random-float, and so on) aren't the only ones that use pseudo-random numbers. Many other operations also make random choices. For example, agentsets are always in random order, one-of and n-of choose agents randomly, the sprout command creates turtles with random colors and headings, and the downhill reporter chooses a random patch when there's a tie. All of these random choices are governed by the random seed as well, so model runs can be reproducible.
NetLogoのプリミティブのうち、疑似乱数を使っているものは名前に「random」があるもの(random, random-floatなど)だけではありません。その他にも多くの操作でランダム選択が行われています。たとえば、エージェント集合はランダムな順番で動作します。one-ofやn-ofは、エージェントをランダムに選択します。sproutコマンドはランダムな色とランダムな方向でタートルを生成します。downhillレポーターは、同順位のものがあるときはランダムにパッチを選択します。これらのランダム選択はすべて乱数シードによって管理されています。そのため、モデルの動きは再現ができます。
In addition to the uniformly distributed random integers and floating point numbers generated by random and random-float, NetLogo also offers several other random distributions. See the dictionary entries for random-normal, random-poisson, random-exponential, and random-gamma.
randomとrandom-floatでは、一様分布の整数と浮動小数点数を生成しますが、NetLogoではそれ以外にも別の分布による乱数を提供しています。詳しくはrandom-normal,
random-poisson,
random-exponential,
random-gammaを見てください。
Code run by buttons or from the command center uses the main random number generator.
ボタンで動作するコードやコマンドセンタから実行されるコードは、メインの乱数生成器を使います。
Code in monitors uses an auxiliary random generator, so even if a monitor does a calculation that uses random numbers, the outcome of the model is not affected. The same is true of code in sliders.
モニターのコードは補助の乱数生成器を使います。そのため、モニターが乱数を使った計算をしたとしても、モデルの結果は影響を受けません。スライダーのコードの場合も同様です。
You may want to explicitly specify that a section of code does not affect the state of the main random generator, so the outcome of the model is not affected. The with-local-randomness command is provided for this purpose. See its entry in the NetLogo Dictionary for more information.
メインの乱数生成器の状態にモデルの結果が影響されないようにするために、コードのある部分をはっきりと区別したい場合があるかもしれません。このような場合のためにwith-local-randomnessコマンドが用意されています。詳しい説明はNetLogoディクショナリの項目を見てください。
In NetLogo, turtle shapes are vector shapes. They are built up from basic geometric shapes; squares, circles, and lines, rather than a grid of pixels. Vector shapes are fully scalable and rotatable. NetLogo caches bitmap images of vector shapes size 1, 1.5, and 2 in order to speed up execution.
NetLogoでは、タートルの形状はベクトル型です。それらはピクセルの格子ではなく、四角形、円、そしてラインという基本的な幾何学的な形で作られています。ベクトル型は拡張性があり、回転することが可能です。NetLogoは実行スピードをあげるために、大きさ1, 1.5, 2のベクトル型のビットマップ画像をキャッシュしています。
A turtle's shape is stored in its shape variable and can be set using the set command.
タートルの形状はshape変数の中に格納され、setコマンドを使用することによって設定されます。
New turtles have a shape of "default". The set-default-shape primitive is useful for changing the default turtle shape to a different shape, or having a different default turtle shape for each breed of turtle.
新しいタートルはデフォルトの形状を持っています。set-default-shapeプリミティブは、デフォルトのタートルの形状を異なる形状に変更することや、それぞれのタートル品種に異なるデフォルトのタートル形状を持たせることにも使えます。
The shapes primitive reports a list of currently available turtle shapes in the model. This is useful if, for example, you want to assign a random shape to a turtle:
shapesプリミティブはモデル内の現在利用可能なタートルの形状のリストを返します。たとえば、これはタートルにランダムな形状を指定したいときに役立ちます。
ask turtles [ set shape one-of shapes ]
Use the Turtle Shapes Editor to create your own turtle shapes, or to add shapes to your model from our shapes library, or to transfer shapes between models. For more information, see the Shapes Editor section of this manual.
あなた独自のタートルの形状を生成する、あるいは、形状のライブラリーの中から、あなたのモデルに形状を追加する、もしくはモデル間で形状を移行するために、タートル形状エディターを使うことができます。詳しくは当マニュアルの形状エディターの節をご確認ください。
The thickness of the lines used to draw the vector shapes can be controlled by the __set-line-thickness primitive.
__set-line-thicknessプリミティブによって、ベクトルの形状をコントロールして、ラインの太さを描くことができます。
Code Examples: Breeds and Shapes Example, Shape Animation Example
Link Shapes are similar to turtle shapes, only you use the Link Shape Editor to create and edit them. Link shapes consist of between 0 and 3 lines which can have different patterns and a direction indicator that is composed of the same elements as turtle shapes. Links also have a shape variable that can be set to any link shape that is in the model. By default links have the "default" shape, though you can change that using set-default-shape. The link-shapes reporter reports all the link shapes included in the current model.
リンクの形状はタートルの形状に似ています。リンク形状エディターでそれらを作成したり、編集したりすることができます。リンクの形状は、異なるパターンを持つ0から3本のラインや、タートルの形状と同じ要素を含む方向指示器から構成されています。リンクは、またモデル内にあるいくつかのリンクの形状にセットされるshape変数を持ちます。デフォルトのリンクはデフォルトの形状を持ち、set-default-shapeを使い変更することができます。link-shapesレポーターは現在のモデルに含まれるすべてのリンク形状を返します。
The thickness of the lines in the link shape is controlled by the thickness link variable.
リンクの形状でのラインの太さは、thicknessというリンク変数でコントロールします。
The "view" in NetLogo lets you see the agents in your model on your computer's screen. As your agents move and change, you see them moving and changing in the view.
NetLogoの「ビュー」は、あなたのコンピュータ画面上で、あなたのモデルの中のエージェントを見せてくれます。エージェントが動いたり、変化することをビューの中で見られます。
Of course, you can't really see your agents directly. The view is a picture that NetLogo paints, showing you how your agents look at a particular instant. Once that instant passes and your agents move and change some more, that picture needs to be repainted to reflect the new state of the world. Repainting the picture is called "updating" the view.
もちろん、あなたは直接、エージェントを見ることはできません。ビューはNetLogoが表示する一つの絵であり、ある瞬間におけるエージェントがどのように見えるかを示すものです。いったんその瞬間が過ぎてしまうと、エージェントは動いて変化するので、その絵はワールドでの新しい状態を反映して再描画が必要になります。再描画させることを、ビューを「更新する」と呼びます。
When does the view get updated? This section discusses how NetLogo decides when to update the view, and how you can influence when it gets updated.
ビューはいつ更新されるのでしょうか。Netlogoがどのようにしてビューを更新する時を決定するのか、またビューが更新する時に、ユーザーはどのような影響を受けるのかについて、このセクションで検討します。
NetLogo offers two updates modes, "continuous" updates and "tick-based" updates. You can switch between NetLogo's two view update modes using a popup menu at the top of the Interface tab.
Netlogoには「連続的」と「ティックベース」という2つの更新モードがあります。インターフェースタブの上部にあるポップアップメニューを使って、2つのビュー更新モードを切り替えることができます。
Continuous updates are the default when you start up NetLogo or start a new model. Nearly every model in our Models Library, however, uses tick-based updates.
NetLogoのセットアップ時もしくは新しいモデルをスタートしたときは、連続的更新がデフォルトになります。モデルライブラリーのほぼすべてのモデルではティックベース更新を使っています。
Continuous updates are simplest, but tick-based updates give you more control over when and how often updates happen.
連続的更新はきわめて簡単ですが、一方、ティックベース更新は更新のタイミングや回数をコントロールすることができます。
It's important exactly when an update happens, because when updates happen determines what you see on the screen. If an update comes at an unexpected time, you may see something unexpected -- perhaps something confusing or misleading.
更新の発生タイミングは画面表示の内容を決定するため、とても重要です。想定外の時に更新した場合、なんらかの混乱や誤解のある予想外の結果を見ることになります。
It's also important how often updates happen, because updates take time. The more time NetLogo spends updating the view, the slower your model will run. With fewer updates, your model runs faster.
また更新の発生回数も時間に影響があるため重要です。NetLogoでビューを更新すればするほど、モデルの実行は遅くなります。あまり更新しないことはモデルを早く実行することになります。
Continuous updates are very simple. With continuous updates, NetLogo updates the view a certain number of times per second -- by default, 30 times a second when the speed slider is in the default, middle setting.
連続的更新はとても簡単です。連続的更新により、NetLogoはビュー更新を1秒間に特定の回数行います。デフォルトのスピードスライダーの中間設定では、毎秒30回更新をします。
If you move the speed slider to a slower setting, NetLogo will update more than 30 times a second, effectively slowing down the model. On a faster setting, NetLogo will update less than 30 times a second. On the fastest setting, updates will be separated by several seconds.
スピードスライダーを動かして速度を遅くすると、NetLogoは毎秒30回以上ビューを更新しますが、モデルの速度は非常に遅くなります。モデル速度が速い設定では、NetLogoのビュー更新は毎秒30回よりも少なくなります。最も速い設定では、数秒に1回の更新になります。
At extremely slow settings, NetLogo will be updating so often that you will see your agents moving (or changing color, etc.) one at a time.
最も遅い速度の設定では、NetLogoは頻繁に更新されるため、一個一個のエージェントの動きや色の変化などが見られます。
If you need to temporarily shut off continuous updates, use the no-display command. The display command turns updates back on, and also forces an immediate update (unless the user is fast-forwarding the model using the speed slider).
一時的に連続的更新を停止する必要がある場合、no-displayコマンドを使います。displayコマンドを使えば、更新に戻るとともに、直ちに更新を行います。(スピードスライダーを使って最も速い設定にしているときを除きます。)
As discussed above in the Tick Counter section, in many NetLogo models, time passes in discrete steps, called "ticks". Typically, you want the view to update once per tick, between ticks. That's the default behavior with tick-based updates.
ティックカウンターのセクションで前に検討したように、多くのNetLogoのモデルでは、「ティック」と呼ばれる離散的なステップで時刻は計時されます。通常はティックごとに1回ビューを更新したいでしょう。それがティックベース更新でのデフォルトの動作です。
If you want additional view updates, you can force an update using the display command. (The update may be skipped if the user is fast-forwarding the model using the speed slider.)
追加でビュー更新を行いたいときは、displayコマンドを使えば強制的に更新できます。(スピードスライダーを使って最も速い設定にしているときはその更新はスキップされます。)
You don't have to use the tick counter to use tick-based updates. If the tick counter never advances, the view will update only when you use the display command.
ティックベース更新を使うことでティックカウンターを使わなくてもかまいません。ティックカウンターを先に進ませられない場合、displayコマンドを使うときだけ、ビューは更新します。
If you move the speed slider to a fast enough setting, eventually NetLogo will skip some of the updates that would ordinarily have happened. Moving the speed slider to a slower setting doesn't cause additional updates; rather, it makes NetLogo pause after each update. The slower the setting, the longer the pause.
十分早く設定するようにスピードスライダーを動かすと、結局、NetLogoは通常起こりうるいくつかの更新をスキップします。スピードスライダーを動かし遅く設定することは、追加の更新にはつながらず、むしろNetLogoのそれぞれの更新を保留することになります。遅く設定することはより長く保留することになります。
Even under tick-based updates, the view also updates whenever a button in the interface pops up (both once and forever buttons) and when a command entered in the Command Center finishes. So it's not necessary to add the display command to once buttons that don't advance the tick counter. Many forever buttons that don't advance the tick counter do need to use the display command. An example in the Models Library is the Life model (under Computer Science -> Cellular Automata). The forever buttons that let the user draw in the view use the display command so the user can see what they are drawing, even though the tick counter is not advancing.
ティックベース更新の実行下でさえ、インターフェースのボタンをポップアップするときは常に、ビューも更新されます。またコマンドセンターで入力したコマンドが終了した時もそうです。そのため、ティックカウンターを進ませないワンスボタンには、displayコマンドを追加する必要はありません。ただティックカウンターを進ませないフォーエバーボタンには、displayコマンドを使う必要があります。モデルライブラリーの例では、ライフモデルがあります。(コンピューターサイエンスのセルオートマトンの下にあります)ビュー内で描画させるためのフォーエバーボタンについては、displayコマンドを使用することで、ユーザーはティックカウンターを前に進ませなくても見ることができます。
Advantages of tick-based updates over continuous updates include:
連続的更新に対するティックベース更新の利点は次の通りです。
setup buttons don't advance the tick counter, they are unaffected by the speed slider; this is normally the desired behavior.setupボタンがティックカウンターを進めないので、スピードスライダーの影響を受けません。これは通常は望ましい性質です。Nearly every model in our Models Library uses tick-based updates.
モデルライブラリーのほとんどのモデルはティックベース更新を採用しています。
Continuous updates are occasionally useful for those rare models in which execution is not divided into short, discrete phases. An example in the Models Library is Termites. (See also, however, the State Machine Example model, which shows how to re-code Termites using ticks.)
連続的更新は、実行が離散的なフェーズに分割できないごく一部のモデルにおいて有用です。モデルライブラリーの例ではシロアリになります。(一方、ステートマシンの例のモデルにティックを使って、シロアリのモデルをどのようにリコードするかも示しています)
Even for models that would normally be set to tick-based updates, it may be useful to switch to continuous updates temporarily for debugging purposes. Seeing what's going on within a tick, instead of only seeing the end result of a tick, could help with troubleshooting. After switching to continuous updates, you may want to use the speed slider to slow the model down until you see your agents moving one at a time. Don't forget to change back to tick-based updates when you are done, as the choice of update mode is saved with the model.
ティックベース更新に通常にセットされるモデルでさえ、デバックのためには連続的更新を一時的に変更することは有益かもしれません。ティックの最終結果を見る代わりに、ティック内に起こっているものを見ることは、トラブル解決に役立つでしょう。連続的更新にスイッチした後、一個一個のエージェントの動きが見えるまで、モデルを遅くするためにスピードスライターを使いたいと思うかもしれません。更新したモードがモデルに保存されるので、終了時はティックベース更新に戻すことを忘れないでください。
One of the model settings in NetLogo's "Settings..." dialog is "Frame rate" which defaults to 30 frames per second.
NetLogoの「セッティング」ダイアログにはモデル設定の一つである「フレームレート」があり、デフォルトでは毎秒30フレームとなっています。
The frame rate setting affects both continuous updates and tick-based updates.
フレームレートの設定は連続的更新およびティックベース更新の両方に影響します。
With continuous updates, the setting directly determines the frequency of updates.
連続的更新での設定は、直接、更新の頻度を決定します。
With tick-based updates, the setting is a ceiling on how many updates per second you get. If the frame rate is 30, then NetLogo will ensure that the model never runs faster than that when the speed slider is in the default position. If any frame takes less than 1/30 of a second to compute and display, NetLogo will pause and wait until the full 1/30 of a second has passed before continuing.
ティックベース更新で、その設定は1秒あたりにいくつ更新されるかどうかの上限になります。フレームレートが30で、スピードスライダーがデフォルトの位置にある場合、NetLogoはモデルがそれよりも速くは実行されないことを保障します。フレームの計算と表示に1/30秒未満しかかからないのであれば、NetLogoは1/30秒が経過するまで休止します。
The frame rate settings lets you set what you consider to be a normal speed for your model. Then you, or the user of your model, can use the speed slider to temporarily get a faster or slower speed.
フレームレートの設定は、モデル用の通常の速度であると考えられるものに設定されます。その後、あなたやあなたのモデルのユーザーは、スピードを一時的に早くも遅くもするために、スピードスライダーを使うことができます。
NetLogo's plotting features let you create plots to help you understand what's going on in your model.
NetLogoのプロッティング機能は、プロットを作成することでモデルの中で起きていることの理解を容易にします。
Before you can plot, you need to create one or more plots in the Interface tab. For more information on using and editing plots in the Interface tab, see the Interface Guide.
プロットの前に、インターフェースタブの中に1個以上のプロットを作る必要があります。インターフェースタブでのプロットの使用や編集についての詳細はインターフェースガイドを参照ください。
The two basic commands for actually plotting things are plot and plotxy.
実際にプロットするための2つの基本コマンドは、plotとplotxyです。
With plot you need only specify the y value you want plotted. The x value will automatically be 0 for the first point you plot, 1 for the second, and so on. (That's if the plot pen's "interval" is the default value of 1; you can change the interval.)
plotではプロットしたいyの値を指定する必要があります。xの値は最初にプロットする点では自動的に0、2番目の点では1となります。(プロットペンの「interval」をデフォルトである1にしているかどうかによります。つまり間隔は変更することができます。)
The plot command is especially handy when you want your model to plot a new point at every time step. Example:
plotコマンドは、時間ステップごとに新しい点をプロットする場合に特に便利です。たとえば:
plot count turtles
If you need to specify both the x and y values of the point you want plotted, then use plotxy instead. This example assumes that a global variable called time exists:
プロットしたい点のxとyの両方の値を指定する必要がある場合は、plotxyを代わりに使用してください。以下の例ではtimeというグローバル変数があると仮定します:
plotxy time count-turtles
Each plot and its pens have setup and update code fields that may contain commands (usually containing plot or plotxy). These commands are run automatically triggered by other commands in NetLogo.
プロットおよびそのペンは、あるコマンド(通常plotまたはplotxyが含まれる)を含んでいるコードフィールドを設定もしくは更新します。NetLogoではこれらのコマンドは他のコマンドがトリガーとなって自動的に起動されます。
Plot setup commands and pen setup commands are run when the either reset-ticks or setup-plots commands are run. If the stop command is run in the body of the plot setup commands then the pen setup commands will not run.
プロット設定コマンドおよびペン設定コマンドは、reset-ticksもしくはsetup-plotsコマンドが実行されるときに実行されます。stopコマンドがプロット設定コマンドの中で実行されればペン設定コマンドは実行されません。
Plot update commands and pen update commands are run when the either reset-ticks, tick or update-plots commands are run. If the stop command is run in the body of the plot update commands then the pen update commands will not run.
プロット更新コマンドおよびペン更新コマンドはreset-ticks, tick, update-plotsコマンドが実行されるときに実行されます。stopコマンドがプロット更新コマンドの中で実行されればペン更新コマンドは実行されません。
Here are the four commands that trigger plotting explained in more detail.
ここではプロティングのトリガーとなる4つのコマンドについて詳細に説明します。
setup-plots executes commands for one plot at a time. For each plot, the plot's setup commands are executed. If the stop command is not encountered while running those commands, then each of the plot's pens will have their setup code executed.update-plots is very similar to setup-plots. For each plot, the plot's update commands are executed. If the stop command is not encountered while running those commands, then each of the plot's pens will have their update code executed.tick is exactly the same as update-plots except that the tick counter is incremented before the plot commands are executed.reset-ticks first resets the tick counter to 0, and then does the equivalent of setup-plots followed by update-plots.setup-plotsは一度に一つのプロットのためのコマンドを実行します。各プロットではプロットのsetupコマンドは実行されます。コマンド実行中にstopコマンドを入れなければ、各々のプロットペンは、それらのセットアップコードを実行するでしょう。update-plotsはsetup-plotsによく似ています。各プロットで、プロットの更新コマンドは実行されます。それらのコマンドを実行する間に停止コマンドを入れなければ、各々のプロットペンはそれまでの間、更新されたコードを実行するでしょう。tickはupdate-plotsと全く同じです。reset-ticksははじめにティックカウンターを0にします。そしてupdate-plotsに続き、setup-plotsと同様な動きをします。A typical model will use reset-ticks and tick like so:
標準的なモデルではreset-ticksとtickは次のように使われるでしょう:
to setup
  clear-all
  ...
  reset-ticks
end

to go
  ...
  tick
end
Note that in this example we plot from both the setup and go procedures (because reset-ticks runs plot setup and plot update commands). We do this because we want our plot to include the initial state of the system at the end of setup. We plot at the end of the go procedure, not the beginning, because we want the plot always to be up to date after the go button stops.
この例にあるように、setupとgoの両プロシージャーからプロットすること(reset-ticksはプロット設定とプロット更新のコマンドをプロットするため)に注意してください。setupの最後にシステムの初期状態を含めてプロットしたいのでこれを行います。goボタンを停止した後に、常に最新の状態になりたいので、最初ではなくて、最後にgoプロシージャーをプロットします。
Models that don't use ticks but still want to do plotting will instead use setup-plots and update-plots. In the previous code, replace reset-ticks with setup-plots update-plots and replace tick with update-plots.
setup-plotsとupdate-plotsを代わりに使うことで、モデルはティックを使わずにプロットすることでしょう。上記のコードの中でreset-ticksをsetup-plots update-plots、そしてupdate-plotsを伴うreplace tickに変更されます。
Code Example: Plotting Example
By default, NetLogo plot pens plot in line mode, so that the points you plot are connected by a line.
デフォルトでは、NetLogo のプロットペンはラインモードでプロットします。その他、プロットするポイントは一つのラインによって接続されます。
If you want to move the pen without plotting, you can use the plot-pen-up command. After this command is issued, the plot and plotxy commands move the pen but do not actually draw anything. Once the pen is where you want it, use plot-pen-down to put the pen back down.
プロットなしにペンを動かしたい場合、plot-pen-upコマンドを使うことができます。このコマンドが発行された後、plotとplotxyコマンドは、ペンを移動しますが、実際には何も描画しません。ペンを置きたい時は、plot-pen-downを使うことでペンは戻ります。
If you want to plot individual points instead of lines, or you want to draw bars instead of lines or points, you need to change the plot pen's "mode". Three modes are available: line, bar, and point. Line is the default mode.
ラインの代わりに個々のポイントをプロットする場合、もしくは、ラインやポイントの代わりにバーを描画したい場合は、プロットペンの「モード」を変更する必要があります。ライン、バー、ポイントの3つのモードが利用可能です。ラインがデフォルトのモードです。
Normally, you change a pen's mode by editing the plot. This changes the pen's default mode. It's also possible to change the pen's mode temporarily using the set-plot-pen-mode command. That command takes a number as input: 0 for line, 1 for bar, 2 for point.
通常はプロットを編集することによって、ペンのモードを変更します。これはペンのデフォルトモードを変更することになります。set-plot-pen-modeコマンドを使って一時的にペンのモードを変更することも可能です。コマンドの入力値については、0はライン、1はバー、2はポイントになります。
A histogram is a special kind of plot that measures how frequently certain values, or values in certain ranges, occur in a collection of numbers that arise in your model.
ヒストグラムは、モデルで生じる数値の集合の中で発生する特定の頻度や特定の範囲内の頻度を測定するプロットの特別な種類です。
For example, suppose the turtles in your model have an age variable. You could create a histogram of the distribution of ages among your turtles with the histogram command, like this:
たとえばタートルでは年齢の変数を持っているとします。あなたはこのようにヒストグラムのコマンドを使用してタートル間での年齢分布のヒストグラムを作成することができます。
histogram [age] of turtles
The numbers you want to histogram don't have to come from an agentset; they could be any list of numbers.
ヒストグラムにしたい数値をエージェント集合から持ってくる必要はありません。それらは数字の任意のリストになります。
Note that using the histogram command doesn't automatically switch the current plot pen to bar mode. If you want bars, you have to set the plot pen to bar mode yourself. (As we said before, you can change a pen's default mode by editing the plot in the Interface tab.)
ヒストグラムコマンドを使用することでは、自動的にカレントプロットペンからバーモードに切り替えないということに注意してください。バーを使用したい場合は、プロットペンをバーモードに自分で設定する必要があります。(前述のように、インターフェースタブのプロットを編集することにより、ペンのデフォルトモードを変更することができます。)
Like other types of plots, histograms can be set to auto scale. However, auto scaled histograms do not automatically resize themselves horizontally like other plot types do. To set the range programmatically, you can use the set-plot-x-range primitive.
他のタイプのプロットと同様に、ヒストグラムにはオートスケールを設定することができます。しかし他のタイプとは異なり、水平方向のリサイズは自動的には行いません。set-plot-x-rangeプリミティブを使えば、プログラムによって範囲を設定することができます。
The width of the bars in a histogram is controlled by the plot pen's interval. You can set a plot pen's default interval by editing the plot in the Interface tab. You can also change the interval temporarily with the set-plot-pen-interval command or the set-histogram-num-bars. If you use the latter command, NetLogo will set the interval appropriately so as to fit the specified number of bars within the plot's current x range.
ヒストグラムのバーの幅は、プロットペンの間隔によって制御されます。インターフェースタブのプロットを編集して、プロットペンのデフォルトの間隔を設定することができます。set-plot-pen-intervalコマンドやset-histogram-num-barsコマンドで一時的に間隔を変更することができます。あなたは後者のコマンドを使用する場合はプロットの現在のxの範囲内のバーの本数を指定して適合するように、NetLogoは適切に間隔を設定します。
Code Example: Histogram Example
You can clear the current plot with the clear-plot command, or clear every plot in your model with clear-all-plots. The clear-all command also clears all plots, in addition to clearing everything else in your model.
clear-plotコマンドでカレントプロットをクリアすることができます。あるいはclear-all-plotsを使用してモデル内のすべてのプロットをクリアすることができます。clear-allコマンドは、モデル内のその他のすべてをクリアすることに加えて、すべてのプロットをクリアします。
If you want to remove only the points that a particular pen has drawn, use plot-pen-reset.
特定のペンが描画したポイントだけを削除したい場合はplot-pen-resetを使用します。
When a whole plot is cleared, or when a pen is reset, that doesn't just remove the data that has been plotted. It also restores the plot or pen to its default settings, as they were specified in the Interface tab when the plot was created or last edited. Therefore, the effects of such commands as set-plot-x-range and set-plot-pen-color are only temporary.
全体のプロットはクリアされるか、ペンがリセットされるときは、プロットしたデータは削除しません。プロットが作成または最後に編集されたときに、インターフェースタブで指定されたとしても、そのデフォルトの設定にプロットやペンを復元します。したがってset-plot-x-rangeとset-plot-pen-colorのコマンドの効果は一時的なものです。
The default x and y ranges for a plot are fixed numbers, but they can be changed at setup time or as the model runs.
プロットのデフォルトのxとyの範囲は数値が固定されていますが、セットアップ時もしくはモデルの実行中に変更することができます。
To change the ranges at any time, use set-plot-x-range and set-plot-y-range. Or, you can let the ranges grow automatically. Either way, when the plot is cleared the ranges will return to their default values.
任意の時点で範囲を変更するには、set-plot-x-rangeと set-plot-y-rangeを使用します。また範囲を自動的に拡張させることができます。いずれかの方法で、プロットが範囲をクリアする時、デフォルト値に戻ります。
By default, all NetLogo plots have the auto scaling feature enabled. This means that if the model tries to plot a point which is outside the current displayed range, the range of the plot will grow along one or both axes so that the new point is visible. Histogram plots, however, do not auto scale horizontally.
デフォルトでは、すべてのNetLogoのプロットはオートスケール機能が有効になっています。モデルが現在の表示範囲外にあるポイントをプロットしようとすると、新しいポイントを表示するために、一方または両方の軸に沿って、プロットの範囲を拡大します。しかしヒストグラムのプロットは水平方向にはオートスケールしません。
In the hope that the ranges won't have to change every time a new point is added, when the ranges grow they leave some extra room: 25% if growing horizontally, 10% if growing vertically.
新しいポイントが追加されるたびに変更する必要はありません。水平方向に25%、垂直方向に10%の拡張余地を残しています。
If you want to turn off this feature, edit the plot and uncheck the Auto Scale? checkbox. At present, it is not possible to enable or disable this feature only on one axis; it always applies to both axes.
この機能をオフにしたい場合は、プロットを編集して、自動拡張機能をオフにできるでしょうか。現時点では、チェックボックスをオンにするだけで、一つの軸上でこの機能を有効または無効にすることはできません。それは常に両方の軸に適用されます。
You can show the legend of a plot by checking the "Show legend" checkbox in the edit dialog. If you don't want a particular pen to show up in the legend you can uncheck the "Show in Legend" checkbox for that pen also in the advanced plot pen settings (the advanced plot pen settings can be opened by clicking the pencil button for that pen in the plot pens table in the plot edit dialog).
編集ダイアログの「Show legend」チェックボックスをチェックして、プロットの凡例を表示することができます。高度なプロットペンの設定(高度なプロットペンの設定は、プロットペンテーブル内のそのペンに対して鉛筆ボタンをクリックして開くことができる)の中で、凡例に表示する特定のペンを使用しない場合は、そのペンの「Show in Legend」チェックボックスをオフにすることができます。
Most plots can get along with a fixed number of pens. But some plots have more complex needs; they may need to have the number of pens vary depending on conditions. In such cases, you can make "temporary" plot pens from code and then plot with them. These pens are called "temporary" because they vanish when the plot is cleared (by the clear-plot, clear-all-plots, or clear-all commands).
ほとんどのプロットはペンの固定した数と一緒に取得することができます。しかし、いくつかのプロットは、より複雑なニーズを持ち、ペンの数は条件によって異なる場合があります。このような場合には、コードから「一時的」なプロットペンを作ることができるし、それらをプロットします。プロットがクリアされたときに消えるので、これらのペンは「一時的」と呼ばれます。(clear-plot、clear-all-plotsまたはclear-allコマンドによる)
To create a temporary plot pen, use the create-temporary-plot-pen command. Typically, this would be done in the Code tab, but it is also possible to use this command from plot setup or plot update code (in the edit dialog). By default, the new pen is down, is black in color, has an interval of 1, and plots in line mode. Commands are available to change all of these settings; see the Plotting section of the NetLogo Dictionary.
一時的なプロットペンを作成するには、create-temporary-plot-penコマンドを使用します。通常これはコードタブで行われますがプロットのセットアップまたはプロット更新コード(編集ダイアログボックスで)からこのコマンドを使用することも可能です。デフォルトでは、新しいペンはダウンしており、色は黒で、1の間隔を持ち、ラインモードでプロットします。コマンドは、これらのすべての設定を変更することが可能です。NetLogoディクショナリのプロッティングに関する項目を参照してください。
Before you can use the pen, you'll have to use the use the set-current-plot and set-current-plot-pen commands. These are explained in the next section.
ペンを使用する前にset-current-plotとset-current-plot-penコマンドを使用する必要があります。これらは次のセクションで説明します。
Before NetLogo 5, it was not possible to put plot commands in the plot itself. All of the plot code was written in the Code tab with the rest of the code. For backwards compatibility, and for temporary plot pens, this is still supported. Models in previous versions of NetLogo (and those using temporary plot pens) have to explicitly state which plot is the current plot with the set-current-plot command and which pen is the current pen with the set-current-plot-pen command.
NetLogo 5以前では、プロット自体にプロットコマンドを置くことはできませんでした。プロットのすべてのコードは、コードの残りの部分とコードタブで書かれています。後方互換性と一時プロットペンのために、これらはまだサポートされています。 NetLogoの以前のバージョン(および一時プロットペンを使用したもの)のモデルは、set-current-plotコマンドを使って、どのプロットがカレントプロットであるか宣言するとともに、set-current-plot-penコマンドを使用して、どのペンがカレントペンであるか宣言する必要があります。
To set the current plot use the set-current-plot command with the name of the plot enclosed in double quotes, like this:
カレントプロットを設定するために、二重引用符で囲まれたプロットの名を指定してset-current-plotを使用します。次の通りです。
set-current-plot "Distance vs. Time"
The name of the plot must be exactly as you typed it when you created the plot. Note that later if you change the name of the plot, you'll also have to update the set-current-plot calls in your model to use the new name. (Copy and paste can be helpful here.)
プロットの名前は、プロットを作成したときにそれを入力したとおりでなければなりません。後でプロットの名前を変更した場合、新しい名前を使用するには、モデル中のset-current-plot呼び出しも更新する必要があることに注意してください。(コピーと貼り付けにより更新できます。)
For a plot with multiple pens, you can manually specify which pen you want to plot with. If you don't specify a pen, plotting will take place with the first pen in the plot. To plot with a different pen, the set-current-plot-pen command was used with the name of the pen enclosed in double quotes, like this:
複数のペンによる描画では、プロットしたいペンを手動で指定することができます。ペンを指定しない場合、プロットは、プロット内の最初のペンで行われます。別のペンを使ってプロットするには、set-current-plot-penコマンドは、このように二重引用符で囲まれたペンの名前で使用されていました。
set-current-plot-pen "distance"
Once the current pen is set, then commands like plot count turtles can be executed for that pen.
カレントペンが設定されると、plot count turtlesのようなコマンドはそのペンのために実行することができます。
Older models with plots usually had their own do-plotting procedure that looked something like this:
プロットのある古いモデルは、通常、次のようなdo-plottingプロシージャーを含んでいます:
to do-plotting
  set-current-plot "populations"
  set-current-plot-pen "sheep"
  plot count sheep
  set-current-plot-pen "wolves"
  plot count wolves

  set-current-plot "next plot"
  ...
end
Once again, this is no longer necessary in NetLogo 5, unless you are using temporary plot pens.
一時的なプロットペンを使用しないなら、NetLogo 5ではこれは必要ありません。
Not every aspect of NetLogo's plotting system has been explained here. See the Plotting section of the NetLogo Dictionary for information on additional commands and reporters related to plotting.
NetLogoのプロットシステムのあらゆる側面がここで説明されているわけではありません。プロッティングに関連する追加のコマンドやレポーターについてはNetLogoディクショナリのプロッティングに関する項目を参照してください。
Many of the Sample Models in the Models Library illustrate various advanced plotting techniques. Also check out the following code examples:
モデルライブラリのサンプルモデルの多くは、様々な先進的なプロットの手法を例示しています。また次のコード例をチェックしてください。
Code Examples: Plot Axis Example, Plot Smoothing Example, Rolling Plot Example
Strings may contain any Unicode characters.
文字列はUnicodeのキャラクターを含みます。
To input a constant string in NetLogo, surround it with double quotes.
NetLogoでは定数として文字列をインプットする際は、文字列を二重引用符で囲みます。
The empty string is written by putting nothing between the quotes, like this: "".
""のように空の文字列を書くことがあります。
Most of the list primitives work on strings as well:
多くのリストのプリミティブは文字列でも動きます。
but-first "string" => "tring"
but-last "string" => "strin"
empty? "" => true
empty? "string" => false
first "string" => "s"
item 2 "string" => "r"
last "string" => "g"
length "string" => 6
member? "s" "string" => true
member? "rin" "string" => true
member? "ron" "string" => false
position "s" "string" => 0
position "rin" "string" => 2
position "ron" "string" => false
remove "r" "string" => "sting"
remove "s" "strings" => "tring"
replace-item 3 "string" "o" => "strong"
reverse "string" => "gnirts"
A few primitives are specific to strings, such as is-string?, substring, and word:
is-string?、substring、wordといったいくつかのプリミティブは文字列操作専用となります。
is-string? "string" => true
is-string? 37 => false
substring "string" 2 5 => "rin"
word "tur" "tle" => "turtle"
Strings can be compared using the =, !=, <, >, <=, and >= operators.
文字列は=, !=, <, >, <=, and >=という演算子を使うことで比較できます。
If you need to embed a special character in a string, use the following escape sequences:
文字列の特定のキャラクターを組み込む必要があれば、次のようなエスケープ文字列を使うことができます。
\n = newline\t = tab\" = double quote\\ = backslashThis section is about output to the screen. Output to the screen can also be later saved to a file using the export-output command. If you need a more flexible method of writing data to external files, see the next section, File I/O.
このセクションでは画面への出力について説明します。画面に出力された内容はexport-outputコマンドを使って後でファイルにも保存することができます。外部ファイルへデータを書き込むといった柔軟な方法が必要であれば、次のファイル入出力節を参照してください。
The basic commands for generating output to the screen in NetLogo are print, show, type, and write. These commands send their output to the Command Center.
NetLogoでの画面出力のための基本的なコマンドはprint, show, type, writeになります。
For full details on these four commands, see their entries in the NetLogo Dictionary. Here is how they are typically used:
これらの4つの詳細は、NetLogoディクショナリの各項目を参照してください。ここでは典型的な使用法について説明します。
print is useful in most situations.show lets you see which agent is printing what.type lets you print several things on the same line.write lets you print values in a format which can be read back in using file-read.printは最も多くの場面で利用可能です。showはエージェントがプリントするものを見せます。type同じラインの上にいくつかの物をプリントします。writeはfile-readを使用して、読めるフォーマットで値をプリントすることができます。A NetLogo model may optionally have an "output area" in its Interface tab, separate from the Command Center. To send output there instead of the Command Center, use the output-print, output-show, output-type, and output-write commands.
NetLogoモデルは、コマンドセンターとは別に、インターフェースタブの中で「出力領域」を任意に持つことができます。コマンドセンターの代わりにそちらへ出力を送るには、output-print, output-show, output-type, output-writeコマンドを使用します。
The output area can be cleared with the clear-output command and saved to a file with export-output. The contents of the output area will be saved by the export-world command. The import-world command will clear the output area and set its contents to the value in imported world file. It should be noted that large amounts of data being sent to the output area can increase the size of your exported worlds.
出力領域はclear-outputコマンドを使ってクリアすることができ、export-outputコマンドを使ってファイルに保存することができます。出力領域の内容は、export-worldコマンドで保存できます。import-worldコマンドは出力領域をクリアし、内容をimported worldファイルの属性にセットします。これは多くのデータを出力領域に送り、エクスポートしたワールドのサイズを増加させることになるでしょう。
If you use output-print,
output-show,
output-type,
output-write,
clear-output, or
export-output in a model which does not have a separate output area, then the commands apply to the output portion of the Command Center.
モデル内で、output-print,
output-show,
output-type,
output-write,
clear-output,
export-outputを使うと、分離された出力領域は持ちません。それらのコマンドはコマンドセンターの出力部分に適用します。
In NetLogo, there is a set of primitives that give you the power to interact with outside files. They all begin with the prefix file-.
NetLogoには、外部ファイルと接続する機能を与える一連のプリミティブがあります。それらはfile-という接頭語ではじまります。
There are two main modes when dealing with files: reading and writing. The difference is the direction of the flow of data. When you are reading in information from a file, data that is stored in the file flows into your model. On the other hand, writing allows data to flow out of your model and into a file.
ファイルを扱うときは「読み込み」と「書き込み」の2つの主要なモードがあります。その違いはデータが移動する方向です。ファイルから情報を読み込むとき、ファイルに保存されたデータはモデルへ移動します。一方、書き込みはモデルからファイルへデータが移動することを許可します。
When working with files, always begin by using the primitive file-open. This specifies which file you will be interacting with. None of the other primitives work unless you open a file first.
ファイルを機能させるときは、file-openプリミティブを使うことによって、いつでも開始できます。これは操作したいファイルを指定することになります。他のプリミティブはファイルを最初に開かない限り機能しません。
The next file- primitive you use dictates which mode the file will be in until the file is closed, reading or writing. To switch modes, close and then reopen the file.
次のfile-が接頭詞になるプリミティブは、ファイルを閉じるまでの間、読み込みと書き込みのどちらのモードになるかを決定します。モードを切り替えるには、ファイルをいったん閉じて再度開きます。
The reading primitives include
file-read,
file-read-line,
file-read-characters, and
file-at-end?
Note that the file must exist already before you can open it for reading.
読み込み用のプリミティブには
file-read,
file-read-line,
file-read-characters,
file-at-end?があります。ファイルを読み込むには開く前に既に存在していなければならないことに注意ください。
Code Examples: File Input Example
The primitives for writing are similar to the primitives that print things in the Command Center, except that the output gets saved to a file. They include
file-print,
file-show,
file-type, and
file-write. Note that you can never "overwrite" data. In other words, if you attempt to write to a file with existing data, all new data will be appended to the end of the file. (If you want to overwrite a file, use file-delete to delete it, then open it for writing.)
書き込み用のプリミティブは、結果がファイルに保存される点以外は、コマンドセンターに表示するプリミティブに似ています。書き込み用のプリミティブには
file-print,
file-show,
file-type,
file-writeがあります。決してデータを「上書き」できないことに注意ください。別な言葉でいうと、既存のファイルに書き込もうとしても、すべての新しいデータは、そのファイルの最後尾に追加されることになります。(もしファイルを上書きしたい場合は、file-deleteでいったん削除してから、書き込みのために開いてください。)
Code Examples: File Output Example
When you are finished using a file, you can use the command file-close to end your session with the file. If you wish to remove the file afterwards, use the primitive file-delete to delete it. To close multiple opened files, one needs to first select the file by using file-open before closing it.
ファイル使用を終了するときは、file-closeコマンドでファイルとのセッションを終了させます。そのファイルを後で削除したいときはfile-deleteプリミティブを使用してください。複数のファイルが開いているときに、閉じるファイルを選びたいときは、file-openを使ってファイルを選びます。
;; Open 3 files3つのファイルを開く
file-open "myfile1.txt"
file-open "myfile2.txt"
file-open "myfile3.txt"

;; Now close the 3 files3つのファイルを閉じる
file-close
file-open "myfile2.txt"
file-close
file-open "myfile1.txt"
file-close
Or, if you know you just want to close every file, you can use file-close-all.
すべてのファイルを閉じたいときはfile-close-allを利用できます。
Two primitives worth noting are file-write and file-read. These primitives are designed to easily save and retrieve NetLogo constants such as numbers, lists, booleans, and strings. file-write will always output the variable in such a manner that file-read will be able to interpret it correctly.
重要な2つのプリミティブにfile-writeとfile-readがあります。これらのプリミティブは、数値、リスト、論理定数、文字列などのNetLogoの定数を簡単に保存したり取得するために設計されているものです。file-writeが出力した変数は、file-readで常に正しく読み取れるように設計されています。
file-open "myfile.txt"  ;; Opening file for writing書き込み用にファイルを開く
ask turtles
  [ file-write xcor file-write ycor ]
file-close

file-open "myfile.txt"  ;; Opening file for reading読み込み用にファイルを開く
ask turtles
  [ setxy file-read file-read ]
file-close
Code Examples: File Input Example and File Output Example
Letting the user choose
ユーザーに選択させる
The user-directory,
user-file, and
user-new-file
primitives are useful when you want the user to choose a file or directory for your code to operate on.
user-directory,
user-file,
user-new-fileプリミティブは、ユーザーにファイルやディレクトリを選択させたいときに利用できます。
This section describes how to capture a QuickTime movie of a NetLogo model.
この節ではNetLogoモデルでのQuickTime動画のキャプチャー方法を記述します。
First, use the movie-start command to start a new movie. The filename you provide should end with .mov, the extension for QuickTime movies.
初めにmovie-startコマンドを使って新しい動画を開始します。ファイル名はQuickTime動画用の.mov拡張子が最後につきます。
To add a frame to your movie, use either movie-grab-view or movie-grab-interface, depending on whether you want the movie to show just the current view, or the entire Interface tab. In a single movie, you must use only one movie-grab- primitive or the other; you can't mix them.
動画にフレームを追加するには、現在のビューを表示する動画にしたいのか、インターフェースタブ全体を表示する動画にしたいのかによって、movie-grab-viewかmovie-grab-interfaceかを使い分けます。一つの動画ではどちらかのmovie-grab-プリミティブを使います。それらを混ぜて使うことはできません。
When you're done adding frames, use movie-close.
フレームの追加が完了したら、movie-closeを使います。
;; export a 30 frame movie of the viewビューの30フレームの動画をエキスポート
setup
movie-start "out.mov"
movie-grab-view ;; show the initial state初期状態を表示
repeat 30
[ go
  movie-grab-view ]
movie-close
By default, a movie will play back at 15 frames per second. To make a movie with a different frame rate, call movie-set-frame-rate with a different number of frames per second. You must set the frame rate after movie-start but before grabbing any frames.
デフォルトでは動画は毎秒15フレームです。他のフレームレートの動画を作るには、movie-set-frame-rateで異なるフレームレートを設定します。フレームレートの設定はmovie-startの後でかつフレームを取り込む前に行わなければなりません。
To check the frame rate of your movie, or to see how many frames you've grabbed, call movie-status, which reports a string that describes the state of the current movie.
動画のフレームレートをチェックする、あるいはいくつの動画を取り込んでいるかを見るには、movie-statusで現在の動画の状態を文字列として確認することができます。
To throw away a movie and delete the movie file, call movie-cancel.
動画を取り消して動画ファイルを削除するには、movie-cancelを使います。
Code Example: Movie Example
Movies can only be generated from the NetLogo GUI, not when running headless, or by background runs in a parallel BehaviorSpace experiment.
動画はNetLogo GUIから生成され、ヘッドレス(画面なし)の状態では生成されません。あるいはBehaviorSpace実験とパラレルでバックグラウンドで生成されます。
NetLogo movies are exported as uncompressed QuickTime files. To play a QuickTime movie, you can use QuickTime Player, a free download from Apple.
NetLogoの動画は非圧縮のQuickTimeファイルにエキスポートされます。QuickTimeの動画を再生するには、AppleからフリーでダウンロードできるQuickTime Playerを使うことができます。
Since the movies are not compressed, they can take up a lot of disk space. You will probably want to compress your movies with third-party software. The software may give you a choice of different kinds of compression. Some kinds of compression are lossless, while others are lossy. "Lossy" means that in order to make the files smaller, some of the detail in the movie is lost. Depending on the nature of your model, you may want to avoid using lossy compression, for example if the view contains fine pixel-level detail.
動画は圧縮されないので、ディスクスペースをたくさん使います。サードパーティのソフトウェアを使えば動画を圧縮することもできます。いろいろな種類の圧縮方法がありますが、欠落あるものとないものがあります。「欠落」があるものはファイルをより小さくできますが、動画の細部の一部を欠落させています。詳細なピクセルレベルの画像が必要な場合など、あなたのモデルの性質によっては欠落させる圧縮は避けた方がよいでしょう。
One software package that can compress QuickTime movies on both the Mac and Windows platforms is QuickTime Pro. On Macs, iMovie works as well. PNG compression is a good choice for lossless compression.
MacとWindows両方のプラットフォームでQuickTime動画を圧縮できるソフトウェアとしてQuickTime Proがあります。MacではiMovieが同様に動作します。PNG圧縮は欠落がない用途には良い選択です。
The 2D and the 3D view show the world from the perspective of the observer. By default the observer is looking down on the world from the positive z-axis at the origin. You can change the perspective of the observer by using the follow, ride and watch observer commands and follow-me, ride-me and watch-me turtle commands. When in follow or ride mode the observer moves with the subject agent around the world. The difference between follow and ride is only visible in the 3D view. In the 3D view the user can change the distance behind the agent using the mouse. When the observer is following at zero distance from the agent it is actually riding the agent. When the observer is in watch mode it tracks the movements of one turtle without moving. In both views you will see a spotlight appear on the subject and in the 3D view the observer will turn to face the subject. To determine which agent is the focus you can use the subject reporter.
2Dや3Dのビューはオブザーバーの視点からワールドを表示します。デフォルトではオブザーバーは原点上のz軸の正の位置からワールドを見下ろしています。follow, ride, watchのオブザーバーコマンドやfollow-me, ride-me, watch-meのタートルコマンドを使って、オブザーバーの視点を変更することができます。followやrideモードのときは、オブザーバーは対象となるエージェントと共にワールドを動き回ります。followとrideの違いは3Dビューでの見え方の違いのみです。3Dビューではユーザーはマウスを使ってエージェントとの距離を変えることができます。オブザーバーがエージェントとゼロの距離でfollowしているときはエージェントにrideしているのと同じです。オブザーバーがwatchモードの時は、動かずに一つのタートルの動きを追跡します。両方のビューで、対象となるエージェントにはスポットライトがあたります。また3Dビューではオブザーバーは対象となるエージェントの方向を向きます。どのエージェントに焦点を当てるかを決定するにはsubjectレポーターを使います。
Code Example: Perspective Example
The drawing is a layer where turtles can make visible marks.
ドローイングはタートルが表示可能なマークを作ることができるレイヤーです。
In the view, the drawing appears on top of the patches but underneath the turtles. Initially, the drawing is empty and transparent.
このビューではドローイングはパッチの最上部でタートルの下部に現れます。最初はドローイングは空でかつ透明です。
You can see the drawing, but the turtles (and patches) can't. They can't sense the drawing or react to it. The drawing is just for people to look at.
あなたはドローイングを見ることができますが、タートル(やパッチ)はできません。それらはドローイングを感じたりリアクトすることはできません。ドローイングは人々に見せるものです。
Turtles can draw and erase lines in the drawing using the pen-down and pen-erase commands. When a turtle's pen is down (or erasing), the turtle draws (or erases) a line behind it whenever it moves. The lines are the same color as the turtle. To stop drawing (or erasing), use pen-up.
タートルはpen-downやpen-eraseコマンドを使うことでドローイングの中で、線を書いたり消したりすることができます。タートルのペンが終了したり、(消されたり)した時は、タートルはドローイングが動くときはいつでもドローイングの背後の線を書いたり、(消したり)します。それらの線はタートルと同じ色です。ドローイングを停止(消す)ためにpen-upを使います。
Lines drawn by turtles are normally one pixel thick. If you want a different thickness, set the pen-size turtle variable to a different number before drawing (or erasing). In new turtles, the variable is set to 1.
タートルによって描かれたラインは、通常、一つのピクセルの厚さになります。異なる厚さにしたいなら、書く(消す)前に異なる数字をpen-sizeのタートル変数にセットします。
Lines made when a turtle moves in a way that doesn't fix a direction, such as with setxy or move-to, the shortest path line that obeys the topology will be drawn.
setxy、move-toのように、タートルが方向を定めずに動くときにラインは書かれます。そして描かれるトポロジーに従った最短のラインになります。
Here's some turtles which have made a drawing over a grid of randomly shaded patches. Notice how the turtles cover the lines and the lines cover the patch colors. The pen-size used here was 2:
これは、パッチをランダムに隠したグリッドの上を、いくつかのタートルが描かれることになります。ラインやパッチの色をカバーしたラインをどのようにタートルがカバーするか注意してください。pen-size はここで2つ使われます。:
![[color chart]](images/drawing.gif)
The stamp command lets a turtle leave an image of itself behind in the drawing and stamp-erase lets it remove the pixels below it in the drawing.
stampコマンドはタートルに、ドローイングの中でそれ自体を隠したイメージを残します。また stamp-eraseはドローイングの中でそれより下位のピクセルを消します。
To erase the whole drawing, use the observer commmand clear-drawing. (You can also use clear-all, which clears everything else too.)
全てのドローイングを消すために、オブザーバーコマンドであるclear-drawingを使います。(また全てを消すためにclear-allを使うこともできます。)
Importing an image
イメージのインポート
The observer command import-drawing command allows you to import an image file from disk into the drawing.
オブザーバーコマンドであるimport-drawingコマンドは、ディスクからイメージファイルをインポートして、ドローイングに入れることができます。
import-drawing is useful only for providing a backdrop for people to look at. If you want turtles and patches to react to the image, you should use import-pcolors or import-pcolors-rgb instead.
import-drawingは人々が見る背景を提供するためだけに有効です。タートルやパッチに画像と相互作用させたいときは、代わりにimport-pcolors、import-pcolors-rgbを使う必要があります。
Comparison to other Logos
他のLogoとの比較
Drawing works somewhat differently in NetLogo than some other Logos.
ドローイングはNetLogoでは他のLogo製品と多少異なる動きをします。
Notable differences include:
注意すべき違いとしては:
fence command to confine the turtle inside boundaries, in NetLogo you edit the world and turn wrapping off.screen-color, bgcolor, or setbg. You can make a solid background by coloring the patches, e.g. ask patches [ set pcolor blue ].fenceコマンドを使って、タートルの内部の境界を制限する代わりに、NetLogoでワールドを編集し、ラッピングを取り消します。screen-color, bgcolor, やsetbgといった画面のカラーはありません。パッチのカラーリングによって固定した背景を作成できます。たとえば、ask patches [ set pcolor blue ]など。Drawing features not supported by NetLogo:
NetLogoでは次のドローイング機能はサポートされていません:
window command. This is used in some other Logos to let the turtle roam over an infinite plane.flood or fill command to fill an enclosed area with color.windowコマンドはありません。これは他のLogo系言語ではタートルを無限平面の上で動き回らせるために使われます。floodやfillコマンドはありません。The way the world of patches is connected can change. By default the world is a torus which means it isn't bounded, but "wraps" -- so when a turtle moves past the edge of the world, it disappears and reappears on the opposite edge and every patch has the same number of "neighbor" patches. If you're a patch on the edge of the world, some of your "neighbors" are on the opposite edge.
パッチからなるワールド上の経路は変化させられます。初期設定では、ワールドは閉じられておらず、「循環する」円環形です。そのため、タートルがワールドの端を横切る時、一度消えてから逆側に再度現れ、すなわち全てのパッチは同じ数だけ「隣の」パッチがあることになります。もしあなたがワールドの端にいるパッチならば、何人かの「お隣り」が反対側の端にいることになります。
However, you can change the wrap settings with the Settings button. If wrapping is not allowed in a given direction then in that direction (x or y) the world is bounded. Patches along that boundary will have fewer than 8 neighbors and turtles will not move beyond the edge of the world.
しかし、セッティングボタンでこの循環の設定を変えることができます。もしある方向への循環が許されていなければ、ワールドはその方向(x方向かy方向)には閉じられています。境界沿いのパッチは隣接するパッチの数が8より少なく、タートルはワールドの端を越えられません。
The topology of the NetLogo world has four potential values, torus, box, vertical cylinder, or horizontal cylinder. The topology is controlled by enabling or disabling wrapping in the x or y directions. The default world is a torus.
NetLogoのワールドの物理的な位相は4種類、すなわち円環形、箱形、垂直円柱形、水平円柱形があります。位相はxまたはy方向の循環を可能または不可にすることにより制御します。初期設定では円環形になっています。
A torus wraps in both directions, meaning that the top and bottom edges of the world are connected and the left and right edges are connected. So if a turtle moves beyond the right edge of the world it appears again on the left and the same for the top and bottom.
円環形ではxとyの両方向で循環し、ワールドの上と下、そして左と右の端が繋がっています。そのため、もしタートルがワールドの右端を横切れば左から現れ、ワールドの上下でも同じことが起こります。
A box does not wrap in either direction. The world is bounded so turtles that try to move off the edge of the world cannot. Note that the patches around edge of the world have fewer than eight neighbors; the corners have three and the rest have five.
箱形ではどの方向へも循環しません。ワールドは閉じられており、そのためタートルはワールドの端を超えることはできません。ワールドの端のにあるパッチは隣接するパッチの数が8より少ない、すなわち角にあるパッチは隣接するパッチの数が3つ、その他のパッチは5つであることに注意して下さい。
Horizontal and vertical cylinders wrap in one direction but not the other. A horizontal cylinder wraps vertically, so the top of the world is connected to the bottom. but the left and right edges are bounded. A vertical cylinder is the opposite; it wraps horizontally so the left and right edges are connected, but the top and bottom edges are bounded.
水平、垂直円柱形では1方向のみで循環し、もう片方の方向では循環しません。水平円柱形では上下方向に循環し、ワールドの上端と下端が繋がっていますが、左右の端は閉じられています。垂直円柱形ではその逆で、左右方向に循環し、左端と右端が繋がっていますが、上下の端は閉じられています。
Code Example: Neighbors Example
When coordinates wrap, turtles and links wrap visually in the view, too. If a turtle shape or link extends past an edge, part of it will appear at the other edge. (Turtles themselves are points that take up no space, so they cannot be on both sides of the world at once, but in the view, they appear to take up space because they have a shape.)
座標が循環する場合、タートルやリンクもビュー上で視覚的に循環します。もしタートルの形状やリンクの先が端を超えれば、その部分は反対側の端に現れます。(タートルそれ自体は空間を有しない点であるので、ワールドの両端に同時にあるということはありませんが、ビュー上ではタートルは形状を有するため、同時に現れます。)
Wrapping also affects how the view looks when you are following a turtle. On a torus, wherever the turtle goes, you will always see the whole world around it:
ビュー上でタートルを追跡してゆけば、循環の仕組みが解ります。円環形では、タートルがどこへ行こうとも、その周囲のワールド全体を見ることができます。

Whereas in a box or cylinder the world has edges, so the areas past those edges show up in the view as gray:
箱形や円柱形のワールドには端があり、その向こう側はビュー上ではグレーで表わされます。
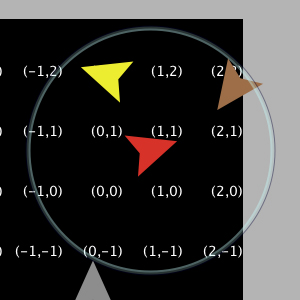
Code Example: Termites Perspective Demo (torus), Ants Perspective Demo (box)
Code Example: Termites Perspective Demo (円環形), Ants Perspective Demo (箱形)
The topology settings also control the behavior of the distance(xy), in-radius, in-cone, face(xy), and towards(xy) primitives. The topology controls whether the primitives wrap or not. They always use the shortest path allowed by the topology. For example, the distance from the center of the patches in the bottom right corner (min-pxcor, min-pycor) and the upper left corner (max-pxcor, max-pycor) will be as follows for each topology given that the min and max pxcor and pycor are +/-2:
位相の設定はまた、distance(xy), in-radius, in-cone, face(xy), towards(xy)といったプリミティブのふるまいも制御できます。位相によってプリミティブでも循環が適用されるかが変わります。それらは位相により許容されたもののうち最短の経路を選択します。たとえば、pxcorとpycorの最小値及び最大値で決められる右下角(min-pxcor, min-pycor)と左上角(max-pxcor, max-pycor)との間の距離は、各位相によって以下のようになります。
All the other primitives will act similarly to distance. If you formerly used -nowrap primitives in your model we recommend removing them and changing the topology of the world instead.
他のすべてのプリミティブは距離と同じような挙動を示します。もしあらかじめモデル上で-nowrapプリミティブを使用するならば、それらを取り除き、ワールドの位相を変えることを推奨します。
If your model has turtles that move around you'll need to think about what happens to them when they reach the edge of the world, if the topology you're using has some non-wrapping edges. There are a few common options: the turtle is reflected back into the world (either systematically or randomly), the turtle exits the system (dies), or the turtle is hidden. It is no longer necessary to check the bounds using turtle coordinates, instead we can just ask NetLogo if a turtle is at the edge of the world. There are a couple ways of doing this, the simplest is to use the can-move? primitive.
もし動き回るタートルのあるモデルで、使用するのが循環しない端のある位相ならば、それらが端に達したとき何が起こるかについて考慮する必要があります。いくつかの一般的な選択肢があります:タートルが跳ね返ってワールドに戻る(規則正しく、あるいはランダムに)、タートルがシステム上では存在し続ける(死ぬ)、タートルが隠れる、といったように。タートルの座標を利用して境界を確認することはもはや必要ありません。タートルがワールドの端にいるかどうかをNetLogoに尋ねることができます。これには2つの方法があります。最も簡単な方法はcan-move?プリミティブの使用です。
if not can-move? distance [ rt 180 ]
can-move? merely returns true if the position distance in front of the turtle is inside the NetLogo world, false otherwise. In this case, if the turtle is at the edge of the world it simple goes back the way it came. You can also use patch-ahead 1 != nobody in place of can-move?. If you need to do something smarter that simply turning around it may be useful to use patch-at with dx and dy.
can-move?は単に、タートルの前の座標がNetLogoのワールド内に収まっているならばtrueと返し、そうでなければfalseと返します。この場合、タートルがワールドの境界にいれば、単純に来た経路へ戻ります。can-move?ではpatch-ahead 1 != nobodyも使用できます。
単に歩き回るより賢いことをする必要があれば、patch-atをdx、dyと共に使用するのが便利です。
if patch-at dx 0 = nobody [
  set heading (- heading)
]
if patch-at 0 dy = nobody [
  set heading (180 - heading)
]
This tests whether the turtle is hitting a horizontal or vertical wall and bounces off that wall.
これでタートルが水平もしくは垂直の壁にぶつかって跳ね返るかどうかを確認できます。
In some models if a turtle can't move forward it simply dies (exits the system, like in Conductor or Mousetraps).
タートルが前へ進めない場合、単純に死ぬようにするモデルもあります(避雷針やネズミ取りに捕まったかのように、システムから抜け出します)。
if not can-move? distance[ die ]
If you are moving turtles using setxy rather than forward you should test to make sure the patch you are about to move to exists since setxy throws a runtime error if it is given coordinates outside the world. This is a common situation when the model is simulating an infinite plane and turtles outside the view should simply be hidden.
forwardではなくsetxyを使ってタートルを動かす場合、setxyは仮にワールドの外部の座標が与えられた場合にランタイムエラーを出すため、動かそうとしている先のパッチが存在するかどうかを確認すべきです。モデルで無限平面をシミュレートしていて、タートルが単にビューの外部に隠れているとき、普通に起こり得る状況です。
let new-x new-value-of-xcor
let new-y new-value-of-ycor

ifelse patch-at (new-x - xcor) (new-y - ycor) = nobody
  [ hide-turtle ]
  [ setxy new-x new-y
    show-turtle ]
Several models in the Models Library use this technique, Gravitation, N-Bodies, and Electrostatics are good examples.
モデルライブラリのいくつかのモデルでこのテクニックが使われています。Gravitation、N-Bodies、Electrostaticsが良い例です。
The diffuse and diffuse4 commands behave correctly in all topologies. Each patch diffuses and equal amount of the diffuse variable to each of its neighbors, if it has fewer than 8 neighbors (or 4 if you are using diffuse4), the remainder stays on the diffusing patch. This means that the overall sum of patch-variable across the world remains constant. However, if you want the diffuse matter to still fall off the edges of the world as it would on an infinite plane you still need to clear the edges each step as in the Diffuse Off Edges Example.
diffuseとdiffuse4コマンドは全ての位相で正確にふるまいます。各パッチは、隣接する各パッチに対する等しい量の拡散変数を拡散し、隣接するパッチの数が8より少なければ(diffuse4の場合は4より少なければ)、残りは元のパッチに留まります。これは、ワールド内のパッチ変数の総計が常に一定であることを意味します。しかし、拡散させるものを、無限平面のモデルのようにワールドの端で減少させたいならば、Diffuse Off Edges Exampleモデルのように、各ステップで端を初期化する必要があります。
A link is an agent that connects two turtles. These turtles are sometimes also called nodes.
リンクは2つのタートルを繋ぐエージェントです。これらのタートルはノードとも呼ばれます。
The link is always drawn as a line between the two turtles. Links do not have a location as turtles do, they are not considered to be on any patch and you cannot find the distance from a link to another point.
リンクは常に2つのタートル間の線として描画されます。タートルとは異なり、リンクは場所を有さず、いかなるパッチ上にもないとみなされ、リンクのもう一方の点までの距離は判りません。
There are two flavors of links, undirected and directed. A directed link is out of, or from, one node and into, or to, another node. The relationship of a parent to a child could be modeled as a directed link. An undirected link appears the same to both nodes, each node has a link with another node. The relationship between spouses, or siblings, could be modeled as an undirected link.
リンクには有向と無向の2種類があります。有向リンクは、一つのノードから出て、もう一方のノードに至ります。親子の関係は有向リンクに例えられます。無向リンクでは、両方のノードが同じに見え、各々のノードはもう一方のノードとリンクを有します。配偶者あるいは兄弟姉妹の関係は無向リンクに例えられます。
There is a global agentset of all links, just as with turtles and patches. You can create undirected links using the create-link-with and create-links-with commands; and directed links using the create-link-to, create-links-to, create-link-from, and create-links-from commands. Once the first link has been created directed or undirected, all unbreeded links must match (links also support breeds, much like turtles, which will be discussed shortly); it's impossible to have two unbreeded links where one is directed and the other is undirected. A runtime error occurs if you try to do it. (If all unbreeded links die, then you can create links of that breed that are different in flavor from the previous links.)
タートルやパッチと同様に、全てのリンクにグローバルエージェント集合があります。無向リンクはcreate-link-withとcreate-links-withコマンドを、有向リンクはcreate-link-to、create-links-to、create-link-from、create-links-fromコマンドを使用して作成できます。一旦、最初のリンクが有向もしくは無向で作成されれば、すべての品種のないリンクは同様にされます(リンクにもタートルのように品種があります。すぐ後で説明します)。有向と無向の2つの品種のないリンクを持つことはできません。作成しようとすると実行時エラーが発生します。(もしすべての品種のないリンクが死ねば、以前のものとは異なる種類のリンクは作成可能になります。)
In general, primitives that work with directed links have "in", "out", "to", and "from" in their names. Undirected ones either omit these or use "with".
一般に、有向リンクとあわせて動作するプリミティブは名前に「in」「out」「to」「from」を含みます。無向リンクはこれらを含まないか、「with」を含みます。
A link's end1 and end2 variables contain the two turtles the link connects. If the link is directed, it goes from end1 to end2. If the link is undirected, end1 is always the older of the two turtles, that is, the turtle with the smaller who number.
リンクのend1とend2変数は、リンクが繋ぐ2つのタートルを含みます。有向リンクであれば、end1からend2へ進みます。無向リンクであれば、end1が常に2つのタートルのうち古い方、すなわちwho番号が小さい方になります。
Link breeds, like turtle breeds, allow you to define different types of links in your model. Link breeds must either be directed or undirected, unlike unbreeded links this is defined at compile time rather than run time. You declare link breeds using the keywords undirected-link-breed and directed-link-breed. Breeded links can be created using the commands create-<breed>-with and create-<breeds>-with for undirected breeds and the commands create-<breed>-to, create-<breeds>-to, create-<breed>-from, and create-<breeds>-from for directed links.
リンク品種は、タートル品種のように、モデル内で異なる型のリンクを定義できるようにします。リンク品種は有向あるいは無向のいずれかでなければならず、品種のないリンクとは異なり、実行時ではなくコンパイル時に定義されます。リンク品種はundirected-link-breedとdirected-link-breedによって定義できます。品種のあるリンクは、有向リンクはcreate-<breed>-withとcreate-<breeds>-withコマンドで、無向リンクはcreate-<breed>-to、create-<breeds>-to、create-<breed>-from、create-<breeds>-fromコマンドで作成できます。
There cannot be more than one undirected link of the same breed (or more than one unbreeded undirected link) between a pair of agents, nor more than one directed link of the same breed in the same direction between a pair of agents. You can have two directed links of the same breed (or two unbreeded directed links) between a pair if they are in opposite directions.
エージェントの組の間では、同じ品種の2個以上の無向リンク(または2個以上の品種のない無向リンク)は存在できません。また、エージェントの組の間では、同じ方向で同じ品種の2個以上の有向リンクも存在できません。もし方向が逆であれば、同じ品種の有向リンク(または品種のない有向リンク)でも存在できます。
Layouts
レイアウト
As part of our network support we have also added several different primitives that will help you to visualize the networks. The simplest is layout-circle which evenly spaces the agents around the center of the world given a radius.
ネットワークの補助機能の一部として、ネットワークの可視化を助ける別のプリミティブも追加してあります。最も単純なのはlayout-circleで、半径を与えられたワールドの中心の周囲に、エージェントを均等に配置します。
layout-radial is a good layout if you have something like a tree structure, though even if there are some cycles in the tree it will still work, though as there are more and more cycles it will probably not look as good. layout-radial takes a root agent to be the central node places it at (0,0) and arranges the nodes connected to it in a concentric pattern. Nodes one degree away from the root will be arranged in a circular pattern around the central node and the next level around those nodes and so on. layout-radial will attempt to account for asymmetrical graphs and give more space to branches that are wider. layout-radial also takes a breed as an input so you use one breed of links to layout the network and not another.
layout-radialは、対象が樹状であれば有効なレイアウトです。いくつか循環があっても良いのですが、あまり多いと解り辛いかもしれません。layout-radialは、根本のエージェントを(0,0)点の中心ノードにして、同心のパターンでそれに繋がるノードを配置します。根本のエージェントから次のノードへは、中心ノードからの円周状のパターンに配置され、次にそれらのノードを中心にして次のレベルへと、繰り返して配置されます。layout-radialは、非対称のグラフの解明のため、より広範囲の枝に、より広い空間を与えようとします。layout-radialはまた、入力として品種を受け取るので、ネットワークのレイアウトにある品種を使って他の品種は使わないようにすることもできます。
Given a set of anchor nodes layout-tutte places all the other nodes at the center of mass of the nodes it is linked to. The anchor set is automatically arranged in a circle layout with a user defined radius and the other nodes will converge into place (this of course means that you may have to run it several times before the layout is stable.)
一組の固定したノードが与えられれば、layout-tutteは、他の全てのノードを、リンクしたノード群の中心に配置します。固定したノードの組は、ユーザーが定義した半径に従って自動的に円周状に配置され、他のノードはきちんと収束します(このことはもちろん、レイアウトが安定するまでには、何度か実行しなければならないことを意味しています)。
layout-spring is useful for many kinds of networks. The drawback is that is relatively slow since it takes many iterations to converge. In this layout the links act as springs that pull the nodes they connect toward each other and the nodes repel each other. The strength of the forces is controlled by inputs to the primitives. These inputs will always have a value between 0 and 1; keep in mind that very small changes can still affect the appearance of the network. The springs also have a length (in patch units), however, because of all the forces involved the nodes will not end up exactly that distance from each other.
layout-springは多くの種類のネットワークに有用です。欠点は、収束するのに多くの繰り返し計算を行うため、比較的時間が掛かることです。このレイアウトでは、リンクは互いに繋がるノードや互いに反発し合うノードを引っ張るばねとして働きます。この力の強さはプリミティブへの入力値により制御されます。この入力は、常に0から1の値を取ります。非常に小さな変化がネットワークの様相に影響を及ぼすことに注意して下さい。このばねも(パッチ単位で)長さを有しますが、全ての力が関係するため、ノードは必ずしも互いの距離を収束させません。
Code Examples: Network Example, Network Import Example, Giant Component, Small Worlds, Preferential Attachment
Tasks let you store code to be run later. There are two kinds, command tasks and reporter tasks.
タスクは後で実行するためにコードを保存します。コマンドタスクとレポータータスクの2種類があります。
Tasks are values, which means that a task may be passed as input, reported as a result, or stored in a variable.
タスクは値です。その意味は、タスクは入力として渡されたり、結果としてレポートされたり、変数として保存されたりするということです。
A given task might be run once, multiple times, or not at all.
与えられたタスクは1回実行されるかもしれませんし、何回も実行されるかもしれませんし、実行されないかもしれません。
In other programming languages tasks are known as first-class functions, closures, or lambda.
他のプログラミング言語では、タスクは第1級関数、クロージャ、ラムダなどとして知られています。
Primitives specific to tasks are task, is-command-task?, and is-reporter-task?.
タスクに関連するプリミティブはtask、is-command-task?、is-reporter-task?です。
The task primitive creates a task. The task it reports might be a command task or a reporter task, depending on what kind of block you pass it. For example task [ fd 1 ] reports a command task, because fd is a command, while task [ count turtles ] reports a reporter task, because count is a reporter.
taskプリミティブはタスクを生成します。返すタスクは、渡すブロックの種類によって、コマンドタスクあるいはレポータータスクになります。たとえばtask [ fd 1 ]はfdがコマンドなのでコマンドタスクを返します。一方task [ count turtles ]はcountがレポーターなのでレポータータスクを返します。
These primitives require tasks as input: foreach, map, reduce, filter, n-values, sort-by. When calling these primitives, the task primitive is optional, so for example one may write simply foreach mylist [ print ? ] instead of foreach mylist task [ print ? ], though the latter is also accepted. (Because task is optional, the syntax for these primitives is backward-compatible with existing code from previous NetLogo versions.)
foreach, map, reduce, filter, n-values, sort-byはタスクを入力値として必要とします。これらのプリミティブを呼び出す際にはtaskプリミティブは任意であり、たとえばforeach mylist task [ print ? ]と書く代わりに単にforeach mylist [ print ? ]と書くことができます。(taskが任意であるため、これらのプリミティブの構文規則にはNetLogoの過去のバージョンのコードと後方互換性があります。)
The run command accepts command tasks as well as strings.
runコマンドはコマンドタスクか文字列を受け取ります。
The runresult reporter accepts reporter tasks as well as strings.
runresultレポーターはレポータータスクか文字列を受け取ります。
run and runresult allow passing inputs to a task. As with all primitives accepting varying number of inputs, the whole call must be surrounded with parentheses, so for example (run my-command-task 5) or (runresult my-reporter-task "foo" 2). When not passing input, no parentheses are required.
runとrunresultではタスクに入力値を渡すことができます。可変の個数の入力値を受け取れる他のプリミティブと同様に、プリミティブの呼び出しはたとえば(run my-command-task 5)や(runresult my-reporter-task "foo" 2)のようにかっこで囲む必要があります。入力値を渡さない場合はかっこは必要ありません。
A task may take zero or more inputs. The inputs are referenced using the special variables ? (aka ?1), ?2, ?3, etc. Any extra inputs are ignored.
タスクには入力値がある場合があります。入力値は?(?1と等しい), ?2, ?3などの特別な変数によって参照されます。余分な入力は無視されます。
Creating and running tasks is fast. To use run or runresult on a new string for the first time is about 100x slower than running a task. Modelers should normally use tasks instead of running strings, except when running strings entered by the user.
タスクの生成と実行は速いです。runあるいはrunresultを新しい文字列に対して最初に実行する場合の速度は、タスクを実行するよりも約100倍遅くなります。モデル作成者は、ユーザーによって入力された文字列を実行する時を除いて、文字列を実行するのではなくタスクを使うべきです。
Simple uses of foreach, map, reduce, filter, n-values, and sort-by can be written with an especially concise syntax. You can write:
foreach, map, reduce, filter, n-values, sort-byは、簡潔な構文規則のもとで次のように記述することができます。
map abs [1 -2 3 -4] => [1 2 3 4]
reduce + [1 2 3 4] => 10
filter is-number? [1 "x" 3] => [1 3]
foreach [1 2 3 4] print
In older NetLogo versions, these had to be written:
古いバージョンのNetLogoでは、次のように記述しなければなりませんでした。
map [abs ?] [1 -2 3 -4] => [1 2 3 4]
reduce [?1 + ?2] [1 2 3 4] => 10
filter [is-number? ?] [1 "x" 3] => [1 3]
foreach [1 2 3 4] [ print ? ]
The old syntax remains valid.
古い構文規則はまだ有効です。
The concise syntax can also be used with the task primitive. So for example task die is short for task [ die ], task fd is short for task [fd ?], and task + is short for task [?1 + ?2].
簡潔な構文規則はtaskプリミティブでも使うことができます。たとえば、task dieはtask [ die ]の短縮形、task fdはtask [fd ?]の短縮形、task+はtask [?1 + ?2]の短縮形です。
Tasks are "closures"; that means they capture or "close over" the bindings (not just the current values) of local variables and procedure inputs. They do not capture agent variables and do not capture the identity (or even the agent type) of the current agent.
タスクはクロージャであり、ローカル変数とプロシージャ入力の結合(単に現在の値ではなく)をキャプチャーあるいは「閉じ込める」ことを意味します。エージェント変数やエージェントの識別も(あるいはエージェントの種類すらも)キャプチャーしません。
The stop and report commands exit from the dynamically enclosing procedure, not the enclosing task. (This is backward-compatible with older NetLogo versions.)
stopとreportコマンドは、動的エンクロージングプロシージャから脱出しますが、エンクロージングタスクからは脱出しません。(これは古いNetLogoバージョンと後方互換性があります。)
The extensions API supports writing primitives that accept tasks as input. Write us for sample code.
拡張APIは、入力としてタスクを受け入れる書き込みプリミティブをサポートします。
We hope to address at least some of the following limitations in future NetLogo versions:
将来のNetLogoバージョンで、少なくとも次の制限を解決することを望んでいます。
import-world does not support tasks.let to give their inputs names, if needed.)ifelse-value not if, and you don't use report at all. If your code is too complex to be written as one reporter, you'll need to move the code to a separate reporter procedure, and then call that procedure from your task, passing it any needed inputs.ifelse and while and agent primitives such as of and with don't accept tasks. So for example if I have a reporter task r and two command tasks c1 and c2, I can't write ifelse r c1 c2, I must write ifelse runresult r [ run c1 ] [ run c2 ].task may be omitted is only available to primitives and extension primitives, not ordinary procedures. So for example if I have a procedure p that accepts a task as input, it must be called as e.g. p task [ ... ] not p [ ... ].import-worldはタスクをサポートしません。letを使用できます)ifではなくifelse-valueを使用しなければならず、reportを全く使用しません。もしひとつのレポーターとして記述するためのコードが複雑過ぎるなら、そのコードを分割したレポータープロシージャに移行する必要があり、タスクからそのプロシージャを呼び出し、それを任意の必要とされる入力にパスします。ifelseやwhileのようなコントロールプリミティブ、ofやwithのようなエージェントプリミティブはタスクを受け入れません。たとえば、もしレポータータスクrと二つのコマンドタスクc1, c2があった場合、ifelse r c1 c2と書くことはできず、ifelse runresult r [ run c1 ] [ run c2 ]と書かなければなりません。taskを省略できる簡潔な構文規則はプリミティブおよび拡張機能プリミティブにおいてのみ有効であり、通常のプロシージャでは有効ではありません。したがってタスクを入力値として受け取るプロシージャpがある場合、p [ ... ]ではなくp task [ ... ]で呼び出します。Code Example: State Machine Example
NOTE: The following information is included only for backwards compatibility. We don't recommend using the ask-concurrent primitive at all in new models.
注意:以下の情報は後方互換性の確保のためだけに記載されています。新しいモデルでask-concurrentプリミティブを使用することは推奨しません。
In very old versions of NetLogo, ask had simulated concurrent behavior by default. Since NetLogo 4.0 (2007), ask is serial, that is, the agents run the commands inside the ask one at a time.
Netlogoの非常に古いバージョンでは、askは同時に実行されるのがデフォルトでした。2007年のNetLogo 4.0以来、askは順番に実行されます。つまり、エージェントはaskの中で一個ずつコマンドを実行します。
The following information describes the behavior of the ask-concurrent command, which behaves the way the old ask behaved.
以下では古いaskコマンドのような振る舞いをするask-concurrentコマンドについて説明します。
ask-concurrent produces simulated concurrency via a mechanism of turn-taking. The first agent takes a turn, then the second agent takes a turn, and so on until every agent in the asked agentset has had a turn. Then we go back to the first agent. This continues until all of the agents have finished running all of the commands.
ask-concurrentはturn-takingのメカニズムによって同時実行をシミュレートします。最初のエージェントがターンし、2番目のエージェントがターンして、全てのエージェント集合がターンします。その後、最初のエージェントに戻ります。エージェントのすべてがすべてのコマンドを実行して終了するまで続けます。
An agent's "turn" ends when it performs an action that affects the state of the world, such as moving, or creating a turtle, or changing the value of a global, turtle, patch, or link variable. (Setting a local variable doesn't count.)
移動、タートルの生成、グローバル変数、タートル変数、パッチ変数、リンク変数の変更のようなワールドの状態に影響するようなアクションを実行したとき、エージェントの「ターン」は終了します。(ローカル変数の設定はこれに含まれません。)
The forward (fd) and back (bk) commands are treated specially. When used inside ask-concurrent, these commands can take multiple turns to execute. During its turn, the turtle can only move by one step. Thus, for example, fd 20 is equivalent to repeat 20 [ fd 1 ], where the turtle's turn ends after each run of fd. If the distance specified isn't an integer, the last fraction of step takes a full turn. So for example fd 20.3 is equivalent to repeat 20 [ fd 1 ] fd 0.3.
forward(fd)とback(bk)のコマンドは特別に扱われます。ask-concurrent内部で使用すると複数回のターンを使うことができます。タートルはターンの間に1歩だけ進むことができます。従ってたとえばfd 20は、fdの各実行の後でタートルのターンが終わるrepeat 20 [ fd 1 ]と同じです。指定された距離が整数でない場合は、最後の端数のステップで1回のターンを使います。たとえばfd 20.3はrepeat 20 [ fd 1 ] fd 0.3と同じです。
The jump command always takes exactly one turn, regardless of distance.
jumpは距離に関わらず、1回のターンを使います。
To understand the difference between ask and ask-concurrent, consider the following two commands:
askとask-concurrentの違いは次の二つのコマンドを考えてください:
ask turtles [ fd 5 ]
ask-concurrent turtles [ fd 5 ]
With ask, the first turtle takes five steps forward, then the second turtle takes five steps forward, and so on.
askの場合は、最初のタートルが5歩前に進んでから、2番目のタートルが5歩進みます。
With ask-concurrent, all of the turtles take one step forward. Then they all take a second step, and so on. Thus, the latter command is equivalent to:
ask-concurrentの場合は、すべてのタートルが1歩進んでから、2歩目に進みます。従って後者のコマンドは下記と同じことです。
repeat 5 [ ask turtles [ fd 1 ] ]
Code Example: Ask-Concurrent Example shows the difference between
askandask-concurrent.Code Example: Ask-Concurrent Exampleは
askとask-concurrentの違いを表しています。
The behavior of ask-concurrent cannot always be so simply reproduced using ask, as in this example. Consider this command:
ask-concurrentはaskを使って常に再現できるとは限りません。次のコマンドを見てみます:
ask-concurrent turtles [ fd random 10 ]
In order to get the same behavior using ask, we would have to write:
askを使って同じ動作を得るには、次にように書かなくてはなりません:
turtles-own [steps]
ask turtles [ set steps random 10 ]
while [any? turtles with [steps > 0]] [
  ask turtles with [steps > 0] [
    fd 1
    set steps steps - 1
  ]
]
To prolong an agent's "turn", use the without-interruption command. (The command blocks inside some commands, such as create-turtles and hatch, have an implied without-interruption around them.)
エージェントの「ターン」を続けるにはwithout-interruptionコマンドを使用します。(コマンドブロックの中のcreate-turtlesやhatchはそれらの周りにwithout-interruptionを持っています。
Note that the behavior of ask-concurrent is completely deterministic. Given the same code and the same initial conditions, the same thing will always happen (if you are using the same version of NetLogo and begin your model run with the same random seed).
ask-concurrentの振る舞いは完全に決定的であることに注意してください。同一のコードと初期条件が与えられれば、同じ結果が得られます(同じバージョンのNetlogoを使用して、同じ乱数の種を使ってモデルを開始した場合)。
In general, we suggest you not use ask-concurrent at all. If you do, we suggest you write your model so that it does not depend on the exact details of how ask-concurrent works. We make no guarantees that its semantics will remain the same in future versions of NetLogo, or that it will continue to be supported at all.
一般的には、ask-concurrentをまったく使わないことをお勧めします。もし使うとしても、ask-concurrentが正確にどのように動作するかに依存しないモデルとすることをお勧めします。NetLogoの将来のバージョンでサポートを継続することは保証できません。
Tie connects two turtles so that the movement of one turtles affects the location and heading of another. Tie is a property of links so there must be a link between two turtles to create a tie relationship.
タイは2つのタートルをつなげるもので、一方のタートルを動かすと、もう一方のタートルの位置や方向も変化します。タイはリンクのプロパティで、タイの関係を作るためには、2匹のタートルの間にリンクが作られていなければなりません。
When a link's tie-mode is set to "fixed" or "free" end1 and end2 are tied together.
If the link is directed end1 is the "root agent" and end2 is the "leaf agent".
That is when end1 moves (using fd, jump, setxy, etc.) end2 also moves the same distance and direction. However when end2 moves it does not affect end1.
リンクのtie-modeが「fixed」や「free」に設定されている場合、end1とend2はタイで結ばれている状態になります。
もしリンクが有向リンクであるならば、end1が「ルート」でend2が「リーフ」になります。
これはつまり、end1が動くと(たとえばfd, jump, setxyなどを使った場合)、end2も同じ距離と方向で動きます。しかし、end2が動いても、end1には影響を及ぼしません。
If the link is undirected it is a reciprocal tie relationship, meaning, if either turtle moves the other turtle will also move. So depending on which turtle is moving either turtle can be considered the root or the leaf. The root turtle is always the turtle that initiates the movement.
リンクが無向リンクである場合は対等のタイの関係になります。つまり、どちらかのタートルが動くともう一方のタートルも動きます。どちらのタートルが動くかによって、タートルはルートにもなるし、リーフにもなると考えることができます。どのような場合でもルートタートルというのは、動作を始める方のタートルのことを指します。
When the root turtle turns right or left, the leaf turtle rotates around the root turtle the same amount as if a stiff were attaching the turtles. When tie-mode is set to "fixed" the heading of the leaf turtle changes by the same amount. If the tie-mode is set to "free" the heading of the leaf turtle is unchanged.
ルートタートルが左右に向きを変えると、リーフタートルもまたルートタートルの周りを同じ角度で回転します。まるでタートルにくっついているようです。tie-modeが「fixed」に設定されている場合、リーフタートルの向きも同じ角度で変化します。tie-modeが「free」に設定されている場合は、リーフタートルの向きは変化しません。
The tie-mode of a link can be set to "fixed" using the tie command and set to "none" (meaning the turtles are no longer tied) using untie. To set the mode to "free", you need to: set tie-mode "free".
リンクのtie-modeは、tieコマンドを使えば「fixed」の状態にすることができ、untieコマンドを使えば「none」の状態(タートルの間にタイがない)にすることができます。モードを「free」に設定するにはset tie-mode "free"とする必要があります。
Code Example: Tie System Example
The __includes keyword allows you to use multiple source files in a single NetLogo model.
予約語__includesを使えば、1つのNetLogoモデルの中で複数のソースファイルを使用することができます。
The keyword begins with two underscores to indicate that the feature is experimental and may change in future NetLogo releases.
先頭がアンダースコア2文字で始まる予約語は、試験的運用をしているものか、将来のNetLogoのリリースで変更される可能性のあるものです。
When you open a model that uses the __includes keyword, or if you add it to the top of a model and hit the Check button, the includes menu will appear in the toolbar. From the includes menu you can select from the files included in this model.
予約語__includesを使ったモデルを開いたときや、モデルの先頭に予約語(__includes)を入力してCheckボタンを押した場合には、ツールバーにインクルードメニューが表示されます。インクルードメニューから、このモデルに含まれているファイルの中から必要なものを選ぶことができます。
When you open included files they appear in additional tabs. See the Interface Guide for more details.
インクルードされたファイルを開くと、それらのコードは新しいタブに表示されます。さらに詳しく知りたい場合には、Interface Guideを見てください。
You can have anything in external source files (.nls) that you would normally put in the Code tab: globals, breed, turtles-own, patches-own, breeds-own, procedure definitions, etc. Note though that these declarations all share the same namespace. That is, if you declare a global my-global in the Code tab you cannot declare a global (or anything else) with the name my-global in any file that is included in the model. my-global will be accessible from all the included files. The same would be true if my-global were declared in one of the included files.
外部ソースファイル(.nls)には、通常コードタブに記述するものは何でも書くことができます。たとえば、globals、breed、turtles-own、patches-own、breeds-own、プロシージャの定義などです。これらの定義はすべて、同じ名前空間で共有されることに注意してください。つまり、もしmy-globalというグローバルをコードタブで宣言したならば、そのモデルに含まれているどのファイルの中でも、my-globalという名前を使用することができなくなります(これはグローバルに限らず、すべてについてそうです)。my-globalには、すべてのインクルードファイルからアクセスすることができます。また、あるインクルードファイルの中でmy-globalを宣言した場合も同様になります。
In the Code tab and elsewhere in the NetLogo user interface, program code is color-coded by the following scheme:
コードタブなどNetLogoのインターフェスにおいては、プログラムコードは下のスキームで色づけされています。
The remainder of this section contains technical terminology which will be unfamiliar to some readers.
本章は、一部の読者にとっては馴染みの薄い専門用語を含んでいます。
The only keywords in the language are
globals,
breed,
turtles-own,
patches-own,
to,
to-report, and
end, plus
extensions and the experimental
__includes keyword. (Built-in primitive names may not be shadowed or redefined, so they are effectively a kind of keyword as well.)
この言語における予約語は、
globals,
breed,
turtles-own,
patches-own,
to,
to-report,
end,
extensionsと実験的な__includesのみです。(組み込みのプリミティブ名は上書きされたり、再定義されません。つまりこれらは一種の予約語となります。)
All primitives, global and agent variable names, and procedure names share a single global case-insensitive namespace; local names (let variables and the names of procedure inputs) may not shadow global names or each other. Identifiers may contain any Unicode letter or digit and the following ASCII characters:
すべてのプリミティブ名、グローバル変数名、エージェント変数名、プロシージャ名は唯一の大局的な大文字小文字を区別しない名前空間を共有します。局所名(letlet変数とプロシージャの入力名)は大局名を上書きすることはありません。識別子は次の任意のUnicode文字または数字と次のASCII文字を含めることができます。
.?=*!<>:#+/%$_^'&-
Some primitive names begin with two underscores to indicate that they are experimental and are especially likely to change or be removed in future NetLogo releases.
アンダースコアー2つで始まるプリミティブ名は実験用であり、将来のNetlogoでは変更または削除される可能性があることを示しています。
Identifiers beginning with a question mark are reserved.
クエスチョンマーク(?)で始まる識別子は予約されています。
NetLogo is lexically scoped. Local variables (including inputs to procedures) are accessible within the block of commands in which they are declared, but not accessible by procedures called by those commands.
NetLogoはレキシカルスコープです。局所変数(プロシージャへの入力を含む)は、それらが宣言されたコマンドのブロックの中においてアクセスが可能ですが、そのコマンドから呼び出されたプロシージャからはアクセスが行えません。
The semicolon character introduces a comment, which lasts until the end of the line. There is no multi-line comment syntax.
セミコロン(;)キャラクタはコメントを示し、その行の終わりまで続きます。複数行コメントの構文は存在しません。
A program consists of optional declarations (
globals,
breed,
turtles-own,
patches-own,
<BREED>-own,
extensions
) in any order, followed by zero or more procedure definitions. Multiple breeds may be declared with separate breed declarations; the other declarations may appear once only.
プログラムは任意の数のプロシージャの定義によって、任意の宣言(
globals,
breed,
turtles-own,
patches-own,
<BREED>-own,
extensions
)から成り立っています。複数の品種はそれぞれのbreed宣言によって宣言されます。それ以外の宣言は一度だけ現れます。
Every procedure definition begins with to or to-report, the procedure name, and an optional bracketed list of input names. Every procedure definition ends with end. In between are zero or more commands.
全てのプロシージャの定義、プロシージャの名前、任意の括弧で囲まれた入力名のリストらは、toかto-reportから始まります。全てのプロシージャの定義はendで終わります。その間には、ゼロ個以上のコマンドが含まれます。
Commands take zero or more inputs; the inputs are reporters, which may also take zero or more inputs. No punctuation separates or terminates commands; no punctuation separates inputs. Identifiers must be separated by whitespace or by parentheses or square brackets. (So for example, a+b is a single identifier, but a(b[c]d)e contains five identifiers.)
コマンドは0個以上のレポーターである入力値を取得し、レポーターもまた0個以上の入力値を取得します。句読点が入力値を区切らない限り、コマンドを終了しません。識別子は空白か丸括弧、角括弧で区切られなければなりません。(例として、a+bは一つの識別子ですが、a(b[c]d)eは5つの識別子を含んでいます。)
All commands are prefix. All user-defined reporters are prefix. Most primitive reporters are prefix, but some (arithmetic operators, boolean operators, and some agentset operators like with and in-points) are infix.
すべてのコマンドは文頭に置かれます。すべてのユーザー定義レポーターも文頭に置かれます。大部分のプリミティブレポーターも文頭に置かれますが、いくつか(算術演算子、論理演算子、withやin-pointsなどのエージェント集合のオペレータ)は中間に置かれます。
All commands and reporters, both primitive and user-defined, take a fixed number of inputs by default. (That's why the language can be parsed though there is no punctuation to separate or terminate commands and/or inputs.) Some primitives are variadic, that is, may optionally take a different number of inputs than the default; parentheses are used to indicate this, e.g. (list 1 2 3) (since the list primitive only takes two inputs by default). Parentheses are also used to override the default operator precedence, e.g. (1 + 2) * 3, as in other programming languages.
すべてのコマンドとレポーター(プリミティブとユーザー定義の両方とも)は、標準では固定された数の入力を取得します。(これは、コマンドや入力値を区切ったり終了させたりするための句読点が無くても言語がパースされるようにするためです。)いくつかのプリミティブでは標準とは異なる数の入力値を取得することができます。丸括弧は次のようなときに用いられます。たとえば(list 1 2 3)(listプリミティブは標準では二つの入力のみを取得するため)。また他のプログラミング言語と同様に、丸括弧は標準の演算子の優先順位を上書きするために用いられます。たとえば(1 + 2) * 3。
Sometimes an input to a primitive is a command block (zero or more commands inside square brackets) or a reporter block (a single reporter expression inside square brackets). User-defined procedures may not take a command or reporter block as input.
プリミティブへの入力値はコマンドブロック(角括弧内の0個以上のコマンド)もしくはレポーターブロック(角括弧内の単一のレポーター表記)となることがあります。ユーザー定義プロシージャはコマンドブロックやレポーターブロックを入力値として受け付けません。
Operator precedences are as follows, high to low:
演算子の優先順位は高い順に以下となります:
with,
at-points,
in-radius,
in-cone^*, /, mod+, -<, >, <=, >==, !=and, or, xorThere is no agreed-upon standard definition of Logo; it is a loose family of languages. We believe that NetLogo has enough in common with other Logos to earn the Logo name. Still, NetLogo differs in some respects from most other Logos. The most important differences are as follows.
Logoには標準的な定義の合意は存在しません。自由な言語の一つです。NetLogoは、Logoの名前を標榜するうえでは、他のLogoとの共通点は十分であると我々は信じています。NetLogoはいくつかの点において他のLogoとは異なっています。最も重要な違いは以下です。
+, *, etc.) have lower precedence than reporters with names. For example, in many Logos, if you write sin x + 1, it will be interpreted as sin (x + 1). NetLogo, on the other hand, interprets it the way most other programming languages would, and the way the same expression would be interpreted in standard mathematical notation, namely as (sin x) + 1.+, *など)は、レポーターと比較してより下位の優先順位となります。例を挙げると、多くのLogoにおいてはsin x + 1と記入した場合、sin (x + 1)と解釈されます。一方でNetLogoでは、他の多くの言語がするように、(sin x) + 1として、すなわち標準的な数学表記として解釈されます。and and or reporters are special forms, not ordinary functions, and they "short circuit", that is, they only evaluate their second input if necessary.andとorレポーターは通常の関数ではなくスペシャルフォームとなります。それらは「短絡化」した動作、つまり必要な場合にのみ2個目の引数を評価します。to-report instead of to. The command to report a value from a reporter procedure is report, not output.toの代わりにto-reportを用いて定義しなくてはなりません。レポータープロシージャから値を返すコマンドはreportであり、outputではありません。to square [x].to square [x]。foo, never :foo or "foo. (To make this work, instead of a make command taking a quoted argument we supply a set special form which does not evaluate its first input.) As a result, procedures and variables occupy a single shared namespace.fooであり、:fooや"fooとは用いません。(これが機能するようにするために、引用符で囲まれた引数を取るmakeコマンドの代わりに、最初の入力を評価しないsetスペシャルフォームを提供しています。)結果として、プロシージャと変数は単一の共有された名前空間を占有しています。The last three differences are illustrated in the following procedure definitions:
最後の3つの違いは、以下のプロシージャの定義に表れています:
| most Logos | NetLogo |
|---|---|
to square :x output :x * :x end |
to-report square [x] report x * x end |
[see spot run] (a list of words), but in NetLogo you must write "see spot run" (a string) or ["see" "spot" "run"] (a list of strings) instead.[see spot run](wordsのリスト)と記述することができますが、NetLogoでは代わりに"see spot run"(文字列)もしくは["see" "spot" "run"](文字列のリスト)と記述する必要があります。run command works on tasks and strings, not lists (since we have no "word" data type), and does not permit the definition or redefinition of procedures.runコマンドはタスクと文字列に対して機能し、リストに対しては機能しません(「word」型が無いため)。また、プロシージャの定義、再定義においては用いることはできません。if and while are special forms, not ordinary functions. You can't define your own special forms, so you can't define your own control structures. (You can do something similar using tasks, but you must use the task, run, and runresult primitives for that, you cannot make them implicit.)ifとwhileといった制御構造はスペシャルフォームであり、一般的な関数ではありません。スペシャルフォームをユーザーが独自に定義することはできないため、独自の制御構造を定義することもできません。(似たようなことはタスクを用いることで可能となりますが、task、run、runresultプリミティブを使用しなくてはならず、暗黙的に作成することはできません)Of course, the NetLogo language also contains other features not found in most Logos, most importantly agents and agentsets.
当然ながら、NetLogo言語は、ほとんどのLogoには存在しない、エージェントやエージェント集合などの重要な機能を含んでいます。